
Practivistas solar 2015

This project is a follow-up to the solar panel systems installed in La Yuca and Ghetto2Garden, in addition to the installation of a new system completed in Las Malvinas. The following page will cover system assessments, costs, and how to install a system. The background goes into the past projects, as well as problems faced by the solar team. The literature review outlines information specifically for PV solar panel systems and some information on education matters, as the solar team involved the community in the installation process. The timeline displays the daily tasks of the project followed by the budget. In the last portion of the page, there is a guide explaining the installation of the Las Malvinas system.
Background[edit | edit source]
In the summer of 2015, Practivistas from Cal Poly Humboldt and Universidad Iberoamericana joined with three communities around Santo Domingo, Dominican Republic to improve previous Practivistas solar systems as well as build a new solar photovoltaic system. La Yuca, Ghetto2Garden, and Las Malvinas are communites that Practivistas have worked with in the past. In 2014, a solar system was installed in a small La Yuca school to power lights and fans. The goal of the 2015 team was to run tests to check the health of the battery and to fix any issues found with the system. The same was needed for Ghetto2Garden. The final challenge was to teach community members in Las Malvinas how solar systems work and by bringing collective knowledge together- construct a small solar system. The system was installed in a public location in Las Malvinas to power three LED lights and a fan with help from the community. Amongst all these projects, it was a priority to educate and involve members of the communities so that each system can be maintained by the people who use them.
Past Project Links
The following page mainly concentrates on the Las Malvinas installation. To view the updates regarding the La Yuca system, click here. For more information about Getto2Garden, click here.
Problem statement[edit | edit source]
The objective of the project is to install a solar photovoltaic system in a publicly accessible location in Las Malvinas as well as to improve current solar photovoltaic systems in the communities of La Yuca and Ghetto2Garden. The team will hold solar workshops in Las Malvinas in order to work with community members to collaboratively install the new system.
Criteria
After meeting with the community of Las Malvinas, Tomas of Ghetto2Garden, and the director of the school in La Yuca, our group thought these were the most important criteria of the three different solar projects.
| Criteria | Weight | Constraints |
|---|---|---|
| Durability | 9 | The panel must be mounted in a way that can withstand 5 mph winds common to Santo Domingo. The other components must be installed in an area that will be kept dry. |
| Education | 7.5 | Through workshops, members of the community will learn the concepts behind solar energy and how to maintain the components of the system. |
| Security | 7 | The solar system must be mounted to decrease the risk of theft. It should be placed in plain sight so the community members can keep an eye on it. |
| Maintenance | 8 | The system must be low maintenance so community members can keep it in working condition without the need for solar experts. |
| Cost | 5 | It is necessary to spend all of the set budget. |
| Safety | 6 | The solar system must not be able to be tinkered with by children in the area. |
| Effectiveness | 10 | The system must supply electricity so that the community benefits from the resource. |
Literature Review[edit | edit source]
Here is the link to our Practivistas solar 2015/lit review
Process[edit | edit source]
This section covers the specific steps taken by the solar 2015 team in order to assess and maintain the systems in La Yuca and Ghetto2Garden as well as achieve a completed solar system in Las Malvinas.
Timeline[edit | edit source]
The following table outlines the tasks completed by the solar 2015 team.
| Date | Task | Photos |
|---|---|---|
| May 28 | The first community meeting was held in Las Malvinas where the electrical needs of the community was discussed and the team exchanged contact information. It was also announced that there will be a free solar panel installation workshop taught by practivistas. They will also be installing a small system in an accessible area in the community. This is projected to happen around the week of June 22. |  |
| May 30 | The team went to Ghetto2Garden to check out the cat and dog sanctuary and to check out the situation of the solar system as it was disassembled while founder and manager, Tomas, went out of town. He expressed the need for a protective shelf for the batteries as he wishes to remodel the kitchen. The system has been disconnected and must be correctly rewired. The team concluded that they need to solve the wiring problems and come up with a secure system at this site. |  |
| June 1 | The team went to La Yuca to assess the PV system and meet with administration, although they did not show up. Once they gained access to the storage room it was apparent that the LED lights in the storage room have been disconnected due to damage to the roof and it was also discovered that the Rainwater Catchment System has been dismantled by bad weather and children, who could also potentially stand on the solar panels. Update: The teaching assistant, Jack, and Javier fixed the Rainwater Catchment system and the LED lights were also repaired over the duration of this project. |  |
| June 2 | The team met with the administration at La Yuca to gain permission to test the system by draining and recharging the batteries. Administration in La Yuca have addressed that we need to make sure we give a hands-on tour of the solar panel system once we have finished so they can address any future problems and/or educate the children in order to prevent them from possible destruction. They stated that the inverter has not been outputting power and that it was smoking in April. The team used a multimeter to measure the voltage. The batteries were at 12.86V and the inverter was at 1.2 amps. The inverter was removed from the storage room in order to have it repaired. |  |
| June 3 | Due to the broken state of the inverter the team could not return to La Yuca to test how long the solar panels would take to recharge, as planned. The day was used instead to strategically plan out the next steps we need to make. The first priority was transportation of the inverter to an electrical shop and to make a shelf/ table to hold the four 6V batteries at Ghetto2Garden. |  |
| June 5 | The inverter was taken to SM Electronica by local electrician and taxi driver, Tito, to be fixed. The team called Eddie to ensure that he had the tools needed to construct a compartment to hold the batteries at the system in Ghetto2Garden for next Thursday's proposed construction meeting. (Update: Tomas informed the team that there is a shelf sturdy for the batteries). Therefore, communication is a vital component as the team spent a lot of time and energy planning the shelf and with this new information we are able to adapt to new circumstances and use the materials in another way. |  |
| June 8 | The inverter was fixed and picked up by Tito. The cost for repairs was RD$1050. The team went to La Yuca to connect the inverter with Tito with the intention of draining the system however the solar panels were left on due to miscommunication. When the batteries were checked with the multimeter it was at a healthy 12.28 DCV. |  |
| June 9 | After discharging the batteries overnight, the team went to La Yuca in the afternoon to begin recharging the batteries. They had difficulty reading the voltage of the batteries, thus unable to effectively take data of the charging process. Due to little knowledge on the voltage of a charged and discharged battery, the team researched more that evening to return in a couple of days to efficiently repeat the process. This is will give them a better understanding of the functionality of the entire system, and will have reliable data that can be used for future systems in Ghetto2Garden and Las Malvinas. |  |
| June 11 | Today the team had a community meeting for the solar panel workshops in Las Malvinas to collectively plan out the days with interested members of the community. We chose June 23, 26, and 27th as they work best with all of our schedules and on Sunday June 28th we will install a small system at the Botica. As it will be a solidifying learning experience for our team and the community members of how to size and wire the system. |  |
| June 12 | The team met with Lonny in order to create a lesson plan and update him on the current state of our project. They made a tentative schedule to go to Ghetto2Garden to rewire the system. We split up so half of us could work on updating the General Solar Sizing Spreadsheet and discharge the system in La Yuca; as it was not well monitored the first time. Since the school only used the PV system once before the batteries are still in good shape and the collected data from discharging and recharging will be displayed further down the page. |  |
| June 13-14 | The second group in the team went to La Yuca to recharge the batteries back to 13.7 Volts and the other group went to buy a battery monitor and other materials, unfortunately, the stores were closed but the batteries proved to be healthy. The team met up the next day to assess the data and size the system for Las Malvinas, further equations must take place as we collaborate with the community and decide what items are necessary for the Botica. |  |
| June 16 | The old inverter in Ghetto2Garden was mutilated by rats and Tomas gave the old inverter to Tito in order to get it fixed at SM Electronica. Today the team went to Ghetto2Garden with the fixed inverter in order to fix the system, as it was rewired while Tomas was away the system had to be assessed and it was found that the batteries were not wired correctly and had to be rotated and corrected. The charge controller was not working either and had to be removed from the system to be taken back to Santo Domingo for repair. The wires from the lightning arrestor to the breakers, charge controllers, and the batteries had to be removed in order to be rewired efficiently before returning to Ghetto2Garden. |  |
| June 19-20 | The charge controller was taken to TraceSolar and was beyond repairs. The team must wait until they get a shipment of new charge controllers and purchase necessary items for the workshops and system in Las Malvinas. The team started making an outline for teaching the community on solar energy systems and a lesson plan has been laid out for the team to better prepare themselves for teaching the community members. The team has a material list and will continue purchasing items necessary for the system. |  |
| June 23 | Today the team had a meeting with the director of the program resulting in restructuring itself and choosing a leader. The team needed more motivation and communication in order to manage time wisely and complete the required items with the limited amount of time left. The first solar workshop was held today at 5pm and was successful. The topics covered in this workshop were components of a solar panel system, power equations, and the difference between series and parallel wiring. |  |
| June 25 | Today the team purchased a charge controller from Téchnica Electromecánica Núñez, since TraceSolar was too expensive. The team also made another outline to teach how to size the components needed for a PV solar system for the second cworkshop at 5pm. During the first half of the workshop there were hands-on learning with mini solar panels practicing series and parallel, by connecting the panels and measuring the voltage and current with a multimeter. Everyone in the workshop also had a light attached to the panels that they were able to connect in order to visualize each component in the mini system. The topic covered in the second half of the class was primarily on sizing the system and deciding on what should be powered in the Botica. While in Las Malvinas the team took inventory of the 7 outlets and backings, electrical wire, conduit, and an indoor panel board load controller that was bought by the construction team for the Botica. |  |
| June 26 | Today the 250W and 24V solar panel and accessories were purchased from Téchnica Electromecánica Núñez with a grand total of RD$37,045. The team was planning on rewiring the Ghetto2Garden system with our professor/director, Lonny, however Tomas told us that he would not be able to get us a ride. Therefore we spent the time planning what had to be done over the next week and assigning tasks. Afterwards we received word from Tito that he will be able to go and give us a ride. With the limited notice our team leader accepted the late night challenge to rewire the system with the help of another member and supportive phone advice from Lonny ultimately able to complete the task. |  |
| June 27 | Today the team rewired the system in Ghetto2Garden. They also purchased the 24V inverter as well as lights and a fan for the Botica in Las Malvinas. The following Saturday the team plans to split up so everyone can work on their individual components of the project. This picture displays the completed system in Ghetto2Garden protected within a shelf and rewired correctly so that it it now a working system. |  |
| June 28 | Today was the third and final day of the solar workshops.The participants connected the components in order to connect the system. Ultimately, they were able to get the system to run and power a fan, which was the highlight for Junior, the youngest participant in the workshop. During this hands-on workshop the participants began questioning each other on what each component did and how to wire it and everyone was pitching in to answer it.The system hd to be taken down and put into Enrique's house as the Botica did not have doors at that time. |  |
| June 30 | The team installed the solar panels in Las Malvinas with the help of local electrician, Bernardo and his son, Junior. The Botica received a door and windows in order to protect the equipment inside. The government should be inhabiting the Botica to provide affordable medicine to the people in Las Malvinas. Instructions on how to install the PV solar system can be located lower on the page. |  |
| July 1 | Today the team did a walkthrough in La Yuca with the maintenance people on how to clean their system and what signs to look out for. This included washing off the panels with water and a sponge once a month, monitoring the wires, dusting the batteries, and that they could use the system for up to 4 hours without sun. Today was also the last day of spanish class and we are preparing our group presentation. |  |
| July 2-3 | The team did their final presentations for the community of Las Malvinas and for UNIBE. |  |
Budget[edit | edit source]
| Las Malvinas Materials | Unit Price $(DOP) | Quantity | Cost $(DOP) | Cost $(USD) |
|---|---|---|---|---|
| Solar Panel 250W / 24V | 9,000 | 1 | 9,000 | 200 |
| Feet of cable to Panel | 35.00 | 15 | 525 | 11.67 |
| Connector Panel | 500 | 1 | 500 | 11.11 |
| Nationwild Batteries 115AMP / 12V | 9,500 | 2 | 19,000 | 422.22 |
| Jumper 6" | 70 | 1 | 70 | 1.55 |
| Jumper 36" | 600 | 2 | 1,200 | 26.67 |
| DC 30 Breaker | 625 | 1 | 625 | 13.89 |
| DC 63 Breaker | 625 | 1 | 625 | 13.89 |
| Electrical Wire | 300 | 7 | 2,100 | 47.72 |
| Las Malvinas 24V Inverter | 10,000 | 1 | 10,000 | 228 |
| Barello Wire #18 | 190 | 1 | 190 | 4.22 |
| 30 amp Charge Controller | 5,500 | 1 | 5,500 | 122.2 |
| Soldering Iron | 236 | 2 | 472 | 10.48 |
| Solder | 637.20 | 1 | 637.20 | 14.16 |
| Electrical tape | 60 | 1 | 60 | 1.33 |
| Heat Shrink | N/A | 1 | 50 | 1.11 |
| Plywood | 980 | 1 | 980 | 21.78 |
| Screws | 1.20 | 24 | 28.80 | 0.64 |
| Nails | N/A | 12 | 5 | 0.11 |
| 20" Enlate | 215 | 2 | 430 | 9.56 |
| Total Cost | $51,998 | $1,149 | ||
| Ghetto2Garden and La Yuca Materials | Unit Price $(DOP) | Quantity | Cost $(DOP) | Cost $(USD) |
|---|---|---|---|---|
| Fix Ghetto2Garden 24V Inverter | 7,000 | 1 | 7,000 | 155.66 |
| 30 amp Charge Controller | 5,500 | 1 | 5,500 | 122.2 |
| Fix La Yuca 12V Inverter | 1,000 | 1 | 1,000 | 22.20 |
| Total Cost | $13,015 | $276.6 | ||
Las Malvinas Workshops and Installation[edit | edit source]
The following outlines the steps for installing the solar energy system at the Botica.

Preparation to Installation[edit | edit source]
Prior to the installation of the solar panel system at the botica, there were two workshops held in Las Malvinas. All and anyone was invited to these workshops as a place to learn from one another about photovoltaic technology and discuss the system that the community would be installing that following Sunday. The purpose of these workshops was to share knowledge of the needed system components, on how to wire the components, and on how to size the components to support the desired energy needs.
Topics of Day One
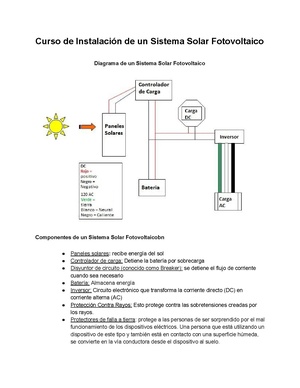
- The Direct Current components involved in a system
- The fuctions of these components
- Calculating the Power, Current, and voltage in a system
- How to wire in series and parallel
Worksheets of The Day

Topics of Day Two
- Distincting between parallel and series wiring for solar panels
- Equations for calculating size of components
- Sizing the system on the Botica
Worksheet of The Day
Wiring
How to Wire Batteries and Panels in Series or Parallel
- Differentiate the wires between positive and negative. Black wires represent negative and red wires represent positive.
- For each wire, split the exposed parts in two. Wires split in half, preparing to be connect with another wire.
- For series, connect the positive wire to the negative wire, making an X with the split pieces.
- Cross the two wires and twist. Wires will form one single wire when finished.
- Once the wires are twisted, fold them down for the best possible connection.
- You can use a multimeter on the solo wires of each panel or batter to check for voltage and amps. Multimeter on one positive and one negative.
- For parallel wiring, connect positive wires to positive wires and negative wires to negative wires.
- When using a multimeter, you can directly touch the positive and negative ends directly onto the twisted wires.
- Due to amps of the panel being large, make sure you switch amp readings to the larger measurement.
Installing The System[edit | edit source]
For help with sizing your system you can use this spreadsheet. There is an english version and spanish version.
Materials NeededWire the 12V batteries in series. Then take the inverter terminal end cables and wire the
positive and negative cables from the inverter to the batteries.


Wire the positive battery terminal wires to the 63 amp breaker and from the breaker into the
charge controller. Make sure the breaker is in the off position. Wire the negative terminal wires from
the negative of the batteries to the charge controller.


Take the panel cable and separate the individual positive and negative cables from within
the panel cable. Wire the positive and negative cables into the panel plugs to connect to the panel
itself. This large panel cable containing the individual positive and negative, will eventually feed
the current from the panels into the charge controller.


Wire the panel positive wire to the 30 amp breaker and then wire the panel positive
from the 30 amp breaker to the charge controller. Make sure the breaker is in the off position.
Wire the panel negative to the charge controller.


Now that The DC system is connected, you turn it on in the same order. First switch the
inverter on, then the 63 amp breaker from the batteries, and last the 63 amp breaker from the panels. The
charge controller will show the system is delivering electricity.


The finished system in the Botica


footer
Operation[edit | edit source]

Turning Power On and Off[edit | edit source]
To protect one's solar panel system, the components MUST be turned on in this order:
- Turn on inverter
- Turn on the 63 amp breaker to the batteries
- Turn on the 30 amp breaker to the solar panel
- Turn on the Alternating Current breakers in breaker box
The components MUST be turned off in reverse order:
- Turn off the Alternating Current breakers in breaker box
- Turn off the 30 amp breaker to the solar panel
- Turn off the 63 amp breaker to the batteries
- Turn off inverter
What Will be Powered[edit | edit source]
Below presents what loads will be powered by the system within the Botica and a recommended length of time the loads should be operated.
Loads in the Botica
- Three LED lights
- One fan
- One radio
- One cash register
- One phone
Schedule[edit | edit source]
Monday - Friday
- LED lights - 4 hours
- Fan - 4 hours
- Radio - 4 hours
- Cash register - 8 hours
- Phone - 2 hours
System Testing[edit | edit source]
Using this test, one will be able to learn how many hours certain loads can be used without sun. This test will also provide information about how long it takes the battery to reach full charge on a clear day, and reveal any malfunctions in the components.
- On a clear day, turn off inverter and turn off all loads in order to charge the battery 100%.
- Turn the 30 amp breaker for the solar panel off and the 63 amp breaker for the battery on
- To check that the battery has reached its maximum capacity, consult the charge controller. Some charge controllers will blink green lights when the battery is fully charged. Take a voltage reading with a multimeter that is set to 20 Direct Current Voltage (DCV) for a 12 volt system and 200 DCV of a 24V system. Consult the table on this site to determine if the battery is fully charged based from the DCV reading http://www.solar-electric.com/deep-cycle-battery-faq.html Proceed with steps once the battery is 100% charged.
- Turn on all loads that would replicate the amount of power needed from the solar system by the user normally.
- Turn off both breakers: the one for the panel and the one for the battery.
- Finally, have one person turn on the inverter while another person starts a 10 minute timer.
- Every 10 minutes check the DCV of the battery and record findings.
- The battery should never be discharged more than 20%, reference the table from the link in step three to calculate what the DCV should be when the battery has reached an 80% depth of discharge (DOD).
- Once the battery has read the desired DOD, turn off all loads and the inverter, but turn on the breaker for the battery.
- To begin the recharging process, have one person turn on the breaker for the solar panel, while another person starts a 10 minute timer.
- Monitor the DCV every 10 minutes until the battery is fully charged.
Maintanence[edit | edit source]
Weekly
- Keep an eye out for damage to the wires
- Prevent dust from building up
Monthly
- Clean solar panel using a cloth and water (no soaps)
- Remove obstacles shading panel (such as tree branches)
Yearly
- If anything breaks call an electrician
- Test batteries
Conclusion[edit | edit source]
Testing Results[edit | edit source]
Ghetto2Garden[edit | edit source]
To learn about the testing results for Ghetto2Garden, go to the Update 2015 section on the Ghetto2Garden page.
La Yuca[edit | edit source]
To learn about the testing results for the La Yuca system, go to the Update 2015 section on the La Yuca page.
Las Malvinas Botica Installation[edit | edit source]
The installation was very successful and all the components were connected correctly delivering power to the Botica. After having hands on discussions and workshops prior to the installation, the residents of Las Malvinas know the system and the functions of the components. They can maintain the system over the years and share their knowledge to other members to take proper care.
Lessons learned[edit | edit source]
- Communication needs to be extremely consistent throughout the process, and always make sure anyone involved in the project is informed on a step that needs to be accomplished.
- The people involved in the process need to work together because you can't do it alone.
- It is very important to establish a leader in the beginning and express what needs to be done and accomplished daily so everyone can be as efficient as possible and do what is best for the team.
- We should have known exactly what steps needed to be made before we went to La Yuca to test the batteries as we found out you can damage the batteries by discharging them too low. We would have been more time efficient if we did not have to keep going out to the site without the knowledge needed to successfully complete the task we set out to do.
- It is crucial to be able to adapt to the information given to us as we need to best prepare for the upcoming deadlines we need to accomplish. Overall, it is best to use time wisely and communicate with others as what is needed to be done.
- The community members have been extremely helpful and are more knowledgeable on the subject than us and we are grateful they are willing to share their time and know-how on any subject with us. It is vital to learn useful phrases in Spanish to express your gratitude for them and communicate what needs to be done so we can complete our project.
Next steps[edit | edit source]
System improvements to be made in the future:
- In Las Malvinas the next step is to add enough power to run a refrigerator.
- The systems at Ghetto2Garden and La Yuca need to be checked up on by Practivistas to make sure they are still in working order.
Troubleshooting[edit | edit source]
Consult this manual when troubleshooting the charge controller: CM3048 Charge Controller Manual
| Component | Size | Picture |
|---|---|---|
| PV Panel | 250 Watt PV panel |  |
| Inverter | 2.6Kw 24V |
 |
| Deep Cycle Batteries | Two 12V batteries in series 115AH and 24V total |
 |
| Panel Breaker | 30 amps shuts off current of PV panels to the rest of the system. |
 |
| Charge Controller | 30 amp 48V |  |
| Breaker | 63 amps, shuts off current to batteries |
 |
| AC Breaker Box | Contains two 120/240V 40 amp breakers Control over what loads will run in the Botica. |
  |
| Wire | 10 gauge, 2.5mm2 DC: red(+), black (-) AC: black (hot), white (nuetral), no ground, blue (back up for hot) |
 |
| Conduit | 3/4 in2 Protects wires from getting damaged |
 |
| Battery Terminal Ends | Connect the battery (+) and (-) to the charge controller (+) and (-) |  |
| Battery Terminal Connectors |
Wire the two batteries in series |  |
| Inverter Terminal Connectors |
Connect the batteries to the inverter. |  |
| Lights | LED 13V each |  |
| Fixtures | porcelain, sized to any household light |  |
| Outlets, Switches, Switch plates |
three of each | |
| Electrical Box | 6 for each light switch and outlet |  |
| Problem | Suggestion |
|---|---|
| Batteries are not charging when loads are turned off | 1. Shade or grim may be preventing the solar panel from generating electricity. Remove shading obstacle and clean solar panel as directed in the maintenance section.
|
| Batteries are charged, but a load is not working | Test the load on a grid-connected outlet. If it still does not work, load is defective. If it does work, there is an issue with the wiring between the battery and the load. |
| Charge controller screen is blank | Check that the batteries and solar panel are wired to the charge controller securely and correctly with clean wires. |
Video[edit | edit source]
Working Together for Energy[edit | edit source]
Why Solar, Why Workshops?[edit | edit source]
Solar is a great resource because it is abundant and everyday the sun is shining. Those qualities make it very widely used amongst many organizations that want communities with little exposure to the technology to become independent. The only down fall is that the system components are expensive and for the system to be successful there needs to be someone knowledgeable on solar power to maintain it. That is why it is important to host workshops so communities that are having solar energy systems installed, have an understanding of the components and their functions. This increases the longevity of the system and builds a stronger resilient community that can truly become independent. When the workshops are over and the system is installed, what will be left behind is knowledge amongst friends and family who can share their knowledge on Solar across the communties.
Developing a Workshop Together[edit | edit source]
- Research other workshops or lesson plans to be familiar with the content that should be presented.
- When gathering topics that should be discussed, its important to bring into account the level of previous education amongst the community. Some may be more skilled than others at math or some may not be as good of readers. Also bring into account you could have a wide variety of students from children to adults.
- Try to present material in a variety of techniques that will accompany a variety of learning styles, whether its visual, auditory, or hands on learners.
- Have a lot of interaction with the students.
- Remember its an exchange of knowledge and you are just presenting the knowledge that already exists but it will be an equal contribution from both informer and student.
- Once you've done your part, its there turn to take that material and make something out of it.
- We aren't experts, so there will come an amazing point where you will be learning together.
Las Malvinas, Botica Example[edit | edit source]
For the botica, the workshops that were organized, presented the basic materials on system components, what they do, and ways to wire. There were two pre-planning community workshops. In the pre-planning workshops the community decided what type of workshops they would like. Then there were two workshops, a day of hands on wiring of the system, and the final day was the complete installation of the system. The second day involved a lab that was a hands on representaton of what we learned the first day. At the end of the second day, together the community sized the system based off of what they learned from the couple workshops and their energy needs. We all came back a few days later and started the wiring. Because of the workshops the students weren't students any more, they became the teachers to friends and families explaining and sharing the wiring process. The following day, the construction went the same way and the solar energy system was successfully installed, delivering power to the botica.

Team[edit | edit source]
- Amanda Hutchins
- Athena Vescott
- Ellen Thompson
- Jessica Solomon
- Laura Estrella
- Javier Duran Jr
References[edit | edit source]