
This page outlines the Arroyo Norte waste plastic innovation from start to finish over the six week project that is all part of the Practivistas Dominicana program located in Santo Domingo, Dominican Republic. The project's goal was to use plastic present at the Arroyo Norte dump to create sell-able products by using small pieces of HDPE plastic and creating plastic strips create products using a plastic extruder. The final products include roses, bracelets, a small woven bag, and a large woven beach bag.
Background[edit | edit source]
The Arroyo Norte waste plastic innovation is a project created by the plastics team of the Practivistas Dominicana program. Practivistas is a summer program from Cal Poly Humboldt and is based in Santo Domingo, Dominican Republic. The program is six week course where the students work with underdeveloped communities in the Dominican Republic to help improve the quality of the lives of the community members through Appropriate Technology projects. The plastic innovation project is a collaboration between the Practivista program, Universidad Iberoamericana (UNIBE), and the community of Arroyo Norte. Arroyo Norte is a small community in Santo Domingo that is located next to Duquesa, the dumpsite for Santo Domingo. The excess of HDPE plastic located at the dump helped lead to the communities idea of the waste innovation project. The goal is to help reduce the amount of plastic in the dump and help boost the community's economy by collecting plastic, shredding it, making extruded plastic strips using a plastic extruder, making products using the strips, and selling them for profit to be put back into the project and the community economy. The plastic team is Rebecca Stark, Fernando Alberto, Luis Gonzalez, and Arroyo Norte community members.
Problem statement[edit | edit source]
The objective of this project is to work with the community of Arroyo Norte to design and create an upcycled, commercial products made from the HDPE plastic that are present at the Arroyo Norte dump to help boast the community economy and remove excess plastic from the dump.
Criteria[edit | edit source]
The table of criteria was created by the plastics team, with input from the Arroyo Norte community, and is used to make decisions for the project. There are constraints that must be met for every decision but the weight next to the criteria shows its importance to the team on a scale of 1 to 10 with 10 being the most important. This criterium help the main goals of the project be considered for every project decision.
| Criteria | Constraints | Weight (1-10) |
|---|---|---|
| Time spent per unit | Less than 2 hours to make each product (less is better) | 7 |
| Profit per unit | At least profitable after deducting costs (labor, materials, electricity, and transportation) (more is better) | 10 |
| Ease of production | A person with basic education can make products | 8 |
| Product Aesthetics | At least 6/10 people like product (more is better) | 7 |
| Sell-ability | At least 10 products sold per week (more is better) | 9 |
| Total project cost (Research and Development) | No more than $1,000 spent (less is better) | 3 |
| Environmental impact | At least 20 lbs of plastic removed from dump per month (more is better), less energy usage than traditional plastic manufacturing (less is better) | 7 |
| Product quality | Product must stand up to product testing | 10 |
Literature Review[edit | edit source]
The literature review has all of the reasurch information done by the plastics team. This information is used to help the team make decisions through out the project. There is information on types of plastics, plastic extrution, weaving, rural community economics and examples of similar projects. The literature review can be found here.
Creating prototypes[edit | edit source]
Cleaning/Cutting Process[edit | edit source]
Step 1. Cut the pre-washed plastic waste[edit | edit source]
Step 2. Clean as many times as possible[edit | edit source]

Step 3. Cut and Clean some more[edit | edit source]
The smaller the pieces (preferably<1mm) better for extrusion.
Making a Rose[edit | edit source]

Overview of the Innovation with Plastics[edit | edit source]
Timeline[edit | edit source]
Below is the completed project timeline, which outlines what was accomplished each day.
28th May, 2015, Thursday[edit | edit source]
Built the plastic innovation team.
29th May, 2015[edit | edit source]
Researched and worked on Literature Review. Main topics include plastic, plastic extrusion, weaving, community economic development, and similar project examples.
1st June, 2015[edit | edit source]
Met with the plastics innovation team. Created project criteria and added to appropedia page. Discussed project ideas and goals.
3rd June, 2015[edit | edit source]
Met with Arroyo Norte community members.
Made list of materials needed to both purchase and obtain from the community.
Made a project schedule and itinerary for the next meeting
8th June, 2015[edit | edit source]
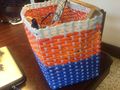
Researched and learned to make a basic woven bag.
9th June, 2015[edit | edit source]
Created a small woven bag and pocket purse using practice paper.
10th June, 2015[edit | edit source]
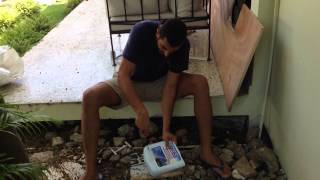
Received the Filastruder. Built the plastic extruder and completed the wiring. Basic test of the extruder using provided ABS plastic pelts.
11th June, 2015[edit | edit source]
Searched for someone to customize extruder nozzles to create plastic ribbons. Had many failed attempts, new nozzles were needed.
12th June, 2015[edit | edit source]
- Continued search for new nozzles, which ended with finding similar ones and purchasing them.
- After searching found new machine experts and made the appropriate customization for the nozzles.
- Set up the extruder with the new customize nozzle and made the first ribbon strip.
- Met with the community at Arroyo Norte
- Made a future tentative schedule for time spent in Arroyo Norte (Thursdays and Sundays).
- Made early diagnostics on the broken extruder (not well mounted to the board).
13th June, 2015[edit | edit source]
Went to Arroyo Norte in the morning to pick up plastic however plans changed because of lack of shredded HDPE plastic at dump. Collected and cleaned HDPE plastic bottles. Found a local disposal site that shredded the cleaned bottles for free. Picked up supplies to repair the extruder. Cut some of the HDPE plastic into smaller pieces using scissors.
14th June, 2015[edit | edit source]
Finished repairing the extruder. Went to go work with the extruder at Arroyo Norte but had issues of electrical wiring, mechanic assembly or power intake. Washed more plastic bottles.
17th June, 2015[edit | edit source]
Group meeting to recollected, reorganize, refocus on our priorities given the project time frame.
18th June, 2015[edit | edit source]
Continued to make strips, Cut different sized holes out of extra nozzles to see which size of slit would create the best strips.
19th June, 2015[edit | edit source]
Went to Arroyo Norte to shred more plastic. Looked for a company that shreds plastic. Shredded more plastic,
20th June, 2015[edit | edit source]
BEACH DAY- Mandatory day off.
21st June, 2015[edit | edit source]
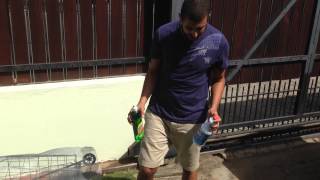
Went to Arroyo Norte, Made color plastic strips by experimenting experimenting with adding cut up colored hdpe plastic bottle caps (found on soda and water bottles).
22nd June, 2015[edit | edit source]
Bought color plastic pellets and began to extrude large amounts of colored strips. Experimented with using a water bath to cool down the plastic to get the desire thickness and consistency of the plastic strips.
23rd June, 2015[edit | edit source]
Went to Arroyo Norte and a community member began to produce a small woven bag using a wooden mould. Continued to experiment with the water bath. Test were interesting but best method continued to be to let the strips fall to the floor from the extruder without any pulling, most consistent method.
24th June, 2015[edit | edit source]
Visited a maker-space Santo Domingo.
25th June, 2015[edit | edit source]
Went to Arroyo Norte to produce strips but ended up having to leave early because of the electricity went out. Made more strips at Luis' house. Finished the small woven bag. Tried to make plastic roses using hot extruded plastic, not very successful.
26th June, 2015[edit | edit source]
Spent day making strips. More work on roses, came up with a good process to make small plastic roses.
27th June, 2015[edit | edit source]
Went to Arroyo Norte, presented the finish bag and continued making strips. Electricity went out at 2:30pm, which ended work in Arroyo Norte. Went to Luis' house and made a new mould for a bigger bag and produced a large amount of strips of varying colors. Worked on making basic bracelets to sell. Created by cutting extra strips to the correct length, heating the ends of the strips with a hot air blower and then clamping the two ends together using pliers.
28th June, 2015[edit | edit source]
Spent all day making strips and starting a large woven beach bag.
29th June, 2015[edit | edit source]
Finished making strips for and building the Sunset beach bag. More bracelets and roses made.
30th June, 2015[edit | edit source]
Last visit to Arroyo Norte, showed finished prototypes and said goodbyes. Presented the project to a near bye teacher. Began to work on final presentation.
1st July, 2015[edit | edit source]
Continued to work on final presentation and the project Appropedia page.
2nd July, 2015[edit | edit source]
Completed a simple presentation, and presented at Las Malvinas.
3rd July, 2015[edit | edit source]
Finished final presentation and presented at UNIBE. Sold bracelets for 50RD each and made 800RD to be used for the project. End of project and program.
Budget[edit | edit source]
Table of all money spent on project. This is not recreation costs as some money was spent on research and development.
Cost[edit | edit source]
| Materials | Unit Price $(DOP) | Quantity | Cost $(DOP) | Cost $(USD) |
|---|---|---|---|---|
| Extruder | 18,428.00 | 1 | 18,428.00 | 410.00 |
| Customized Nozzle/Dies | 800.00 | 1 | 800.00 | 17.80 |
| Shred Plastic Service | N/A | 1 | 300.00 | 6.67 |
| Allen Wrench | 112.00 | 1 | 112.00 | 2.49 |
| Practice Weave Paper | 245.00 | 2 | 490.00 | 10.90 |
| New Nozzle/Dies | 36.00 | 5 | 180.00 | 4.00 |
| Large Level | 250.00 | 1 | 250.00 | 5.56 |
| Small Level | 179.00 | 1 | 179.00 | 3.98 |
| Small 90deg Brackets | 119.00 | 1 | 119.00 | 2.65 |
| Large 90deg Bracket | 70.00 | 3 | 210.00 | 4.67 |
| Aluminum Mesh Net | 230.00 | 2 | 460.00 | 10.23 |
| Scissors | 26.00 | 1 | 26.00 | 0.58 |
| Cholorine | 90.00 | 1 | 90.00 | 2.00 |
| Sand Paper | 30.00 | 1 | 30.00 | 0.67 |
| Duct Tape | 65.00 | 1 | 65.00 | 1.45 |
| Wood Screws | 0.80 | 10 | 8.00 | 0.20 |
| Electrical Wire | 6.00 | 2 Ft | 12.00 | 0.27 |
| Electrical Tape | 112.00 | 1 | 112.00 | 2.49 |
| Customize Nozzle/Dies | 800.00 | 2 | 1600.00 | 35.60 |
| PVC 2x19 Tubing | 309.15 | 1 | 310.00 | 6.87 |
| PVC Cap 1-1/2" | 16.00 | 2 | 32.00 | 0.71 |
| PVC Cap 2" | 17.00 | 2 | 34.00 | 0.76 |
| Drill Bit | 70.00 | 1 | 70.00 | 1.56 |
| Garden Scissors | 210.00 | 1 | 210.00 | 4.67 |
| Wet-Dry Cement | 128.00 | 1 | 128.00 | 2.85 |
| 5 Lbs. of Color Plastic Pellets | 400.00 | 1 | 400.00 | 8.67 |
| Heavy Duty Garden Scissors | 845.00 | 1 | 845.00 | 18.78 |
| Total Cost | $25,500.00 | $567.08 | ||
Operation of extruder[edit | edit source]
- Plug in extruder
- Flip switch closest to control box up (should see the box light up)
- Set temperature on control box and wait for the extruder to reach that temperature
- Once set temperature is reached wait 10 minutes for all plastic to melt
- Flip the second switch (motor will begin to rotate)
- Plastic will begin to extrude, in the beginning it may be necessary to pull the plastic with a pliers till the weight of the plastic can keep it strait (about 1 foot)
Extruder Building Instructions[edit | edit source]
Below is the building instructions for the Filisruder kit. These step by step instructions should be used with the Filistruder instructions and the wiring is not included. The link to the instructions is included here.

Receive kit

Lay out parts

Find shaft collar (looks like a vary large washer about 2in wide) and take out its screw.

Find the feed screw. You will need to insert a flat head screw driver into the shaft collar and gently hit it with a hammer until it expands so you can slide it onto the screw so that the edge of the collar is 95mm from the flat end of the screw.

It should look like this. Once in the correct possession replace the screw and tighten but not to much because you may need to adjust it later.

Now find the barrel and one of the nipples. Screw the barrel into the nipple gently and tighten with a wrench on the cut out section. Be careful not to deform the nipple.

Slide the printed hopper onto the barrel so it matches up with the cut out. You may need to sand the hopper down a bit to be able to slide it on.

Find the two races and the cage(all located in individual great bags and one box). Lubricate with light oil or grease.

Put them in order of race, cage, and race and slide onto the end of the feed screw so they are closest to the flat end and up against the shaft collar.

Add the nylon bushing(the white, large looking washer) on to the feed screw after the last race. It should look like this.

Find the piece of wood with five holes cut into it, four main bolts, eight washers, four nuts, four spacers, and the second nipple.

Put the feed screw into the barrel. Place the wood so that the end of the feed screw comes out of the hole. Take the four bolts add a washer to each and put them through the small holes in the nipple connected to the barrel and the small holes in the wood so that the washer is flush with the nipple and the extra is coming out of the wood holes. You may need to people for this step one person to hold the bolts in place and the other to add components. Now add a spacer to each bolt. Add the second nipple so that the flat side is facing the wood. Finish by adding a washer and nut to each bolt and tightening by hand. Check to see if about 1/4in of the feed screw sticks out of the barrel, if not you need to take it apart and adjust the location of the shaft collar.

Find your motor and add some electrical tape around the motor shaft. About 2-3 wraps is good.

Find the hex socket and place it on the motor shaft so it is snug.

Find the coupling(looks like a small cylinder with threading on the inside) and thread it onto the end of the barrel.

Find the heating band and take off the outside by taking out the screw.

Slide the heating band onto the coupling still it is almost to the back of the coupling. Once it is in possession put the outside piece back on and tighten with the screw.

Place on the insulation very loosely because it will need to come off later.

Use screws to connect the motor to the flat piece of wood with the four small holes.

Put the flat end of the feed screw into the hex socket. It should look like this.

Find the stall protector board and get a very small flat head screw driver or a knife.

Look for the two blue boxes on the top of the board with two little screws on top. Look carefully under the boxes to see which is CV and which is CC. Rotate the CV screw counter-clockwise till you hear a click (a few dozen rotations). Once it clicks rotate it clockwise for 15 rotations. Do the same with the CC screw but only rotate it clockwise for 6 rotations.

Attach the whole extruder to a board using the provided screws. Make sure to predrill the holes in the board and the wood. Leave about 6in of board in front of the barrel.

Attach the fan to the small piece of wood and then screw that the board as well right under the end of the barrel.

Follow the kit instructions for wiring. Your finished extruder should look like this. Enjoy your new extruder.
Conclusion[edit | edit source]
Final prototypes[edit | edit source]
-
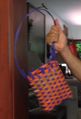
Lamp shade prototypes
-
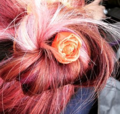
Plastic roses
-
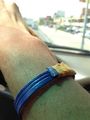
Bracelets
-
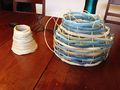
Small woven bag
-
Large beach bag
.jpg)


Testing results[edit | edit source]
Describe the testing results.
Discussion[edit | edit source]
Discuss the testing results.
Lessons learned[edit | edit source]
- When weaving with thick plastic a mould is need
- The plastic pieces need to be cleaned very well before being put into the extruder
- The smaller the plastic pieced are the faster the extruder extrudes the strips
- Arroyo Norte only has power from 11-4 pm during the day and still sometimes goes out during that time
What we wished we did[edit | edit source]
- Worked more days in the community to get more community involvement
- Ordered the extruder earlier to have more time to make prototypes
Next steps[edit | edit source]
- Buy a larger extruder to increase plastic strip production
- Find a better process for cleaning the waste plastic
- Build a shredder so the community can shred their own plastic
- Have thinner strips either from pulling by hand or a hand-crack winder
- Use solar panels to power the extruder
- More community involvement
- Testing prototypes for durability
Troubleshooting[edit | edit source]
For small issues with the extruder please look at the table below for the solutions. If your problem is not listed or the solution does not solve the problem please contact Luis Gonzalez at gonzgarcia.luis@gmail.com, Rebecca Stark at rds334@humboldt.edu, or Fernando Flores at faf34@humboldt.edu.
| Problem | Suggestion |
|---|---|
| The control box does not turn on after flipping the power switch. | Check that it is plugged in and check all wiring connections. |
| The temperature is not increasing even when power is on. | It takes a few minutes for the temperature to start increasing. If it still is not increasing after 3 minutes check the the thermocouple is still in the nozzle and that the other end is connected to the control box. |
| The barrel is rotating after turning on motor | Turn of motor and wait 10 more minutes for the plastic to melt. When ever turning on the extruder you need to wait 10 minutes after it has reached temperature to start extruding plastic. |
| The red light comes on on the stall protection board. | There is three possible problems. The first is that plastic pieces being put into the extruder are to big, cut them smaller. Next check under the hopper to see if plastic pieces are jammed between the barrel and the screw, if so remove with pliers. The final cause is that the everything is to tight. Try to loosen the brackets from the board. |
| The plastic is coming out very slow. | There is a few possible problems. The first is that the plastic needs more time to melt so turn off the motor and wait 5 minutes with the power on. Another possibility is that the plastic pieces are to big, cut them smaller. The nozzle may be need to be cleaned. Finally it could be low electricity, check your outlet. |
| The temperature goes down after turning on the motor. | A small fluctuation is nothing to worry about(20 degrees change). Anything larger could mean an issue. First try to let the extruder heat up for a bit longer before turning in the motor (about 5 minutes). Next check that the thermocouple is still on the nozzle. A final issue could be that wind is blowing onto the thermocouple so pull the insulation forward till it is covering the part where the thermocouple is connected to the nozzle. |
| Rough edges on plastic strips | If you are pulling the plastic then try to pull less. If not then the nozzle is dirty and needs to be cleaned. The easiest way is to heat up the extruder like normal but not turn the motor on and then take a needle and run it along the outside edge of the nozzle cutout. Then turn on the motor and let a bit of plastic come out. Turn of the motor and repeat this process a few times. |
| Lines on the plastic strips | Then the nozzle is dirty and needs to be cleaned. The easiest way is to heat up the extruder like normal but not turn the motor on and then take a needle and run it along the outside edge of the nozzle cutout. Then turn on the motor and let a bit of plastic come out. Turn of the motor and repeat this process a few times. |
Peer reviewed journal article[edit | edit source]
This work could be a followup to the previous year's project (2014) which became a peer reviewed journal article (in 2018):
- Title: An Analysis of Recycling High Density Polyethylene with Limited Resources
- Authors: Isabel Noemi Contreras, Jenna Bader, Patricia DuRant, Lonny Grafman
- DOI: https://doi.org/10.24908/ijsle.v13i2.11621
- Published: Oct 29, 2018
References[edit | edit source]
See Arroyo Norte waste plastic innovation/Literature Review for references.