
Safety Training Requirements[edit | edit source]
- Dr. Pearce Safety Lab Tour
- Worker Health & Safety Awareness
- WHMIS 2015 - Workplace Hazardous Materials Information System
- Laboratory Safety & Hazardous Waste Management
Safety Issues With Method[edit | edit source]
All the maintenance procedure should be done with standard procedures to ensure all the health protocols
Personal protective equipment[edit | edit source]
PPE is to keep YOU safe so that you can keep doing what you want to do.
- Safety glasses – always required
- Lab Coat
- Gloves
SDS and other[edit | edit source]
- Appropriate SDS sheets should be viewed online.
- Note the hazards listed on the door to the Agrotunnel.
Equipment Name[edit | edit source]
- ICFAR- Agrotunnel
- pH meter
- EC meter
- CO2-Temperatue-RH monitor/logger
- Label Maker
- Beaker(s)
- Dropper
- Tongs or clippers
- Cloth and cleaning tools
Operation & Procedure[edit | edit source]
1. Controlling Electrical Conductivity (EC) and pH of Water[edit | edit source]
Grow Walls[edit | edit source]
To ensure accuracy and reliability in measurements, the following steps should be taken:
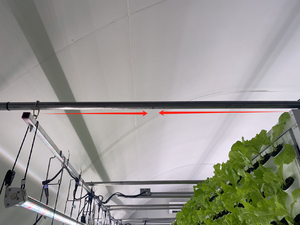
- Move the light source away from the wall to prevent interference.
Proper spacing. 
Proper spacing. - Remove the water level cap from the reservoir and prepare all equipment.
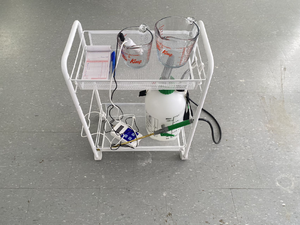
All equipment. 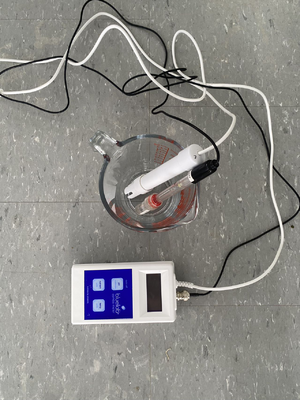
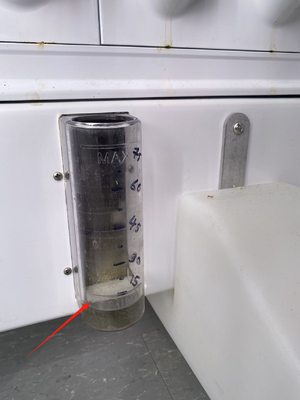
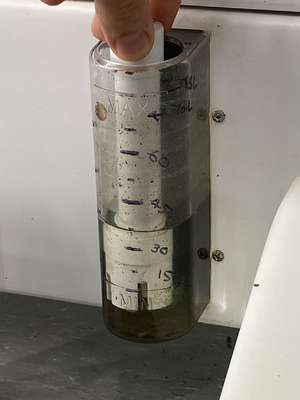
EC and pH sensor. - Record the initial water level of the reservoir.
Analyze water levels. - Insert the pH sensor into the reservoir and record the data using the pH meter.
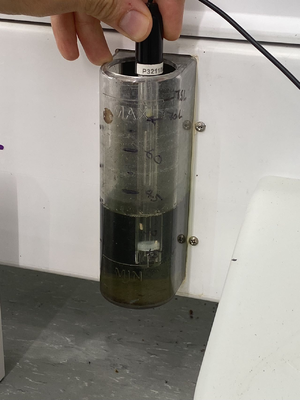
Inserting the pH sensor. - Repeat the procedure with the EC sensor: insert the EC sensor into the reservoir and record the data using the EC meter.
Inserting the EC sensor. - Thoroughly rinse both the pH and EC sensors with water after each measurement or soak them in a bowl of distilled water to ensure cleanliness and accuracy for subsequent measurements.
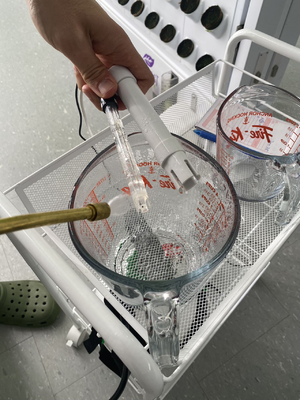
Rinsing the pH and EC sensor. - Ensure both sensors are adequately prepared for the next measurement.


Water Standards
To determine the appropriate amount of water to add to the wall reservoir, consider four key factors: the type of crop, the remaining water level, the daily watering cycle, and the researchers' off days. If the off day falls on the weekend, the lab researcher should refill the reservoir to its maximum capacity on the day before the off day.
To refill the reservoir, two primary options are available. The first option involves utilizing water from a nearby well, which must have a pH range of 8.0 to 8.1. This method necessitates refilling the main reservoir, located outside the Agrotunnel, on a weekly basis. The second option is to use distilled water collected from a dehumidifier, with a pH range of 6.9 to 7.0. The selection between well water, dehumidifier water, or a mixture of both will depend on the specific pH requirements of the crops. Water will be added to the reservoir using a labeled bucket.


To adjust the pH of well water or dehumidifier water, phosphoric acid (specifically for agricultural purposes) can be used. To reduce the pH of well water from 8.1 to 6.5, 1 milliliter of phosphoric acid should be added to 15 liters of well water.


Maintaining the water level in the dehumidifier tank is crucial to prevent overflow. The water level should be kept at less than half of the tank's volume on regular days and less than one-third before weekends. Exceeding these levels could result in overflow during the night, leading to water spillage from the reservoir.

Water Tank
Allow the water to sit undisturbed for the chlorine to evaporate. Then, add it to the water tank. Fill up the tank until the blue sign inside.
Nutrients and Water
The Dutch Nutrient Formula (DNF) is a plant nutrition product developed in Holland. It has been around for 23+ years and provides everything necessary for optimal plant growth. DNF is a convenient 2-part formula for both the Grow and Bloom stages, maximizing nutrient uptake. It eliminates binding, solidification, and waste of mineral elements found in regular 1-part plant food. DNF is highly economical, utilizes all elements effectively, and has proven results supported by industry professionals' testimonials. It contains no additives or dyes, is heavily concentrated, and offers excellent value.
Gro A: 2-0-2 (2% Nitrogen, 2% Soluble Potash, 2% Calcium) Gro B: 0-1-3 (0% Nitrogen, 1% Available Phosphate, 3% Soluble Potash, 0.5% Magnesium)
For each 3 liters of water, 369 grams of fertilizer should be added, divided into two different buckets. These solutions should not be mixed, as each bucket must contain a different solution as shown in the provided picture. The Electrical Conductivity (EC) value for well water is 0.3, while the EC value for dehumidifier water is 0.0. To reach the target EC values, the prepared solutions need to be added to both well water and dehumidifier water. Based on the measured EC values and the target EC values, the required amount of the prepared solutions will be added to maintain the desired EC levels for individual crops; If 120 ml of Gro-A and 160 ml of Gro-B are added to 15 liters of water, the EC value of the water will raise by 2. (The ratio of GRO-A to GRO-B is three-quarters, based on a rule of thumb.)
The EC reading on the device should be between 2 to 3 (for most of the crops planted in the Agrotunnel). If it's higher, it's advisable to add water to the wall until it levels. Nutrients can be added through the wall or water tank. The frequency of nutrient addition depends on the EC number. When baby strawberries start pollinating, it's recommended to add salt to the wall. Maintain a pH level between 5-5.5, and if it's higher, use pH DOWN following the instructions on the wall.


Shut Down
Ensure that the reservoir is filled after appropriately balancing the pH and electrical conductivity (EC) levels.

Harvest Today App[edit | edit source]
The application facilitates the management of growth cycles for cultivators. To achieve this, the user must connect to the wall interface via the application using Bluetooth technology.
By accessing the Settings menu, users can customize the number of cycles per day and their respective durations.

The left-hand side indicator numbered "6" represents the number of cycles per day, while the indicator numbered "1" denotes the duration of each cycle in minutes.
Note: If the cycle duration is set to 30 seconds, the app will display this value as "0".

Important Note: To ensure that changes are saved correctly, please click the Home button after making adjustments. Avoid tapping the back button, as this may result in unsaved changes.

Energy Consumption

Spectral UV-Vis Reading of The Wall

Growing Bins[edit | edit source]
Agrotunnel contains multiple grow bins structures under development.
PVC System
First grow bin consists of a PVC rack for supporting the grow light. A separate frame built from aluminium is used to house grow bins and provides mobility.

Rectangular System
This system integrates the grow light support and platform for grow bins together.

Inverted T System
This design is similar to the rectangular system, but minimized the material usage. It is not intended to be moved frequently.

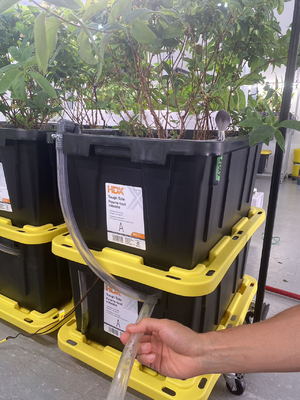
White Commercial Grow Bin This white grow bin is a commercial product. It has a more rigid design with a larger and single grow volume. It is significantly easier to move and can be flat packed.

Single Water Reservoir system
This Aluminium grow frame has six small totes as its growing containers. One large tote is used as water tank and for storing all the drainage from the grow bins.

Measuring the pH and EC of each grow bin
To ensure precise and consistent measurements, follow these steps:
- Water sampling for White PVC frame, Rectangular frame, and Inverted T frame:
- Fill a small beaker with water from the designated bin.
- Measure the pH and EC using appropriate sensors.
- Return the sampled water back to the bin from the top.
- Water sampling for the commercial frame:
- Perform measurements directly in the reservoir, similar to the procedure used for the grow wall section.
- Water sampling for the single water reservoir frame:
- Similar to the commercial frame, properties of the solution can be directly measured from the large tote. However, the pH and EC can be balanced after adding the required water to the reservoir since the fluctuations in the chemical properties of this reservoir is considerable.
This approach ensures accurate monitoring and adjustment of water quality parameters across different bin types.


Proper Grow Bin Watering Procedures
Prepare the watering buckets by balancing the pH and EC levels according to the procedure outlined in the water standard section. Use the submersible pump to refill the bins by following these steps:

- Submerge the submersible pump in the prepared watering bucket.

Submerge the pump into the pre-prepared water bucket.

- Connect the submersible pump's hose to the bins' integrated holes to refill their tanks. This method applies to all grow frames.
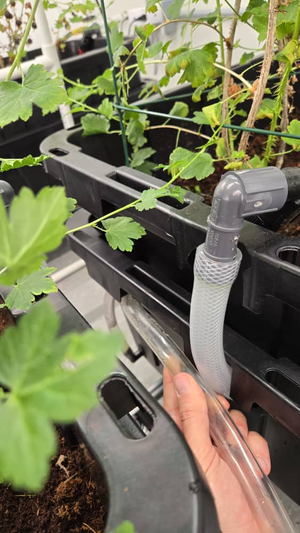
Refilling Method for White PVC and Rectangular frame.

- For the Inverted T frame, refill the tanks from the irrigation tube hole. There is sufficient space for the water tube to be squeezed inside.
Refilling method for Inverted T frame.

- Refill the commercial grow bin using the same method as the walls.
This process ensures the bins are properly watered and the pH and EC levels are maintained within the required standards.
2. HVAC and Air Condition[edit | edit source]
The indoor climate conditions must be regulated to maintain a temperature range of 19-25 degrees Celsius and a relative humidity (RH) range of 50-65%. These parameters are controlled using a heat pump and a dehumidifier.


Open Source Sensor
Here is the link to the Onshape file: https://cad.onshape.com/documents/3dbf26f69536174d862ef214/w/52710cffcf409327e12bd46c/e/7ecc6a873d1c36759380f5cf

The URLs for purchasing the products are listed in sequential order below.
https://www.sparkfun.com/products/22395
https://www.sparkfun.com/products/19426
https://www.sparkfun.com/products/16398
https://www.sparkfun.com/products/15081
https://www.sparkfun.com/products/10160
3. Wall Inspection[edit | edit source]
Coco Coir Pots Cleaning
Examine each coco coir pot carefully for any signs of mold or dead leaves. Remove any mold or dead leaves immediately using a spoon. Ensure that all coco coir pots are free from mold and dead leaves.


Examination of Moisture Levels in Coco Coir Pots for Dryness
Examine the coco coir for excessive dryness. If it appears unreasonably dry, investigate the underlying cause.

First, inspect the position of the slits on the back of the dry pots. Ensure that the top slits of the pots are vertically aligned and form a 90-degree angle with the horizontal plane. If the top slits are not correctly positioned, the pot is incorrectly placed and will not receive the appropriate amount of water. Ensure that the coco coir pots are positioned with the top slits oriented correctly upward.

Examine the hole beneath the water channel at the top of the wall. If algae are detected, clean the area immediately. The presence of algae can obstruct the watering system, thereby preventing the planted pots from receiving the necessary amount of water.

To inspect the top section of the wall, use a ladder to climb up. Carefully lift the board at the top of the wall to examine the water channel. Ensure that the water channel is thoroughly cleaned and free of any obstructions that could impede water flow.

Wall Labeling
To enhance the efficiency of tracking and documenting each planted pot, it is essential to label each wall appropriately. Each wall should accommodate 24 pots per row, with a total of 360 pots per side of wall.
Begin by printing labels with a label printer, starting from 1 to 24 for the first row. The subsequent rows should follow consecutively, with labels from 25 to 48, continuing in this manner until reaching 360.


Gently affix the produced labels adjacent to the first and last empty pots on both sides, starting from the top and proceeding to the bottom. This process should be repeated for every growing wall.


Optimizing Crop Wall Arrangements for Enhanced Growth
Analyze the size and growth of all planted crops on a single wall. The size of the crops correlates with the amount of water required for each individual plant; larger crops necessitate more water. Positioning a coco coir pot at the top of the wall, closer to the water channel, ensures it receives the maximum amount of water, while placing a pot at the bottom results in it receiving the least amount of water. Rearrange all the planted pots on a single wall in such a way that the largest crops are positioned at the top, and the smallest crops are placed at the bottom of the wall.

4. Wall Sanitation[edit | edit source]
Click the link below for a detailed procedure.