
Operating Manual for ADMET universal testing Machine (Tensile test) ICFAR


Machine Technical Data[edit | edit source]
Machine Model
eXpert 7600 Single Column Universal Testing Machine
Load Cell Model[edit | edit source]
1000 Series High Force Fatigue Load Cells: SM-1000-38
Load cell capacity[edit | edit source]
1000 lbf ~ 5 kN
Setup the machine[edit | edit source]
If the machine is equipped with compression grips (identified as two gray plates in Figure compression grips and bolts), please follow these steps:
- Begin by removing the bolts from the grips, identified by orange circles in Figure compression grips and bolts.
- Next, remove the grips from the machine.
- Retrieve the tensile grips located in the drawer labeled 'ADMET Mechanical Tester's' beneath the machine.
- If the height is sufficient for placing the tensile grips, proceed to do so, securing them with the bolts as depicted in Figure Tensile grips set up. Ensure that the turning handles are positioned on opposite sides.
- If the height is inadequate, please follow these steps: a. Turn on the machine using the red button and rotate it clockwise until the 'ON' indicator. b. Utilize the machine's keyboard to select option #3 (Position), then use the JOG UP function to elevate the grips to the desired height. If adjustment downward is necessary, simply press JOG DN. c. Once the desired height is achieved, proceed to place the tensile grips as instructed in step 4.
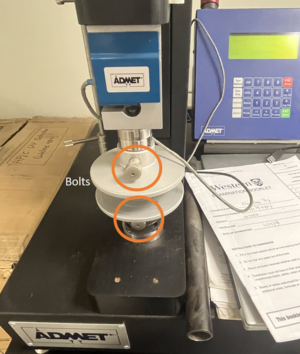
Compression grips and bolts 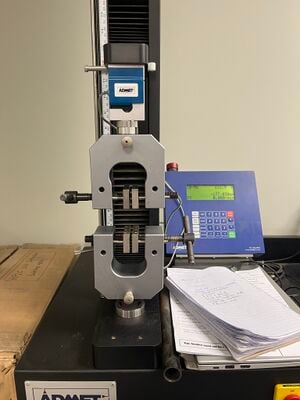
Tensile grips set up


START TENSILE TESTS[edit | edit source]
- Begin by turning on the computer adjacent to the machine.
- Use the username "Charles" and locate the password in the upper corner of the computer (XU@UTM in uppercase).
- NOTE1: The computer may run slowly, so please exercise patience.
- Launch the Gauge Safe software.
- Within the software interface, navigate to the main view window and select "View, Upload, Save." Enter the password "157" when prompted.
- While in the main view window, access the browse function. Under Mechanical tests, create a new folder with your name. This folder will serve as the storage location for all your data. If subfolders are needed for organizing experiments by date, create them within your main folder.
- Confirm your selection by clicking "OK."
- Proceed to the setup view window.
- In the empty area, right-click and select "Load." Using the up arrow, navigate to the Catalina folder and choose the file named "tensile-test.epm." Open the file.
- NOTE2: This configuration is tailored for tensile tests with an end limit of 25 mm.
- NOTE3: If you're conducting tests requiring different end limits, control rates, or compression tests, adjustments can be made in the control window. The rate at which the system stores the data is under the "data acquisition window", e.g. if you choose 10 mm/sec, the data will be saved every 0.1 seconds, if you choose 10 mm/min the data will be stored every 6 seconds. If you want the data be more acurate and gives you more data to draw the curve from the excel file, it is better to set the lower logging rate.
- Before commencing the test, measure your specimen. Record the length of the complete specimen, as well as the width and thickness of the neck. Input these measurements in the "Flat parameters" section.
- If the machine has not been turned on, follow step 5.a. to power it on.
- Use the machine's keyboard to select option #1
- NOTE4: Ensure that you are always in mode #1 when sending the method to the machine.
- Back in the software interface, right-click and choose "Upload to indicator." The machine's screen should display "loading method...saving ID." If not, refer to the troubleshooting section below.
- Place your specimen securely in the grips, ensuring it is perfectly straight and positioned within the clamping area as depicted in the provided image.
- To adjust the height, press 0 (zero) on the machine's keyboard and follow step 5.b. of the setup section.
- Secure the specimen using the turning handles.
- On the machine's keyboard, press 0 (zero), then #1, and finally, the green "ENT start " button to initiate the test.
- Wait until the test is complete. Inn case you need to stop the test Press the red "ESC Stop" button.
- In the software, a window will appear. Press "OK."
- Review the results displayed in the subsequent window. If you encounter any issues or require further assistance, please refer to the troubleshooting section or seek support.
Saving your data[edit | edit source]
To save the data
- As tell you before the data will automaticaly save if you followed the 5 step in the "start tensile test" section
- In the folder you will see 3 different files please name it diferently acording to your test otherwise the automatic save will jous put the date followed by the number of test a point nd a randomw number. so is advisable to rename your file every tilme ypu do a test and create diferent folder if needed.
- To change the location of your autosave go to >main view > browse > look for the folfder you want to save the data
- If you need to prossed mor test pls repeat steps from 13 if youi do not have to change any parameter. otherwise make the changement and load the method to the machine as depict from step 11. To ensure data preservation:
- As mentioned earlier, the data will automatically save if you've followed the 5 steps outlined in the "start tensile test" section.
- NOTE5: Upon accessing the folder, you will observe three distinct files. It's imperative to name each file differently according to your test. Otherwise, the automatic save will append the date, test number, a point, and a random number. Hence, it's advisable to rename your file every time you conduct a test and create separate folders if necessary.
- To alter the location of your autosave: Navigate to >main view > browse, then locate the desired folder for data storage. 7. Should you need to proceed with more tests: Please repeat steps from 13 if no parameter changes are required. Otherwise, make the necessary adjustments and load the method onto the machine as illustrated in step 11.
Troubleshooting[edit | edit source]
If the software displays a window indicating "unable to establish communication with the indicator":
- Begin by selecting "no" and continue. Turn the machine off and on again, waiting for communication to be established.
- If the issue persists, switching off and on the machine. Then, close and reopen the software.
- If the problem persists after restarting, try unplugging and replugging the USB cable from both the computer and the machine directly.
- Attempt to relaunch. If unsuccessful, follow the previous steps outlined in this section.
- If the issue continues seek support.
If uploading to the indicator it show that is not possible please selec okay and in the machine go to 0(zero) and then #1 and try again.