
大多数 RepRap 入门书


MOST Mendel Prusa RepRap - 2013 年夏季版

RepRap 3-D 打印机是一种自REP连接RAP id 原型机,它使用称为熔融沉积建模(FDM) 的制造方法从 3-D 计算机模型构建物理对象。它是开源技术,因此每个对其感兴趣的人都可以使用。开源技术的用户和构建者成为全球社区的一部分,我们鼓励他们调整设计、重新应用技术并与该社区分享他们的发现和创新。
消耗品 - 电力和灯丝
RepRap 打印机使用电力和塑料丝来生产物体。该灯丝与除草机中使用的类似(事实上,有些人已经用除草机灯丝打印),通常由ABS或PLA制成。灯丝呈线圈状或线轴状,通常按重量出售。常用的灯丝直径有两种:1.75 毫米和 3 毫米。
字母汤:STL、SCAD、G 代码,天哪!
与所有数字技术一样,3D 打印充斥着缩略语和行话。这不是详尽的列表,只是最常用的有用列表。
物料清单
它真的没有听起来那么可怕。物料清单只是所需零件的列表。
计算机辅助设计
SCAD 文件是在OpenSCAD中创建的文件,OpenSCAD 是一种用于创建实体 3D CAD(计算机辅助设计)模型的软件。它是免费软件,可用于Linux /UNIX、Windows 和 Mac OS X。OpenSCAD 可以导出 STL 文件进行打印。
STL
STL 文件(归属于 STereoLithography)是将 3-D 形状描述为连续面(一堆连接的三角形)的集合,并用作打印的基本 3-D 文件。
G代码
G 代码是一个 ASCII 文件,用作给定打印的指令集。它本质上是通往打印对象的地图,告诉打印机在哪里以及以多快的速度移动轴,将热端和加热床设置为什么温度以及打印完成后要做什么。G 代码是打印机控制器转化为操作的代码。
切片
切片是将 3D 软件模型(STL 文件)转换为 G 代码的过程。切片器(切片软件)的功能正如其听起来的那样;就像熟食店的切片机一样,它采用 STL 文件描述的大型 3D 形状,并将其在 z 方向(垂直)上切成连续的薄层。
打印机控制器
MOST 打印机使用Melzi 打印机控制器。打印机控制器是整个设备的大脑。它通过管理步进电机、跟踪挤出机热端和加热构建平台的温度,将 G 代码转化为行动,并通知用户状态和错误。它依赖于一种称为“固件”的特殊软件。有多种不同风格的 RepRap 固件可供选择;MOST 打印机使用Repetier。固件采用 C++ 版本编写,旨在与开源Arduino 原型板一起运行,Melzi 打印机控制器正是基于该原型板。配置固件最简单的方法是使用 Arduino 集成开发环境 (IDE)。
Arduino
打印机控制器围绕称为Arduino 的开源电子平台构建。RepRap 打印机直到 Arduino 出现才成为可能。如果没有这项卓越的技术,我们就不会取得今天的成绩。
Arduino集成开发环境
Arduino IDE是用于开发在 Arduino 和基于 Arduino 的板上运行的程序的软件。
固件
固件实际上是软件。它是一个在打印机控制器上运行的程序,将 G 代码转换为操作、处理输入并向用户提供反馈。它是用 C++ 编写的,因此是人类可读的,但对于外行来说可能会令人望而生畏。有必要熟悉固件的有限部分,因为定期升级并且随着打印机的使用经验丰富,用户会想要调整他们的打印机,这确实需要破解固件。
挤压
挤出是一种将材料推过模具以形成连续或半连续形状的工艺,其横截面由模具的形状决定。对于 RepRap 打印机,挤出仅产生直径较小的细丝,但更重要的是提高了细丝的温度,使其与之前沉积的细丝熔合(因此称为 FDM)。打印机生产的物体的形状由构建平台上的挤出机喷嘴的路径决定。
挤出机
MOST打印机挤出机是基于鲍登电缆的挤出机(Bowden extruder)。RepRap 挤出机由热端和冷端两部分组成。冷端是挤出机驱动器,室温长丝被夹在纹理辊和惰轮之间并被迫进入热端。在热端,线材在被挤出到构建平台或要打印的物体上之前被加热。有多种不同的挤出机组件设计,MOST Prusa 打印机专为 3mm 线材设计,并使用 Wade 驱动器;MOST Delta 专为 1.75mm 灯丝设计,并使用 Airtripper 驱动器。两者都使用带有 0.5mm 喷嘴的 J 头热端。
鲍登电缆
鲍登电缆是一种约束在护套(管)内的柔性电缆,使得电缆可以前后移动,甚至可以在一定程度上被压缩,因为它受到护套的限制而不会弯曲。我们使用鲍登电缆将挤出机和热端分开。这样,只需将实际的热端移动到打印床上方,而重型挤出机则位于侧面。这允许更快的打印。
驱动齿轮
滚齿螺栓滚齿螺栓是挤出机驱动器的纹理部分。它具有切入灯丝的齿,以便将步进电机产生的扭矩转化为灯丝中的线性运动。(滚齿是一种常用于生产齿轮的加工方法。RepRap 的所有齿轮都是打印出来的。)MOST Prusa 在其 Wade 挤出机中使用滚齿螺栓。
驱动齿轮驱动齿轮的作用与滚齿螺栓相同,只是它不是螺栓。mk7 驱动齿轮很受欢迎,通常在Airtripper 的 Bowden 挤出机驱动器中发挥作用。MOST Delta 使用 Airtripper,包括其 mk7 驱动齿轮。
挤出机驱动惰轮
无纹理的夹送轮称为惰轮。对于 RepRap 打印机,它通常是滑板轴承(608zz 或同等轴承)。惰轮通过弹簧压在驱动齿轮上。
热端(或Hotend)
热端由整齐地捆绑在金属熔化区域中的加热器和温度传感器(热敏电阻)组成。它采用电加热,并根据挤出细丝的材料仔细控制和设定温度。
喷嘴
喷嘴是挤出的长丝离开挤出机的地方。常见的喷嘴直径有两种,0.5mm和0.35mm。值得注意的是,喷嘴直径和最佳层厚度之间存在关系。
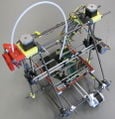
MOST Prusa 运动控制
MOST Prusa 基于Prusa Mendel,这是一种龙门式或笛卡尔机器人,由三个线性轴 x、y 和 z 组成,每个轴均由单独控制的步进电机驱动。x 轴和 y 轴使用同步带和滑轮,而 z 轴使用一对单独驱动的丝杠。轴的精确位置由打印机控制器(还管理温度)维护,并且基于跟踪每个电机在归位后所执行的“步数”。
X轴
MOST Prusa 上的 x 轴围绕黑色塑料部件组装。它悬挂在 z 轴上。
Y轴
MOST Prusa 上的 y 轴围绕白色塑料部件组装。它直接连接到构建平台的框架和位置。
Z轴
MOST Prusa 上的 z 轴围绕黄色塑料部件组装。该轴在由安装在打印机顶部顶点的一对步进电机控制的丝杠上移动。
步进电机
步进电机是一种一次仅移动固定度数的电动机,因此可用于相对精确的运动控制和定位。完整旋转的“步数”由电机的设计决定。MOST打印机使用200步(1.8度)电机;旋转 360 度需要 200 步。
微步进
步进电机可以通过电动方式进行分步,这样 200 个步进电机实际上可以完成 800 或 1600 甚至 3200 步以完成一整圈。这称为微步进,打印机控制器采用微步进来提高打印机的分辨率。Melzi 控制器设置为 1/16 微步,因此每转可执行 3200 步。
限位开关(或终点限位器)
限位开关是一个带有臂的开关,它会被与其关联的轴上的物体碰撞,指示轴已到达其极限位置(起始位置)。大多数控制器软件使用该位置作为可打印空间的原点。
寻的
归位是确定三个轴中每个轴的物理原点所在位置的行为。这是通过移动每个轴直到接触限位开关(终点止动件)来完成的。然后,打印机控制器基本上会记住这些点,并跟踪顺时针和逆时针的步数。归位发生在任何打印开始之前,是 RepRap 运动控制和定位的关键。
正时皮带
同步带基本上是一个柔性齿轮。它是一条带有模制齿的皮带,皮带“节距”是相邻齿上同一点之间的距离(类似于正弦波形式的周期)。MOST打印机采用T5同步带;相邻牙齿中心距为5mm。
丝杠和锁紧螺母
丝杠只是一根螺纹杆,其上装有紧固螺母。螺母受到线性移动部件的限制,因此它不会随丝杠一起旋转,因此它是“俘获”的。MOST Prusa 上有四个固定螺母;x 轴惰轮和电机端上方和下方各有一个。丝杠可以非常精确,这在 z 轴上很重要,因为层高通常只有一毫米的一小部分。
间隙
齿隙是啮合零件之间间隙的结果,例如齿轮与齿轮、皮带轮与同步带或丝杠与防脱螺母之间的间隙。对于大多数打印机设计来说,这不是一个重大问题,但值得注意。挤出机驱动器上的塑料齿轮会磨损,产生更大的间隙,这在细丝回缩时会变得明显;随着时间的推移,将消耗越来越多的运动来补偿增加的间隙 - 更少的灯丝将被缩回。在需要高精度的情况下(例如 z 轴),间隙是一个非常大的问题。幸运的是,重力和一点弹簧扭转了局面。X 轴始终被向下推到下部固定螺母上,有效消除间隙。
轴承
MOST 打印机使用两种类型的轴承。一种是称为 608zz 的旋转轴承,这是一种廉价的滑板轴承,另一种是称为 LM8UU 的直线轴承。轴承标识符(608 和 LM8UU)在讨论打印机时被通俗地使用。
每毫米步数
打印机完成的所有移动都是通过步进电机使其旋转一定量来完成的。该旋转通过 1) 正时皮带和滑轮、2) 丝杠和紧固螺母或 3) 压紧辊和灯丝转换为线性运动。
在正时皮带的情况下,皮带轮的旋转通过皮带轮齿上的一定数量的皮带齿。MOST 打印机使用 12 个齿滑轮,因此一整圈可产生 60 毫米的线性运动(12 齿 × 5 毫米/齿)。由于电机为 200 步/转,并且 Melzi 采用 1/16 微步,因此同步带移动 1 毫米总共需要 53.333 步((200 步/转 × 16 微步/步)/ 60 毫米)。
除了使用螺距之外,丝杠几乎相同。M8 螺杆的螺距为 1.25 毫米,完成一转需要 3200 步(200 步/转 x 16 微步/步),因此需要 2560 步才能将锁紧螺母沿螺杆移动 1 毫米(3200 步/转) / 1.25 毫米/转)。
夹送辊的行为应该就像齿轮一样,因此如果齿轮挤出机驱动器和夹送辊被视为传动装置,则应该能够计算长丝运动的步数/毫米。然而,纹理辊与不同长丝材料的相互作用不同,甚至同一材料的颜色变化也会导致挤出机系统中的不同行为(由于挤出机驱动器上的背压、材料的柔软度以及可能的其他有趣现象而产生)。在实践中,每毫米长丝的步数是通过测量实际挤出的长丝量并根据预期运动与实际运动的比率来考虑步数来凭经验确定的。这不是什么值得兴奋的事情。控制挤出速率的方法有很多,最终重要的是所产生的印刷品尺寸合理且美观。
All of this matters because the firmware uses these key bits of information to move all the axes just the right amount. If these values are wrong, the printer won't produce a print matching the dimensions of the model and probably won't even produce a usable print (keep in mind that the slicer figures all the movements out based on volume of filament required to fill intervening space). Printer users must set these values in firmware and the terms "steps per millimeter" and "E steps per millimeter" are frequently bandied about. The first term refers to the three linear axes and the latter refers to the extruder (E = extruder).
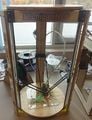
MOST Delta Motion Control
Pretty much everything stated above for the MOST Prusa holds true for the MOST Delta printer except that the kinematics are vastly different. Whereas the Cartesian printer design uses a single motor to move a single axis linearly, the delta printer simultaneously moves all of motors to position the end effector. Instead of having a right rectangular prismatic build volume, the delta has a roughly cylindrical build volume.
Axes?
The delta doesn't really have axes (x, y, z), so the three linear motion control portions of the printer are referred to as "towers" or "apexes". It's still important to uniquely identify the apexes since each has a motor and an associated limit switch and the order in which all of these are wired to the controller board matters. All of the controller boards are designed for Cartesian printers, their motor and limit switch terminals are labelled "x", "y" and "z", so it's only logical to identify the apexes to match. If during commissioning of the printer you notice that the print is mirrored (for instance print is legible when its reflection is viewed) the reason is probably that the x and y towers are reversed on the controller. Swap the x and y motor leads and their respective limit switch leads and the printer should print correctly. (Warning: never connect or disconnect motor wires while the power is on!)
Calibration
Whereas calibration of a Cartesian printer requires only knowledge of the belt pitch, number of teeth on the pulley and steps to complete a revolution of the pulley, delta printers require additional data to ensure that prints are produced to scale and the end effector moves in the x-y plane while printing. The distance between the tie rod pivot points and the effective radius of the printer must also be accurately known. It is also extremely important that care is taken during assembly of the printer to ensure that the apexes are equally spaced and the lengths of the tie rods are identical and carefully measured. One additional requirement is that the carriages all engage their respective limit switches in a plane parallel to the build platform. This is done by setting the height of the limit switch adjustment screws on each of the carriages.
Delta printer kinematics are less intuitive than that used by Cartesian printers and calibrating them can be challenging, but there are payoffs. Delta's have significantly larger build envelopes in a similarly sized footprint, and once calibrated typically require less twiddling to keep going. The MOST Delta design is very robust and tolerates transporting much better than does the Prusa design. Deltas are also much easier to build and have fewer parts, so they're cheaper, too. Finally, the design is easily adapted to different purpose, making it very flexible.
Miscellany
Heated Build Platform
The heated build platform is a circuit board that does nothing but produce heat. Heat helps the initial layer to stick to the build surface and helps reduce warping of the part during printing. This isn't strictly required and greatly increases the requirements on the power supply. The MOST Prusa has a heated build platform; the MOST Delta does not (but it can be added easily, if the power supply is also changed).
M2, M2.5, M3 - What's it all about?
The RepRap is built with metric screws, which aren't as common in the US as in other parts of the world. Metric screws have a pretty simple naming convention - M followed by a number representing the diameter of the screw followed by the length of the screw. M2 is a 2mm diameter standard thread screw; M2×10 is a 2mm diameter screw 10mm long below the cap.
Printing Jargon
Retraction
Retraction is simply backing the filament out of the extruder. It is necessary when moving from one print point to the next when no filament should be extruded, like between adjacent printed parts. The Bowden design stores energy in compressed filament between the drive and hot end and tension in the Bowden sheath. Additional energy is supplied by a change in density upon heating the filament in the hot end. Between these (and probably other fascinating phenomena) there is a tendency for plastic to ooze out of the nozzle even after stopping the extruder drive. The amount of oozed material is minimized by backing filament out of the hot end; the extruder drive is put in reverse. The amount of filament retracted is set during the slicing operation.
Over or Under Extrusion
The slicer does all the math to figure out the volume of plastic to extrude per length of extruder nozzle distance travelled. It's all volumetric, but it's expressed in g-code in linear distance (mm of filament), hence the importance of getting E steps reasonably accurate in firmware. Ultimately, though, the extrusion rate changes and the user must tweak settings to produce a good print.
过度挤出是挤出过多长丝的情况。它表现为凹凸不平的垂直边、球状打印件以及由于间隙不足而在打印件顶部磨削的喷嘴。评估轻微过度挤压的一种快速方法是用手指摩擦印刷品顶部的固体填充层,并注意其光滑程度。如果它有鲨鱼皮般的感觉(在一个方向上较粗糙),则挤压率太高。如果它是光滑的,那么挤出速率恰到好处或太低。
挤出下是相反的情况——挤出的长丝太少。它表现为印刷品内部长时间部分填充运行期间的挤出物撕裂以及固体填充层中的孔或间隙。用指尖感觉部分填充层对于诊断非常有用 - 如果感觉打印很锋利,则表明发生了撕裂。
不要根据前几层或单个固体填充层来评估挤出速率。耐心是有回报的;观察打印机并在打印过程中的各个点进行评估。
造成挤出不足的原因不仅仅是不正确的设置:可能有东西堵塞喷嘴,或者温度可能太低而无法充分熔化灯丝。在这种情况下,挤出机驱动器将无法按照指示的速度推动细丝通过喷嘴。这是很明显的,因为挤出机中的细丝跳跃会发出咔嗒声,或者在更严重的情况下会发出研磨噪音。当将两个手指放在挤出机进料处的长丝上时,长丝是否移动也很明显。