Sanctuary sink to toilet greywater system

Cal Poly Humboldt's Engineering 215 Introduction to Design, introduces the Toilet to Sink Greywater System created by Team Greenlight at the Sanctuary in Arcata, California.
The Santuary in Arcata proposed a design that would recycle greywater in order to reduce freshwater from being flushed down the toilet. Team Greenlight's objective is to design an aesthetically pleasing Sink to Toilet Greywater System that will effectively reuse the water used to wash one's hands by directing it into the toilet bowl. Fresh water is redirected from the toilet tank to the sink to use for hand washing, this reduces the total water output used in the restroom. The greywater that flows down the sink drain after hand washing, flows to the toilet bowl used for flushing waste down the toilet to the sewer. The sink and toilet are placed next to each other, making the design unique compared to the more common sink-toilet systems, where the sink replaces the lid on the back of the toilet. This toilet to sink greywater system was implemented by Team Greenlight from Cal Poly Humboldt's Engineering 215 Introduction to Design class, in Fall 2016 taught by Lonny Grafman, and through funding provided by The Sanctuary and HSU student's working on the design. The background and next steps will also be discussed on this page.
Background[edit | edit source]
The toilet to sink greywater system is a system implemented by Team Greenlight in Fall 2016 in the men's bathroom for their client, the Sanctuary located in Arcata, California. Team Greenlight includes Chris Alvaro, Jocelyn Barber, Margaret Koval, and Gilbert Ordaz. The Sanctuary is a non-profit organization that promotes green technology, art, community involvement and sustainable living by the reuse of every day resources and items. The Sanctuary's objective was to remodel a bathroom that would reduce freshwater usage while at the same time inspiring the user to continue reducing their own personal freshwater usage outside of the Sanctuary.
Problem statement and criteria[edit | edit source]
The Sanctuary wanted to improve the previous bathroom by reducing freshwater usage and at the same time inspire the users to reduce freshwater usage outside the restroom.
Criteria[edit | edit source]
The criteria listed below in table 1 includes constraints for the final design criteria. This helped in deciding solutions for the design by eliminating the ones that didn't fit the criteria.
| Criteria | Constraints in order of importance |
|---|---|
| Safety | The design must work without posing any safety hazards to the user |
| Inspiration | The design must inspire users to reduce clean water usage through the use of signage and art. |
| Cost | The team's maximum budget for the project is $100 |
| Environmental Impact | The new toilet and design should cause a reduction in the water bill. |
| Ease of Access | The design must be operable by the average nine-year-old child which is the minimum age group the client expects to have. |
| Aesthetics | The design must look better than the previously existing toilet. |
| Ease of Plumbing Maintenance | Any clogs or leakages in the design must be repairable by the average person with limited plumbing knowledge in less than 20 minutes per year. |
Description of final project[edit | edit source]
-
Figure 1: Design before stall wall is removed
-
Figure 2: Full design view with visible PVC pipes
-
Figure 3: polyvinyl chloride (PVC) piping
-
Figure 4: Vinyl tubing attached to Overflow fill tube in the toilet tank
-
Figure 5: Vinyl tubing attached to sinks water supply
-
Figure 6: Sink to toilet water flow diagram
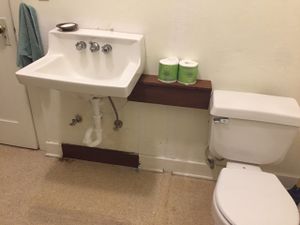
Figure 1 shows what the restroom looked like before the remodeling process began. The toilet to sink greywater system shown in figure 2 was designed to save the amount of water used when washing your hands after using the restroom. The design uses polyvinyl chloride (PVC) piping, shown in figure 2 and figure 3, to reroute the water's drainage onto the overflow tube so that the used soapy water flows directly into the toilet bowl. The design works by attaching the toilet tank's overflow fill tube shown in figure 4 with the sink's hot water supply line using vinyl tubing shown in figure 5. The sink's water runs approximately 40 seconds when the toilet is flushed giving double the amount of time than the recommended 20 seconds according to the Centers for Disease Control and Prevention (CDC). What makes this unique to the standard toilet to sink combinations is that the sink and toilet are placed like any ordinary bathroom would have them rather than replacing the top of the tank with a sink.
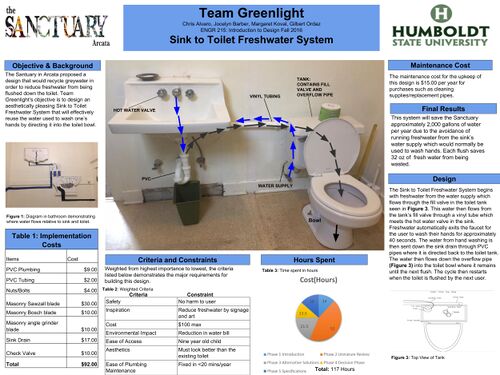
Poster[edit | edit source]
Below is the final poster that team greenlight created
How to use[edit | edit source]
The sink to toilet design begins on the initial flushing of the toilet. Like any toilet, the flapper is lifted and the water travels through the flush valve and into the toilet bowl. In any ordinary flush, the overflow inlet tube is placed directly above the overflow tube but because it is redirected the sink's water faucet, the freshwater is used to wash your hands for 40 seconds . Finally, the water travels through the PVC pipes which flows directly into the overflow tube, ending with a toilet bowl filled with grey water from hand washing. The video below shows how the design works.
Costs[edit | edit source]
The tools and materials used for the whole design is shown in Table 2.
| Quantity | Material | Location | Full Price ($) |
|---|---|---|---|
| 5 | PVC Plumbing | Ace Hardware | 9.90 |
| 1 | PVC Tubing | Ace Hardware | 2.00 |
| 1 | Nuts/Bolts | ACE Hardware | 4.00 |
| 1 | Masonry Sawzall blade | ACE Hardware | 30.00 |
| 1 | Masonry Bosch blade | ACE Hardware | 10.00 |
| 1 | Masonry angle grinder blade | ACE Hardware | 10.00 |
| 1 | Sink Drain | ACE Hardware | 17.00 |
| 1 | Angle Grinder | Donated from Sanctuary | 0.00 |
| 1 | Hack Saw | Donated from Sanctuary | 0.00 |
| 1 | Miscellaneous Tools | Donated from Sanctuary | 0.00 |
| Total Cost | $82.60 | ||
How to build[edit | edit source]
First, shut off the water supply valves to the sink and toilet located underneath the appliances and attached to the wall. Next replace the fill tube leading to the overflow pipe located in the tank of the toilet with a vinyl tubing. This vinyl tubing is to be connected under the sink where the hot water line would normally be connected. Some clamps may be necessary to ensure the tubing is watertight. Once this is accomplished, part of the toilet's fresh water should now flow through the sink when the toilet is flushed, meanwhile, the main fill valve fills the toilet tank as any toilet would. Finally, to reuse the water dispersed from the sink's faucet, the water flows down the sink drain to a series of PVC pipes. The pipes are arranged with a sufficient drop to allow the water to flow back towards the toilet tank and into the overflow tube as originally designed and end up in the toilet bowl from the rim holes.
Building the Sink to Toilet
Turn off the toilet and sinks' water supply and test the water to ensure the water is no longer flowing. Next replace the overflow fill tube with a vinyl tubing that connects from the toilet onto the sinks water supply and use clamps to make it watertight. Not pictured is a new modification where a check valve was installed in place of the sink's hot water supply that connected the vinyl tube to the sink from the fill valve. This check valve prevents back flow of water into the fill valve when the cold water knob is turned on in the sink.
-
Water supply
-
vinyl tubing replacing the toilet tanks overflow fill tube.
-
vinyl tubing attached to sink water supply
Using an angle grinder donated by the sanctuary, a square cutting is made in the back of the toilet tank. Safety masks are worn to avoid damaging the lungs from grinding the porcelain with the masonry saw blade. The square cutting is measured just enough so that the PVC piping fits without having a lifted toilet tank lid.
-
Grinding the toilet tank outside
-
The finished square cutting
The next step is to rearrange the sink's drainage pipes, in this case PVC, in order to direct the sink waters' flow onto the overflow tube located in the toilet tank. This allows the used soapy grey water to flow directly into the toilet bowl.
-
PVC pipes rearranged
-
PVC pipe in toilet tank's overflow tube with drain catch
Finally, the aesthetics of the design may be applied. In this case, a mural of Humboldt bay and the local rivers are painted. Plywood is then primed, cut out, and painted to depict and give visual on how the design works.
-
Close up of mural
-
Entire mural
-
Toilet and sink depictions of the design.
Maintenance[edit | edit source]
The design will require maintenance like any other household appliance. In order to maintain this design any clogs or harmful chemicals must be accounted for. To prevent clogs and hazardous chemicals from going down the drain, signs are hanging on the wall that say not to pour down any hazardous chemicals through the sink. Furthermore, there are two drain catches in case someone pours down food or large particles that could potentially clog the pipes. Cleaning products such as vinegar should be poured down the sink drain every week to prevent any cavities from building up inside the PVC piping. The drain catches should be cleaned out weekly. Finally, if a leak were to occur, the PVC pipes may easily be removed if there should ever be a clog and can either be cleaned or replaced at a relatively low price usually around $15.00.
Maintenance schedule[edit | edit source]
- Daily
- Must make sure that no harmful chemicals are poured down the sink and that the water knob is turned on at all times
- Weekly
- In order to prevent any clogging or bacteria build-up, vinegar is poured down every week to clean out any cavity formation in the PVC piping
- Yearly
- Buy cleaning supplies and possible snake to declog pipes.
- Every 5 years
- Replace the signage and art on the walls as paints may be fading at this time
Troubleshooting[edit | edit source]
This is only how to troubleshoot basic operation. For complex issues, research common restroom plumbing solutions online.
| Problem | Suggestion |
|---|---|
| Water doesn't flow through the overflow tube | Check to see if the PVC pipes have any clogs. |
| Water doesn't run when flushed | Ensure that the water handle is turned on. |
| Leaking pipes | Replace pipes or make sure that the pipes are properly connected and sealed. |
Final Solution[edit | edit source]
The toilet to sink greywater system is a circular system as the fresh water flows from the toilet to the sink, and then greywater flows from the sink to the toilet. The start of this circular system is implemented by flushing the toilet. The flush lifts the flapper, draining the tank water into the toilet bowl. The water supply line from the wall to the toilet, which is Arcata's city water, then fills the fill valve located in the toilet tank. The fill valve then sends water to the inlet tube, where it then flows into the PVC vinyl tube, into the check valve connection, and out of the faucet. The water from the faucet then flows down the sink drain into the PVC pipe. The water flows through the PVC pipe and out of the hooked pipe connection into the overflow tube. The water flows through the overflow tube and through the rim holes on the toilet bowl. The water then flows out of the rim holes into the toilet bowl where it will stay for the next person to use with the next flush.
There will always be grey water in the toilet bowl, while freshwater stays in the back of the toilet tank. The tank water is filled with the city water through the water supply line from the wall. The tank consistently has the clean city water in the back of the tank. The sink will consistently get the clean city water either through the inlet valve, which comes from the tank's water supply, or the hot water supply line that is connected to the sink. The toilet bowl is always going to have greywater in it which comes from the water that flowed out of the sink drain into the overflow tube. When the toilet is flushed, the greywater in the toilet bowl goes down the toilet drain into the sewer with the human waste. The toilet tank's water also is rinsing the toilet bowl during the flush as that water goes down the flapper drain in the back of the tank, out into the bowl through the rim holes, and down the toilet drain to the sewer. When the flapper closes again and the city water refills in the back of the toilet tank as the float ball rises with the city water, the greywater from the overflow tube then flows back into the bowl to remain there until the next person uses it.
Documentation[edit | edit source]

Testing Results[edit | edit source]
The results shows users had trouble understanding the system initially. The testing proved there had to be signage and other adjustments to explain how the design worked and make the use of it simpler. The problem was users would shut off the hot water valve which cut off the flow of water to the toilet bowl defeating the purpose of the design. To fix this the hot water valve was purposely stuck in the on position so it was not able to be turned off and signage was placed above the sink to inform the user. Also, many people did not understand how a toilet works when flushed. Therefore cutouts of a sink and toilet, shown in the how to build section, were made to help users better understand the process of how the water flows due to painted water flows in and out of the toilet and sink.
After the hot water valve was permanently sealed in the on position and the murals and signs were implemented people were liking the design. Initially, the pipes from the toilet to the sink were distracting for the user. A shelf was implemented to hide the pipes and that also left people liking the design for what it is. Hiding the pipes proved to be the better decision as more people did not feel as disgusted when washing their hands. Also with the mural displaying how clean water coming from the Mad River is supplying the clean hand-washing water, people felt more inclined to wash their hands with the installed system.
A final concern from the users was how to reduce clogs to the toilet if a person did pour a larger material or food down the drain. This problem was addressed by putting drain catches in the sink drain, and the overflow tube. If something was to get past the sink drain catch, the secondary catch in the overflow tube would prevent the toilet system itself from getting a clog within the rim holes of the drain.
Discussion and next steps[edit | edit source]
The success of this design can lead to more options for the Sanctuary. The Sanctuary can experiment with letting the toilet tank fill with greywater as well as the bowl.
The next step would be to use the same implementation for the women's bathroom.
Update September 2019[edit | edit source]
This sink to toilet greywater system is still operating at The Sanctuary. Though there are still some aspects of the system that may seem confusing to the user, there are three different signs that may help explain how to properly use the sink and toilet. A problem that was noted in our follow up with Katie Belknap was that users would turn the sink on after the flush and keep it running while trying to find help.. A mural on the wall of the bathroom helps users attain an understanding of how the system functions. In addition, a mesh screen was added to the sink in order to keep debris from clogging the system and ensuring maintenance is kept to a minimum. Also, because this is a greywater system, occasionally there is a slight stench emanating from the toilet but a quick and easy cleaning would eliminate the odor. All in all the project seemed to be successful in limiting freshwater use.
-
A friendly reminder, sink only for washing hands
-
An educational experience
-
Hot water valve permanently sealed
-
Water flows into the sink when the toilet is flushed
-
Some decorations that were added + air freshener
References[edit | edit source]
- "Centers for Disease Control and Prevention." (2015). Centers for Disease Control and Prevention, Centers for Disease Control and Prevention, <http://www.cdc.gov/handwashing/show-me-the-science-handwashing.html> (Dec. 8, 2016).
- Klee, E., A., and C. (2014). "CCAT Wash n Flush ." Appropedia , Appropedia, <https://www.appropedia.org/ccat_wash_n_flush> (Sep. 28, 2016).
- Knight, L. (n.d.). "2.972 How A Toilet Works." 2.972 How A Toilet Works, <http://web.mit.edu/2.972/www/reports/toilet/toilet.html> (Sep. 28, 2016).
- "Refinish a Sink ." (2013). Do-It-Yourself , diyhomerepair.info , <http://diyhomerepair.info/bathrooms-kitchens/sink-refinishing.htm> (Sep. 28, 2016)


