Practivistas Chiapas rainwater catchment

Directing and capturing rainwater is an ancient science that is still in practice today. In regions where water is scarce during a few or all seasons, maximizing the collection and storage of rainwater is useful.[1] Rainwater catchment systems can replace or supplement municipal water sources which can be expensive, unsafe and/or unreliable. Our group was contacted by Otros Mundos, a local sustainability organization, to design and build three different water collection systems in Chiapas, Mexico. The first location is an appropriate technology demonstration house in San Cristobal de las Casas, the other two systems are in a rural indigenous community.
Background[edit | edit source]
In the mountainous region of Chiapas, Mexico, the rainy season normally starts around May or early June and continues until late fall.This is opportune for our group as we have had many torrential downpours to test our systems. From late fall to late spring the municipal water is sporadic, and sometimes rationed; for many locals that rely on city provided water, this can be a hard season. For the indigenous community, water is obtained from a local stream. There are at least three months when water is scarce making it extremely difficult for them to obtain water. One of our rain water catchment systems will only be for pig drinking water, gardening water, and washing dishes at the demonstration house and the other is for cooking and cleaning, and possibly potable water in the indigenous community.
Contributors[edit | edit source]
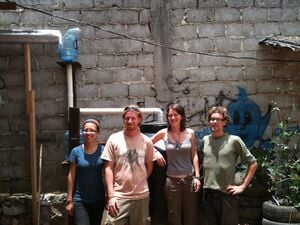
Team BGRZ is made up of four Cal Poly Humboldt students and alumni: Brianna Diaz, Gabriela Pecina Escobar, Robert Duncan and Zach Estela. Brianna is an Art Education/Spanish major. Gabriela is a Spanish Education major. Robert has graduated with a B.S. in NRPI (Natural Resources Planning Interpretation). Zach has graduated with a B.S. in Environmental Science - Appropriate Technology and Climate Change. Project partners are as follows:
- Otros Mundos
- Juan Hidalgo, earthen builder and owner of an appropriate technology demonstration house in San Cristobal
- Indigenous community members
Building Locations[edit | edit source]
- Juan Hidalgo's Demonstration House in San Cristóbal de las Casas, Mexico
- Indigenous community in Rural Chiapas
Criteria[edit | edit source]
Weighted Table[edit | edit source]
This table defines and weights the criteria used to evaluate a successful project.
| Criteria | Weight | Constraints |
|---|---|---|
| Culturally Appropriate Design | 9 | Community acceptance, as indicated by communication |
| Educational ability | 6 | An Appropedia page where internet is available, also building together with clients and discussing maintenance needs |
| Level of material locality | 6 | Local access to project materials |
| Maintainability | 8 | Ease of maintenance |
| Size and location | 6 | Use appropriate, tank must be out of the way |
| Cost | 10 | Affordable for the client |
| Durability of material | 7 | Last several years with maintenance |
| Life Use of rainwater catchment system | 6 | At least 30 years of use |
| Reduces erosion | 5 | Erosion reduction |
| Local labor and Local skills | 9 | Project repeatability with local skills and labor |
| Improves Health | 9 | Water quality and therefore overall health benefits |
| Appropriateness | 8 | Appropriate technology ethos, must have local/reused materials when possible |
| Modular Design | 7 | Incorporation of modular design principles, i.e. interchangeable parts |
| Construction time | 9 | Four weeks |
| Replenishment | 9 | Sized to be replenished year round by average rains |
Literature Review[edit | edit source]
Rainwater catchment systems in general have many varieties in construction. Each catchment system installed in Chiapas will have variations in design because each site has specific needs and different sized spaces for the tanks and catchment systems. In this section, we will be discussing rainwater quality, filtering systems that include the first flush, materials used/needed, and system design.
Reasons For Contamination[edit | edit source]
Four main reasons for rainwater contamination are as follows:
- Polluted while passing through atmosphere
- Filth collected during dry season
- Dirty roof, e.g. animal or bird droppings
- Pollution through collection unit[2]
Materials[edit | edit source]
Toxicity[edit | edit source]
- Pvc can be carcinogenic, Greenpeace Recommends Polyethylene (PE) or Polypropylene (PP) as a safer alternative.[3]
- Zinc oxide, from corrosion of Galvanized corrugated roofing material has a reportedly low toxicity and is considered a 'nuisance particle, unless in vapor form.'
- Furthermore - If the roofs themselves are made of galvanized steel, a gutter made of the same materials is not a significant increase in surface area.
- The Journal of Water Research states "The average zinc concentrations in the run-off from the galvanized-iron roof was about 5-fold higher compared to the tile roof, indicating leaching action but was well below the WHO limits for drinking water quality."[4]
Tank Types, Filter Materials, Availability in San Cristobal[edit | edit source]
- At the demonstration house in San Cristóbal an 1100L tank, unused and located onsite, is employed.
- A mesh screen attached at a 60º angle and a first flush system are the filtration methods used as the water will be mainly used to water a garden and for cleaning pigs
- The indigenous community near Acteal plans to build and install 2 ferro-cement 20,000L tanks
- This system uses both the screen and first flush filtration methods. It also uses a sand filter[5] for extra filtration when the water will be used for cooking and drinking. This filter will be detached from the rest of the rainwater catchment system so that it is only used when necessary, thus reducing maintenance requirements [verification needed].
System Design[edit | edit source]
There are many designs for rainwater catchment systems. The designs vary because of several factors:
- Roof type, shape and size
- Tank type, shape and size
- Purpose of water, ex: garden or drinking?
- Materials used (budget)
- Space to put tank
- Where is tank in relation to roof
- safety: Will there be kids around? Animals? Is it in a walkway?
=== Making Rainwater Safe to Drink ===[6]
Rainwater must be kept free of contamination to be safe to drink. To support that water you collect will be safe:
- Clean the tank, entrance pipe, and roof gutters before the rainy season.
- Allow the first rains of each year to run through the tank to clean it.
- Connect a water filter to the tank (slow sand filter is a simple way to do this).
- Porous beds are part of sand-gravel filters used to clean rainwater. This article has a great photo of a porous bed.
- Animated video http://www.youtube.com/watch?v=YaOOmaGzx0g

- First flush systems are very simple filtration systems to get out larger debris before the sand filter. This helps to keep maintenance to a minimum.
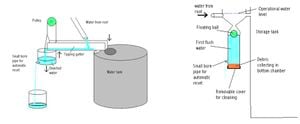
- The tipping gutter system works by filling up a bucket with dirty water, when bucket weighs enough it will change the direction of the gutter to fill up the storage tank.
- The floating ball technique functions by having the contaminated water fill up a pipe that has a ball in it. The ball floats to the top as the pipe is fill and eventually seals the pipe so the clean water is diverted to the water harvesting tank.[7]
Climate Data for San Cristóbal[edit | edit source]
==== Precipitation Data for San Cristóbal ====[8][9]
- According to Rainwater Harvesting Industries, one mm of rain roughly equates to one liter for every square meter of roof surface.
- Very Concise E-Book called Design for Water : Rainwater Harvesting, Stormwater Catchment, and Alternate Water Reuse Written by: Kinkade-Levario, Heather Published by: New Society Publishers,Call number: Limited TD353 --.K56 2007eb NOTE: must be logged in to HSU library to view this book.
Rainfall Data for Mexico[edit | edit source]

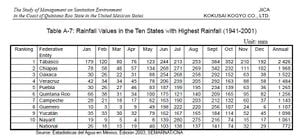
This table shows rainfall data for the 10 rainiest states of Mexico in millimeters both by monthly averages and yearly totals
Temperature Data[edit | edit source]

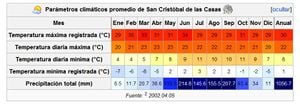
This table shows monthly temperature and rainfall data for San Cristóbal, as well as annual averages and totals
Equations[edit | edit source]
See Basic rainwater collection calculations for relevant rainwater collections equations and a rainwater calculation spreadsheet.
Project Installation[edit | edit source]
Juan Hidalgo's demonstration house[edit | edit source]
Day 1-2:
-
Fig. 1: Tank area before hole was dug
-
Fig. 2: Zach digging the hole
-
Fig. 3: Robert and Zach working hard
-
Fig. 4: Shovel in the hole
-
Fig. 5: Robert tamping dirt
-
Fig. 6: Bri tamping costals
-
Fig. 7: Zach and Juanito checking the level of the tamped area for tank
-
Fig. 8: Gabby and Brianna making a poster for the community
Day 3:
-
Fig. 1b Gabby digging holes for beams
-
Fig. 2b: Brianna and Zach filling holes with sand to secure the wood beams in place
-
Fig. 3b: Zack and Robert nailing the gutter to the wood beams
-
Fig.4b: Cutting PVC to length
Day 4:
-
Fig. 1c: Robert drilling hole for mesh bottle
-
Fig. 2c: The bottle fits!
-
Fig. 3c: Bri hammering brace together
-
Fig. 4c: Hammering brace to wall
Day 5:
-
Fig. 1d: Robert hammering, happy helper painting motor oil on wood, Zach checking level of pipe
-
Fig. 2d: Robert cleaning the tank
-
Fig. 3d: Bri sealing water bottle with caulk
-
Fig. 4d: First flush system all set up
-
Fig. 5d: After we cut down the first system
-
Fig. 6d: Cut down piece
-
Fig. 7d: New first flush
-
Fig. 8d: Flap to divert water
-
Fid. 9d: Connect to rest of system
-
Fig. 10d: System 2 completed
Our steps of installation:
- Dug through the meter or so of saw dust that was covering the ground to reach solid earth. We needed a solid foundation for the ton or so of water that would eventually fill the tank.
- Filled the hole with Costales (sacks) of dirt and tamped them down to create a strong and level foundation. Using a level, we added dirt and sand on top of the sacks to ensure that it was even.
- Moved the 1100 liter Rotoplas tank to its location and put palate underneath to boost it up a few inches. This ensures easier access to the drain spout for future users.
- Set up gutter system. This involved digging holes for wood support beams, cutting the wood to length, installing the three beams, filling the holes with sand and tamping firmly.
- Next came cutting the galvanized corrugated roofing metal (known in mexico as lamina) with an angle grinder with cut-off wheel, bending the lamina intocutting and wrapping wire to the gutter to hold the shape, attaching the gutter to the roof and beams using nails and wire
- Made a table for the first flush system to support its weight when it is full of water.
- Constructed a platform for the mesh wrapped bucket to sit on and hammering holes in the bucket so we could secure the mesh screen to it
- Realized the first flush system was too high so we lowered it about 10 inches
- Patched some holes in a gutter (we had used a scrap piece of galvanized sheet metal which had holes)
- Cut PVC to length and attached together
- Cleaned tank and cut hole in the lid so that a 3" PVC pipe could fit in
- Connected the tank to the rest of the system
- Conducted a test we found out we had some leaks so we sealed the leaks with silicon caulk
- Conducted more testing and realized the water bottle would not seal to the PVC so we tore down that system and created a new one
Steps of re-installation:
- Measure from water bottle to one foot above ground
- Cut pipe
- Put together first flush system
- Connected first flush to mesh screen filter
- Tested before connected to rest of system and discovered water going to both first flush and tank
- Created flap to divert water
- Connected rest of system to tank
- Tested successfully
Testing: Demo House[edit | edit source]
Test 1: Checking the position of the mesh covered bucket
Test 2: Checking the system to see how it works
Test 1: New design:
Systems at Community[edit | edit source]
System #1
-
Fig. 1e: Cutting the metal for the gutters
-
Fig. 2e: Unshaped gutters
-
Fig. 3e: Zach and Robert shaping gutters
-
Fig. 4e: Gabby and Bri prepping gutters for wiring
-
Fig. 5e: Bri prepping bucket for mesh
-
Fig. 6e: Completed mesh
-
Fig. 7e: Wood supports for gutters
-
Fig. 8e: Robert attaching first gutter
-
Fig. 9e: Attached gutters
-
Fig. 10e: View of gutters
-
Fig. 11e: Testing gutters
-
Fig. 12e: Gutters fail test
-
Fig. 13e: Zach adjusting gutters
-
Fig. 14e: Gutters pass second test
System #2
-
Fig. 1f: Zach recylcing wood for the supports
-
Fig. 2f: Wood supports
-
Fig. 3f: Shaped & wired gutters
-
Fig. 4f: Testing Side A of roof
-
Fig. 5f: Side B of roof
-
Fig. 6f: Gutters, side B
-
Fig. 7f: The PVC tubing that connects the two gutters and feeds underground to the first flush and tank
-
Fig. 8f: Carrie and Max mounting the bucket filters
-
Fig. 9f: Carrie Schaden burying the tank bound pipe to allow a footpath
-
Fig. 10f: 19,000 liter ferrocement tank being constructed.
-
Fig. 11f: 19,000 liter ferrocement tank filled with water.
References[edit | edit source]
- ↑ Rainwater Harvesting Journal
- ↑ rainwater quality
- ↑ PVC water pipe safety
- ↑ zinc in run-off
- ↑ sand filter
- ↑ A Community Guide to Environmental Health by Jeff Conant & Pam Fadem
- ↑ tipping gutter and floating ball
- ↑ http://web.archive.org/web/20130525103852/http://www.austinenergy.com/energy%20efficiency/programs/Green%20Building/Sourcebook/rainwaterHarvesting.htm
- ↑ floating ball system demo


