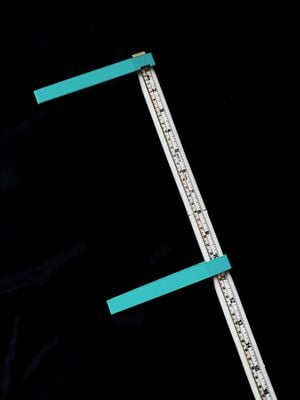
OSAT project - Infantometer

Proper growth of infants and young children is paramount to the development of well-functioning adults. Hospitals in developing countries lack the funding for all proper medical instruments and equipment - one-third of of these hospitals even lack the access to running water.[1] Infantometers can be used to measure the height of infants and small children to gauge the physical growth during the early stages of life. Although infantometers are composed of only several parts, they can be quite costly. This page will discuss how to produce a cost-effective infantometer through access to 3-D printing and minimal external materials.
Bill of Materials[edit | edit source]
- PLA filament was used for all 3-D printed parts
- All STL and FreeCAD files for the 3-D printed parts can be found on Youmagine
- Five slider segments (3-D printed part)
- Cost: $0.40 each (20g of PLA filament at $20.00/kg)
- Top caliper (3-D printed part)
- Cost: $0.36 (18g of PLA filament at $20.00/kg)
- Bottom caliper (3-D printed part)
- Cost: $0.32 (16g of PLA filament at $20.00/kg)
- Measuring tape for sewing applications
- Cost: $3.89
- A meterstick could be used as well. However, this would prevent the instrument from be compact when broken into its parts. The slot sizes on the top and bottom calipers would also need to be resized to the cross-section of the meterstick.
Tools needed[edit | edit source]
- MOST Delta RepRap or similar RepRap 3-D printer
- Tool for removing support material from slider segments. Examples of this may be a small screwdriver or hobby knife.
- Superglue can be used to permanently fix segments together if desired.
Skills and knowledge needed[edit | edit source]
- The ability to operate a 3-D printer is needed to fabricate this instrument.
Technical Specifications and Assembly Instructions[edit | edit source]
Print Instructions[edit | edit source]
For all printed components:
Material: PLA
Layer Height: 0.2mm
Shell Thickness: 1mm
Fill Density: 15%
Print Speed: 70 mm/s
Printing Temperature: 210 C
- Print time estimate: 11 hrs
- Slider segments: 1.5 hrs each
- Top/bottom caliper: 1.75 hrs each
Assembly Instructions[edit | edit source]
- 3-D print five slider segments with support material enabled.
- 3-D print top/bottom calipers (no support necessary).
- Remove support material from pockets and bottom side of slider segments with small screwdriver or hobby knife. Clean up parts with sanding/filing if needed.
- Attach slider segments together (see Figure 1).
- Slide measuring taper into slot along the top of the slider assembly (see Figures 2 and 3).
- Place top caliper at the top of the slider assembly (see Figure 4).
- Place bottom caliper at the bottom of the assembly (see Figure 5).
- Assembly time estimate: 12 min
- Removing support material: 10 min
- Actual assembly: 2 min
- Assembly of Infantometer
-
Figure 1. Slider segment assembly
-
Figure 2. Measuring tape in slider segment
-
Figure 3. Alt. view of measuring tape in slider segment
-
Figure 4. Top caliper joined with slider assembly
-
Figure 5. Bottom caliper on slider assembly
Common Problems and Solutions[edit | edit source]
- Verify that all support material is cleaned out of pockets slider segments before assembly.
- Verify that the width of your measuring tape is complimentary with the width of the slider segment slots before printing.
Cost savings[edit | edit source]
- Five slider segments, $0.40 each (20g of PLA filament at $20.00/kg)
- Top caliper, $0.36 (18g of PLA filament at $20.00/kg)
- Bottom caliper, $0.32 (16g of PLA filament at $20.00/kg)
- Measuring tape for sewing applications, $3.89
- Total cost: $6.57
- Commercial equivalent product: $214.95
- Cost savings: $208.38 (96.94% reduction)
Benefited Internet Communities[edit | edit source]
- These internet communities could benefit from this instrument:
References[edit | edit source]
- ↑ "Study: One-Third of Hospitals in Developing World Lack Running Water," John Hopkins (2016) Available: https://www.jhsph.edu/news/news-releases/2016/study-one-third-of-hospitals-in-developing-world-lack-running-water.html


