Nine station water filtration with an IBC

The following system, named Boriken Watta, was created in response to Hurricane Maria in Puerto Rico for the Institute for Socio-Ecological Research (ISER - https://www.facebook.com/isercaribe/). The goal was to create a system that provided nine stations of clean drinking water for residents to fill up 5 gallons at a time.
This locally made from off the shelf parts system needed to match or beat some combination of the metrics of a specific imported product that filtered batches of 250 gallons in 2 hours, able to filter at least 2000 gallons in a day, for about $7000 USD. This system beat all of those metrics at a cost of approximately $800 USD.
ISER was able to purchase and build four of these units for deployment after Hurricane Maria. It is being shared here so others can iterate on the design primarily for use in natural disaster responses.
Parts[edit | edit source]
| Boriken Watta Parts List | ||
| Component | Purpose | qty |
|---|---|---|
| IBC Tote | Main Storage | 1 |
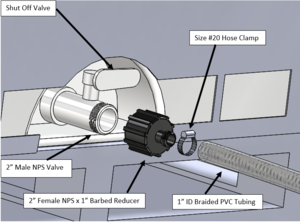
| 2" NPS X 1" Hose Barb | Reduce 2” IBC outlet size to 1” | 1 |
| 1" ID Food Grade Tubing (≤6 ft section) | Short section for further reduction of IBC | 1 |
| 1" to 1/2" Barbed reducer | Reducing the 1” to ½” for the main part of system | 1 |
| 1/2" ID Silicone Tubing (≤6 ft sections) | All three main arms and feeder to the Cross Fitting | 10 |
| 1/2" Cross Fitting | Takes the reduced IBC input and splits to three arms | 1 |
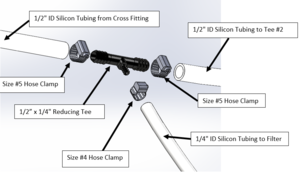
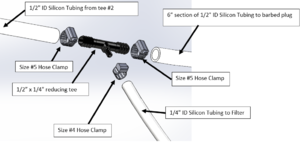
| 1/2"-1/4" Reducing Tee | Takes each ½” arm down to ¼” for the filter lines | 9 |
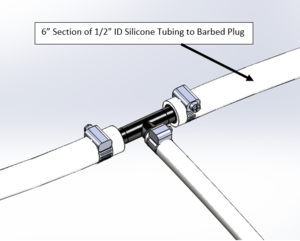
| 1/2" ID Silicone Tubing (6 inches) | Tubing for the end caps on each arm. | 3 |
| 1/4" ID Silicone Tubing (≤6 ft sections) | The filter lines. Tubes from Sawyer may be enough. | 9 |
| Barbed Plug | End caps for each of the three arms. | 3 |
| Tubing Clamps | To turn on and off the filter lines. | 9 |
| 1/4" ID hose clamps (sz 4) (1/4” ~ 5/8”) | Water tight affixing of the 1/4” ID tubing. | 18 |
| 1/2" ID hose clamps (sz 5) (3/8” ~ 3/4”) | Water tight affixing of the 1/2” ID tubing. | 26 |
| 1" ID hose clamps (sz 20) (3/4” ~ 1-3/4”) | Water tight affixing of the 1” ID tubing. | 2 |
| Sawyer ZeroPoint Two Filter | Effective filtering of the virus, bacteria, and cysts. | 9 |
Instructions[edit | edit source]
This system relies on off the shelf components primarily consisting of Sawyer filters, silicone tubing, clamps, and an Intermediate Bulk Container.

In use[edit | edit source]
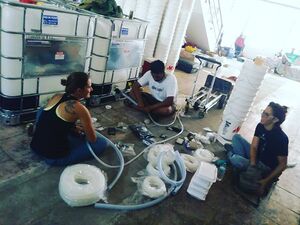
Here is a photo from assembling the #WattaBoricua system at #TallerLibertá #isercaribe by ISER https://www.facebook.com/isercaribe/.
