Instructions to Build your Model
Building your model is a way to reinforce your anatomical knowledge and basic surgical skills. In this section, you will find a list of materials, modules on basic surgical skills, and a step-by-step guide to building your model. There are a series of videos to help you visualize the task before you perform it.
Necessary Materials[edit | edit source]
- Plastic container - 10 cm X 10 cm X 20 cm
- Vinyl fabric - 12 cm X 22 cm
- 1 cm thick polyester batting - 12 cm X 22 cm
- 0.5 cm thick polyester batting - 12 cm X 22 cm
- Cotton fabric - 12 cm X 22 cm
- Cotton batting (ideally 80% cotton, 20% polyester) - 24 cm X 22 cm
- Food-grade plastic wrap - 36 cm X 22 cm
- 3.2 cm binder clip - 6 pieces
- Red marker
- Dark marker
- Suture material
- Procedure glove
- Stocking
- Yarn
- Cotton stuffing
- Tie from a surgical mask
Necessary Equipment[edit | edit source]
- Scissors
- Needle driver
- Haemostat

Anterior Abdominal Wall Procedure[edit | edit source]
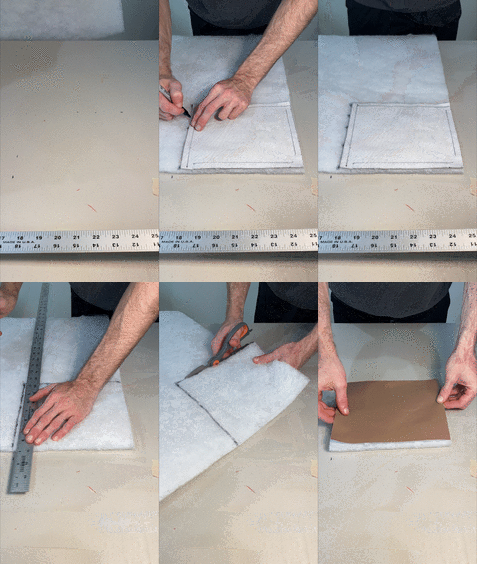
We will start creating the anterior abdominal wall from the external surface (skin). The steps will be very repetitive. At the end of this procedure, you will complete 4 interrupted sutures on the 4 corners. You will record the suturing and instrument tying using your camera stand and the appropriate set up. Cut the vinyl such that it is 1 cm larger than the top of your plastic container on all four sides
- Now, using the vinyl cut out as a template, measure and cut the remaining layers:
- The thicker polyester batting (1 cm)
- The thinner polyester batting
- The cotton fabric
- The cotton batting X2
- Now, you will draw on the striations your 2 muscle layers
- Now it is time to assemble the layers of your model in the correct order
- Place the vinyl (skin), colored side down
- Then place the thicker polyester batting (subcutaneous fat)
- Then cut a piece of plastic wrap and place it next. Place the cut piece of plastic wrap next. This layer will be larger than your others and you will trim it at the end
- Then place another layer of polyester batting (fatty tissue). This will be the thinner, 0.5 cm layer.
- Then place the cotton fabric (fascia)
- Then place both layers of cotton batting (muscle)
- First place the layer with the diagonal lines pointing upwards and to the left - place it facedown
- Then place the layer with the diagonal lines pointing downwards and to the left as the next layer - also facedown
- Last, cut two more layers of plastic wrap and place them as the next layer. Remember, you will trim the plastic layers at the end (peritoneum)
- Reassess your layers to ensure they are all in the correct order
- Place a binder clip on each side to hold the layers in place
- In each corner, place one simple interrupted stitch using whatever suture material you have
- Using the camera stand and your phone, record your simple interrupted sutures and instrument knot tying.
- Trim the excess plastic wrap from all the layers
Appendix-Cecum-Terminal Ileum Complex[edit | edit source]
We will start creating the intestinal portion of your model. During this step, you will practice many basic surgical skills. While practicing these skills, you can use your camera stand set up to record the skill and upload them to the cloud for objective AI feedback.
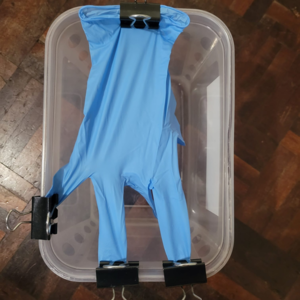
- Attach your glove longitudinally in the plastic container using four binder clips
- Use one binder clip to attach the wrist of the glove to the plastic container
- Use an additional binder clip to attach the fourth finger to the opposite end of the plastic container
- Use another binder clip to attach the fifth finger to the side end of the plastic container
- Use the last binder clip to attach the second finger to the opposite end of the plastic container

Tie off the index finger of the glove with a simple instrument tie
- Now, tie off the index finger of the glove by tying around a clamp

Suture ligate the fourth and fifth finger of the glove - Suture ligate the fourth and fifth finger of the glove
- Invert the glove such that all of your tied off fingers are on the inside
- Take a piece of cotton and thin it out to be approximately 1 cm thick and the length of the middle finger of your glove
- Using a haemostat, place the cotton inside the middle finger of the glove (do not over stuff the tip of the glove)
- Measure and cut the stocking and yarn such that it is 2 cm longer than the middle finger of the glove
- Place the yarn inside of the stocking and place a single interrupted suture at one end to suture the yarn in place
- Fold the middle finger into thirds such that you can clip the ends with a binder clip on the superior surface
- At the distal tip of the finger, begin running your suture by placing one interrupted suture to tie the edges of the finger together
- Do not cut the suture but use it to attach the stocking into the finger
- Ensure that the vessel (yarn) is on the opposite side to which you are suturing
- Throw your stitches at the most 0.5 cm apart
- As you continue stitching the stocking, tie a knot near the base of the finger where the finger meets the palm
- Do not cut the suture after you tie and just continue suturing the stocking onto the glove until there is no more stocking left
- Tie the suture with an instrument tie
- Now, take the loose end of the stocking on the palm side, and place a single interrupted suture attaching the stocking close to the junction of the thumb and palm
- On the other end of the stocking, place a stitch through the end of the stocking with the vessel and then one through the glove and instrument tie
- This will sinch the mesoappendix to a nice round end
- Stuff the glove with cotton balls
- The last step will be to attach the anterior tenia coli
- Cut the tie of the mask and cut it the length of the base of the middle finger to the proximal end of the glove
- Affix the tie to the glove longitudinally with simple interrupted stitches
Reproducibility[edit | edit source]
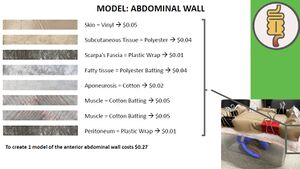
This model is self-created with materials that are globally available. The materials are affordable and available even in areas without large supermarkets. This design ensures learners from around the world can access the training model and practice the psychomotor skills.
Our target learner, general practitioner physician, has approximately $150 of disposable income per month. The reusable parts of the the model cost $2.97, which includes the plastic container and binder clips. The disposable components of the model include the cecum-appendectomy complex, which costs $0.42 per use, and the anterior abdominal wall, which costs $0.22 per two uses (or $0.11 per use). Many of these materials, such as surgical masks and scrub caps, are used daily in the hospital and can be used to build the simulation model. The surgical instruments can all be borrowed from the health facility that employs our target learners.
