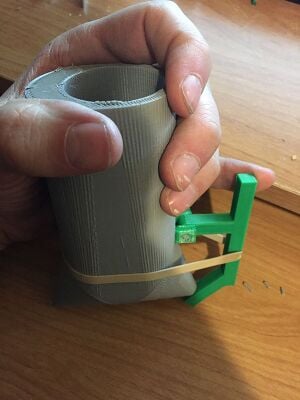
Garden Rip and Seed Tool

This project was originally intended for the developing world to aid in farming and rapid planting. In america we have our large commercial sized farm equipment that can plow, plant, seed and harvest at incredible rates. While this design comes no where close to those production levels it can aid in planting a garden by removing the need to first dig a hole and then place a seed into the hole. Now a planter can simply fill the hopper with seeds and plant a long line in a matter of seconds.
Bill of Materials[edit | edit source]
About 100 grams of any PLA Filament or similar filament
- 1 Medium size and duty rubber band. (I used an Advantage #64 3.5x.25 inch Firm Stretch)
- This can be made out of many other materials as well.
- A 3D printer is required for my methods in the link below
Tools needed[edit | edit source]
- MOST Delta RepRap or similar RepRap 3-D printer
- Soldering Iron
Skills and knowledge needed[edit | edit source]
- Ability to run a 3D printer
- Basic soldering iron safety
Technical Specifications and Assembly Instructions[edit | edit source]
I manufactured the entire product out of PLA on a Delta Bot printer and 1 rubber band. (Athena2) I printed large grey piece by itself using a raft and support everywhere. I also printed the seed control level as an individual print and then the two connection as a separate print. These I only used a skirt. These settings were all setup using the slicing software cura.
I was able to print at 120mm/s and it took about 4.5 hours to print all of the parts. It ended up with a cost of about 100 grams of filament and 2 USD.
To assembly everything I did some plastic non additive welding. To do this I used a hot soldering iron to work similar to a non filler Tig weld. I first put a small piece of filament through the two hooks and the control arm, as a pin, making sure the hooks were the right direction to fit the large bodies curvature. Then using the soldering tip I melted the two ends of the filament pin. Once this cooled I tested the lever to make sure it could rotate freely.
After this came the difficult part. I had to attach the hooks to the large part. To do this first line up the plug into the seed exit hole. Then while keeping the plug in the hole line up the hooks to be square on the large piece. Give the lever a few tries to make sure the plug can enter and leave the seed hole smoothly. Then VERY CAREFULLY using the soldering iron to run a line along the joint of the hooks and body to weld them together. I recommend doing a small dot on each first to hold it in place so you can do the longer line welds without fingers holding the part close.
Finally take your rubber band and wrap it around the handle and fit it into the grooves provided on the design.
Common Problems and Solutions[edit | edit source]
- Take extreme care when welding the hooks to the large piece. This is a critical step and can wreck the project if done wrong.
Cost savings[edit | edit source]
- This Costs about 2USD
- There were no commercial equivalents. The closest I could find was a push-able seeder that costs upwards of 100 USD.
- This is roughly a 98% savings for that