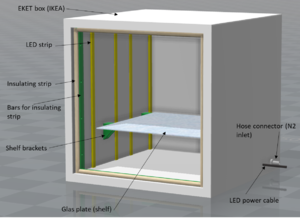
Curing box for photocrosslinkable resins

The final project of Kasper Dienel in the course ELEC-L3999: 3D Printing of Open Source Hardware for Science at Aalto University.
26.10.2017 Comment: The plans for the curing box are ready and most of the parts are printed or purchased, but the whole box is not yet put together. This is because the LED strips ordered on eBay will not arrive until in November or early December 2017.
Designer[edit | edit source]
Kasper Dienel Aalto University, Research Group of Polymer Technology
Project[edit | edit source]
This page describes how you can build a Curing box for photocrosslinkable resins. Such curing boxes are mainly used for after the curing of stereolithography builds. Research Group of Polymer Technology develops biodegradable photocross-linkable resins for SLA devices. Therefore, we can use a box like this to test the crosslinking properties of our materials. The box we have in the lab right now is too small for many of our needs and lacking a gas inlet and heating.
There are many designs on curing boxes on the web, but none of them fit all of our needs. One requirement set by our users was to be able to create an N2 atmosphere within the box. This should be possible with this box as long as the box shows to be airtight enough. Examples of other DYI curing boxes and sources of inspiration: Design 1, Design 2, Design 3, Design 4 and Design 5.
Parts[edit | edit source]
- The box
- Purchase for example a EKET Cabinet with door from IKEA.
- UV LED Flexible Strip
- Purchase 12V 5050 SMD 395-405nm UV LED Flexible Strip
- The wavelength is important and 405nm is suitable for our materials as well as most commercial resins for stereolithography devices
- Shelf brackets
- I modified this model found on Thingiverse to suit my needs, here is a link to my shelf bracket that you can be modified using eg. the parametric OpenSCAD file
- Bars for insulating strip
- To make the door airtight, bars are needed to attach the insulating weather strip on. The parametric 3D printable model I created can be found here including OpenSCAD file.
- Hose connector
- A nice Universal hose adapter can be found here. I decided to use it as it is by just scaling it down a little.
- Weather strip for sealing door and silicone sealant to seal gaps.
- Buy in local hardware store
- Glas plate as shelf
Directions[edit | edit source]
1) Choose a box suitable for your needs. For example, the one from IKEA mentioned above.
2) Print the parts you need. Note that all 3D printable models shared on this page are parametric and therefore customizable according to your needs using OpenSCAD.
3) Put together the box according to the curing box design.
4) Make sure the box is airtight by sealing the box with a silicone sealant. - a way to test is by purging with N2 for some time while having a SMALL burning candle inside the box. The candle should go out if the N2 atmosphere is good enough.
Final Prints and Parts[edit | edit source]
This far the following parts have been printed:
- 4 Shelf brackets using fused filament fabrication. An improvement idea would be to print sliding rails on which the brackets can slide so that the height can be altered easily.
- 1 Bar (printed in two parts) for insulation strips using fused filament fabrication. 3 more should still be printed. However, I am waiting for a FFF printer with a bigger build platform to be functional so that I can print the part-whole and not divided into two.
- 1 Hose connector printed using a Form1+ stereolithography because I had access to such a device. This allows for a part with better resolution.
-
Curing box with most parts
-
Curing box with one bar for insulation and shelf brackets placed
-
Printed shelf brackets
-
One printed bar (printed in two pieces) for insulation weather strip
-
Hose connector printed with SLA
Estimated Cost[edit | edit source]
The price for this DYI curing box is:
IKEA EKET box 25€
LED strip 18€
Weather strip 8€
Silicone seal 4€
Glas plate 10€
Printed parts (assuming you must buy a spool of filament) 25€
Total price:90€
For example Formlabs is selling Curing boxes for 699€ (28.10.2017).
Ideas to improve the design[edit | edit source]
Shelf bracket[edit | edit source]
Creating a vertical bar with holes on which the shelf bracket can slide on and be attached to at different heights so that the height of the shelf can be easily changed.
Hose connector[edit | edit source]
Adding a bracket with screw holes to design so that the connector is easier to attach to the box.
Heating and spinning platfrom[edit | edit source]
A plan is to also add a heating plate to the bottom of the box but we do not need that urgently. A nice addition would also be a Rotating platform


