
CCAT pond 2024

This paragraph will appear in search results and previews for this page. Write a brief introductory text with information such as a description of your project, when was it designed and built, your motivation to solve the problem, the intended users. This will explain your project to someone who has never heard of it before.
Background[edit | edit source]
Schnorkel has 4 group members: Jackson Cunningham, Hannah Barnes, Troy Gankas, and Kaylee Vincent. We are all currently a part of the 205 Intro to Design class taking place in the spring of 2024 held at Cal Poly Humboldt. Our project is the Anti-theft solar power aeration system for the pond for the CCAT, an organization run by students on campus that prioritizes appropriate technology. Their goal is to find ways to provide for human needs without large impacts on the earth's resources. The goal of this project is to firstly create a system that prevents the aeration system and the solar panel from getting stolen, and secondly to restore the pond and make it pleasing to the eye.
Problem statement[edit | edit source]
This project aims to create a solar-powered aeration pump for a pound located at CCAT. We will be building a pump that works through a waterfall to create the aeration necessary to help limit the number of algae in the water along with providing a good environment for plants to grow within the water.

Criteria[edit | edit source]
The criteria constraints of our pond were very simple and easy to asses. The first was theft, which is why this was a project in the first place, and the next was longevity for not having to redo work in the foreseeable future. Cost was a very basic one considering we were on a budget, and aesthetics were a bonus for extra credit which we decided we wanted to take into a lot of consideration. Sound was an afterthought and we knew needed to be included.
| Criteria | Description | Weight (1-10) |
|---|---|---|
| Level of Theft Resistance | The difficulty level for someone to fully steal the components that allow for the functionality of the Pond | 10 |
| Longevity | Amount of time till critical components of the pond fail | 8 |
| Cost | The amount of US dollars in which it will take to keep under the team budget of 250$ | 6 |
| Aesthetics | How well the ponds look and design fit into the surrounding environment | 5 |
| Noise Level | All noise heard from the pond running | 2 |
Prototyping[edit | edit source]
The prototyping process was broken up into 2 different sections, one for functionality and one for desire. We did this because we wished to first better understand how we planned on creating the functionality of the pond then understand better what the client wanted to see visually. We also did this to keep the miscommunication between client and designer very minimal, and so the designer better understood what the client wanted for both functionality and desire. For the function prototype we wished to see the flow rate and scale of the waterfall, we used carboard boxes and duct tape to create a to scale waterfall. We added shelves to the box to test flow rate and show client what our thoughts were. This prototype allowed us to see different heights for shelves and overall waterfall, while also allowing us to test flow rates. Lastly, we used the prototype to show the client the size of the waterfall and let them look at the placement of the waterfall by the pond. This was good because when they look at placements they then decided to change the waterfalls location. For desire we wanted to created a small replica of the pond area with everything we wished to do. We did this to communicate our vision for the pond and allow the client to ask questions and change things. We used air dry clay and cardboard to create this model, and this prototype helped show client placement of the shelves in the water, which allowed them to change their minds and show they wanted in terms of placement. Both prototypes helped show placement of keys parts of the pond and both helped clear up confusion and help change ideas for the client.
- Sample gallery
-
 Sample caption text.
 -
 More sample caption text. This would look better with different images.:)
 -
 Even more sample caption text.


Final product[edit | edit source]

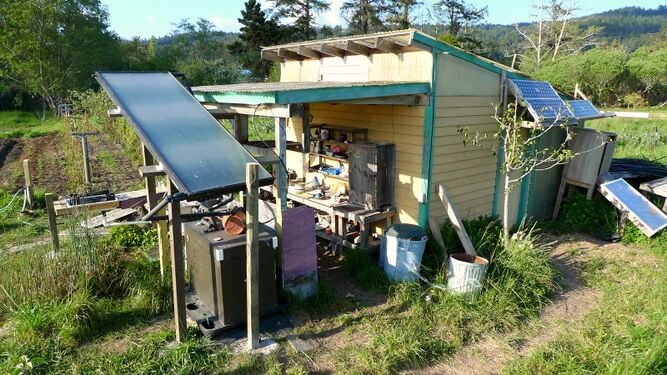
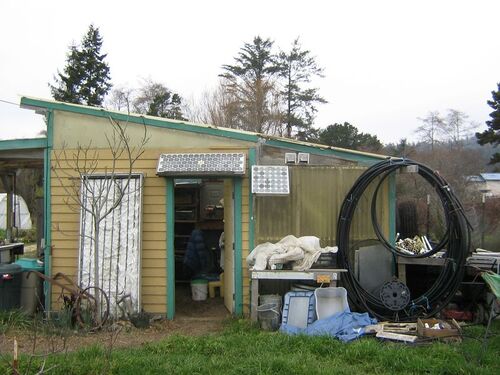
The image below shows each piece of our final product. We added the waterfall, the rock berm, the coco fiber, hiding the pond liner, and the underwater shelves. Out of view is the solar panel that is bolted to the overhang of CCAT. We were able to accomplish almost everything we set out to do, we weren't able to add the rope fencing around the pond, but time did not allow for that and CCAT told us to prioritize the pond functionality over aesthetics.
Construction[edit | edit source]
A very complete description of how the final project is built. This large section should have lots of pictures. Use the Help:Images#Galleries and probably Template:Steps (e.g. Barrel O' Fun Worm Bin Instructions).
- Sample gallery
Video instructions[edit | edit source]
A good way to display a process is by making a video explaining your process. See Template:Video for information on how to add and annotate videos.

Bill of materials[edit | edit source]
Everything purchased in this table is for materials that were directly implemented into the product. This does not include any secondary purchases for transportation or food. We Description of costs, donations, the fact that this is just proposed, etc. For a simple cost table, see Help:Table examples#Cost Table and Template:Bill of materials for two nice formats.
| Piping | Gravel | Wiring | Pump | Sealant | Slabs | Hardware | Rope | Wood | Total: |
|---|---|---|---|---|---|---|---|---|---|
| 30$ | 35$ | 0$ | 30$ | 35$ | 50$ | 20$ | 10$ | 15$ | 225$ |
| 15$ | 15$ | 15$ | 45$ | ||||||
| 270$ |
Operation[edit | edit source]
This is how to operate. It should have a brief introduction. You might want to show images or videos with step-by-step instructions when needed.
There are several rocks on the backside of the waterfall that when moved will allow you to access the electrical box

On the right side of the pump box there are two clasps. Pull each back to open the box.
Maintenance[edit | edit source]
Maintenance of our pond is quite intuitive and simple. Just like any normal body of water, there will be debris build-up which will need to be cleaned, and with an automated water system must be maintained as well. Only someone with knowledge of the pond and how to maintain it should do so. This includes the task of cleaning the filter for the pump at least once a month or when deemed necessary. Taking a net and skimming the pond for debris and finally opening the electric box and making sure it is clean at least once a month.
Maintenance schedule[edit | edit source]
| Price | Total | Time | Total | |||||||
| Water Quality testing | Net | Chemicals | Fiber | Solar panel cleaning | Filter cleaning | Clean out floating debris | Check State of Pump | |||
| Monthly | $1.46 | $1.46 | $3 | free | $5.92 | 10min | 30min | 20min | 5min | 65min |
| Yearly | $17 | $17 | $36 | free | $70 | 120min | 360min | 240min | 60min | 780 min |
- Daily
- No daily tasks!
- Weekly
- No weekly tasks!
- (Can clean out small amounts of floating debris if it bothers you)
- Monthly
- Clean solar panel
- Clean filter
- Clean out floating debris
- Check the state of everything
- Buy chemicals
- Yearly
- Test water quality
- Buy a net
- Check the state of everything
Conclusion[edit | edit source]
Testing results[edit | edit source]
When testing our finished product originally we discovered that our pump wasn't strong enough to pull water into the system and into itself, as it was not a self starting pump. This meant the pump wouldn't be able to start ever and needed a solution. To fix this issue we added a check valve that would allow water to flow into the system but once the pump was off it wouldn't let water leave the system. This helped but it turned out the check valve was getting stuck sometimes and wouldn't closing every time the pump was turned off. We tried adding a reservoir at the top of the outflow to hold extra water and fill the system back up after the pump shut off. This helped but again didn't fix the issue, so we had to redo our design and put the pump into the pond so the waterfall would work.
Discussion[edit | edit source]
From testing our system we were able to figure out that the pump was not strong enough for the distance we wanted it to pull water from. This should us that our pump was not the one we needed, but due to time restrictions we couldn't get another pump. So to solve the problem we employed a few different modifications to fix the problem, like the check valve and the water reservoir, but those solutions needed more time to make work. In the end we had to go with putting the pump in the pond attached to the intake system with a filter on the other end. This way water was always in the system, and it took advantage of the fact that it is easier to push water than it is to pull it.
Lessons learned[edit | edit source]
Discuss lessons were learned during this project and what you would do different next time.
Next steps[edit | edit source]
Discuss any next steps for the project as it goes on into the future.
Troubleshooting[edit | edit source]
This is only how to troubleshoot basic operation. For complex issues, the solution might just say something like contact ________. It should be a table in this format:
| Problem | Suggestion |
|---|---|
| Example issue | Example solution or suggestion |
| Does not turn on | Make sure it is plugged in |
| Another issue | Etc. |
Team[edit | edit source]
Introduce team and semester in the following format:
- Troy Gankas
- Kaylee Vincent
- Hannah Barnes
- Jackson Cunningham
References[edit | edit source]