CCAT (Campus Center for Appropriate Technology) is a appropriate technology workshop space on the Cal Poly Humboldt campus. CCAT encourages community involvement through campus based projects and the funding of off campus endeavors. The current operating space of CCAT consists of the following permanent structures: a main house for community meetings and living quarters for the rotating co directors, a green house connected in part to the main house, a educational yurt which is currently under construction, and the green shed.
Our project focuses on improving the functionality of the green shed. The green shed currently operates as work shed a space to design, build, and maintain appropriate technology projects. The greenshed is located on the same property as the live-in CCAT center. This close proximity is very convenient, but it is being hindered by a lack of grid connected power. The greenshed can not be wired to the main building because of permitting restrictions and is therefore in need of a lighting system which is off grid and self sustaining.
Shed background[edit | edit source]
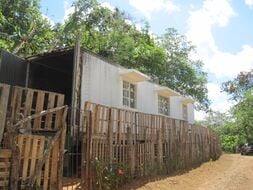
The CCAT green shed is approximately 18 ft x 10 ft with 180ft2 of floor space, it was constructed several years ago by a group of students in 2009. Since then, several other additions have been implemented by volunteers and students at CCAT; A cob wall (CCAT greenshed cob wall) was put in place on the southern side of the shed, as well as a clay-straw slip wall (CCAT greenshed west wall) which was installed on the West side, the North wall was put in place using the cordwood method (CCAT greenshed cordwood wall), and a rainwater catchment system CCAT greenshed rainwater catchment was added last year. The shed is mainly used for the organization and storage of construction materials that are used on a day to day basis on the CCAT campus.
.JPG)
Environmental actors[edit | edit source]
Located in Arcata, California, the site of the green shed has a variable amount of solar irradience, using the PVWATTS v.1 solar irradiance calculator it was determined that Arcata receives a yearly average of 4.48 hours of full sun a day.
Problem statement[edit | edit source]
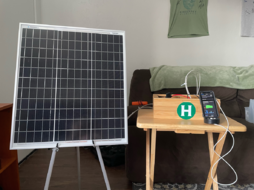
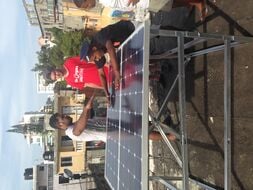
The objective of this project is to design and build a small solar array to light the green shed at CCAT. The greenshed was built in such a way that it would not need lighting during the day, but work is halted as the sun sets. This lighting project will provide enough light for CCAT volunteers to return tools to their proper location and clean up the shed after a day of work. In addition to functionality our system will be used to show how small scale solar can be utilized to solve real world problems. This aligns with the demonstration goals of CCAT.
Project evaluation criteria[edit | edit source]
The following criteria will be used to assess the success of this project. These criteria were chosen based on the suggestions of the project coordinator as well as the diligent students who are working on the lighting system. The scale (1-10) represents the importance level of meeting the constraint of each listed criteria.
| Criteria | Constraints | Weight (1-10) |
|---|---|---|
| Maintainability | Must be easy to clean and maintain the solar array. No more than 2 hours maintenance per month. | 6 |
| Aesthetics | Must be pleasing to the eye and look professional. | 8 |
| Educational Aspect | Must include an educational piece for community. | 4 |
| Safety & Placement | Must be safe for use by CCAT staff and volunteers, must not interfere with work being done. | 10 |
| Reproducibility | The structure could be reproduced by local builders. | 5 |
| Usability | Must sufficiently light tool shed. | 9 |
| Budget | Must not exceed budget of $400. | 10 |
| Functionality | Successfully produces and stores energy for use in shed. | 10 |
| Lifetime | Must be usable for at least 5 years. | 8 |
Literature review[edit | edit source]
The following is a concise synopsis of relevant literature reviewed for the comprehensive green shed lighting project at CCAT.
Solar basics[edit | edit source]
Solar energy can be converted into electricity by photovoltaic panels. This electricity can then be used to power a plethora of devices. Photovoltaics, among other uses, can be used to deliver power to buildings that are not connected to the standard electricity grid. We chose an off grid solar design to exemplify a small scale, self sustainable system which can provide light for various uses in the green shed.
Applications of off grid solar[edit | edit source]
The lighting project for the green shed will demonstrate the manageability of a small off grid solar system. More than one in five people in the world live without electricity, off grid solar systems are an option that can be quickly installed in these areas and provide a base level of electricity. Currently, people without electrical lighting mainly use kerosene lighting which is expensive and when used inside for long periods of time has adverse health effects including from the inhalation of toxins and fire risk.
Calculating possible solar power[edit | edit source]
In order to calculate the power output of a solar system you need to know the amount of full sun hours received by your site, this value will vary over the course of a year but can be averaged. There are online calculators which are able to estimate this solar irradience value. After determining this value a solar path finder can be used to identify the most appropriate location on your site to place your panels.
(Insert image of excel sheet)[missing information]
Lighting options[edit | edit source]
There are many different lighting options that will need to be analyzed. These include a comparison of DC and AC lighting, incandescent, CFL, and LED bulbs. There is a range of criteria that these alternatives will be rated with that includes wattage, lifetime, and cost.
Calculating illumination needs[edit | edit source]
Illumination can be calculated as:
I = Ll × Cu × LLF / Al (1)
where
I = illumination (lux, lumen/m2)
Ll = lumens per lamp (lumen)
Cu = coefficient of utilation
LLF = light loss factor
Al = area per lamp (m2)
Calculating Battery Size[edit | edit source]
(insert battery sizing table)[missing information]
Energy Efficiency[edit | edit source]
Efficiency will be of great importance to this project for many reasons. These reason include the a reduced total system size, reduced carbon intensity of the system, and decreased system cost. Some efficiency measures such as LED lighting instead of CFL lighting may have a higher upfront cost, but this additional cost should be offset by their lower life cycle energy usage.
Return On Investment[edit | edit source]
Because the energy generated by this system will offset energy that would otherwise have to be purchased by a grid provider, in this case PG&E, this system will generate revenue in the form of offset electricity cost. This offset electricity cost will help to recover the upfront cost of the system. The value of this energy offset can be calculated and compared to the upfront cost of the system to determine financially feasible project options.
National Electric Code[edit | edit source]
Although it may not be of importance for this project to meet national electric code, the same standards will be used as a measure of quality assurance. The goal of these standards are to promote safe, reliable, and consistent results from photo-voltaic power systems.
Alternatives[edit | edit source]
Using the sun's energy to illuminate the green shed is one of the many options available in terms of renewable energy. Similar projects could be achieved by taking advantage of other available resources such as wind, micro hydro, or geothermal. Wave or tidal energy could potentially be harnessed as well, given that the location was close enough to the ocean. Solar is most preferred in this case because of the availability of donated panels as well as simple installation and maintenance.
Off Grid Power[edit | edit source]
This photovoltaic system will exemplify the benefits of off grid power. Relief from rising electricity prices will be a benefit. Additionally, trends indicate that the current reliance on petroleum will cause future price increases. Off grid power offers security from these potential downfalls.
Project Design and planning[edit | edit source]
Analysis of Solar Insolation[edit | edit source]
- Solar Pathfinding
-
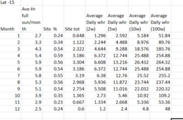
Calculation of average daily energy production for various size panels
-

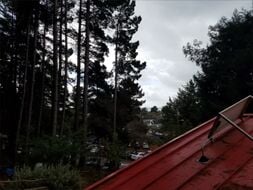
View directly south from roof of green shed
-
Solar Pathfinding at installation site


.JPG)
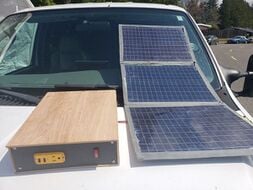
System components[edit | edit source]
Voltage Controller: When installing a PV system a voltage controller is needed to manage the flow of energy from the panel to the battery keeping it at a constant 12V it also controls the charging of the battery by dumping excess energy avoiding damage to your battery bank. You will size your voltage controller based on the current of your system.

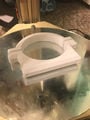
Battery: Selecting the correct size of battery for your system is very important to assure a healthy system. We chose a 12 volt 12 amp hour gel cell battery for our system.
Battery sizing: After soldering our lighting system and measuring current and voltage with a multimeter we moved on to sizing the battery for our system. The power draw of our system was calculated at 3 Watts using the simple equation:

where:
- P: Power in Watts
- I: Current in Amps
- V: Voltage in volts
after we measured current and voltage and with a total current of.24 Amps,with a 12V current. After discussing the use of the shed with the co directors of CCAT we estimated the daily use of the lights as 3 hours.
Lights[edit | edit source]
OUr lights were donated from an organization on campus. It was nessecary to alter the lighting systems so that they would work with our standard 12 Volt panel.
Mounting[edit | edit source]
We needed to find a way to mount our panel on the roof of the shed and to wire it into the interior of the shed without damaging the roof. After a site visit with Ben Scurfeild we decided to use roofing clamps that he had used when mounting panels of the main CCAT house. We used four clamps and scrap aluminum cut to size to make a mounting system.
-
Mounting clamp
-
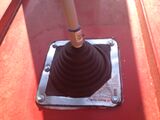
Rubber boot

.JPG)
Scurfield also helped solve our exterior to interior wiring problem by telling us about an inexpensive rubber boot product that can be used to pass conduit through a metal roof with a water tight seal. (See image)
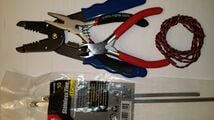
Conduit and Wire[edit | edit source]
Plastic conduit needed to be purchased to encase the wiring to and from the battery. Conduit protects the wiring from damages incurred from tool usage in the greenshed.
Construction[edit | edit source]
Tentative Time Line[edit | edit source]
| Project | Started | Completion |
|---|---|---|
| Calculate net sun for selected locations and determine collection panel placement. | Feb 20 | Feb 22 |
| Determine shed size. | Feb 21 | Feb 21 |
| Using shed size determine desired lighting needs, price, and order lights. | Feb 21 | Feb 22 |
| Determine max kWh the system can generate using panel size and calculated solar exposure. | Feb 22 | Mar 22 |
| Using calculated system generation capacity, desired lighting time, and project budget, determine battery bank size. | Feb 23 | Mar 1 |
| Price the rest of the system including mounts, wiring, switches, and necessary conduit. | Mar 1 | Mar 8 |
| Order remaining system components. | Mar 9 | Mar 16 |
| Install photovoltaic array. | Apr 7 | Apr 12 |
| Link array to chosen light source. | Apr 10 | Apr 16 |
| Test system to ensure proper working of all components. | Apr 22 | May 11th |
Costs[edit | edit source]
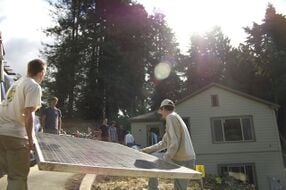
The following table displays the costs for the Green Shed Solar Lighting project. Funding of this project was provided by CCAT. The 100 Watt panels were donated by Scurfield Solar in Arcata, California, which lowered the cost of this project significantly. In addition to the panel, lights were donated from a campus organization.
| Quantity | Material | Source | Cost ($) | Total ($) |
|---|---|---|---|---|
| 4 | Mounting Clamps | Scurfield Solar | 15.00 | 60.00 |
| 3 | Light Bulbs | HSU | donated | donated |
| 1 | Voltage Controller | Scurfield Solar | 46.85 | 46.85 |
| 1 | Southwire 14YEL-SOLX500 Solid Copper THHN, 10 Gauge | Ace Hardware | 54.00 | 54.00 |
| 1 | 12V 12 Ah Battery | Interstate Battery | 60.00 | 60.00 |
| 1 | 25ft flexible conduit | Ace Hardware | 26.35 | 26.35 |
| 1 | 100 Watt Solar Panel | Scurfield Solar | donated | donated |
| 1 | Rubber Boot | Ace Hardware | 24.00 | 24.00 |
| 1 | Light Switch | Ace Hardware | 5.00 | 5.00 |
| n/a | Misc Hardware | Ace Hardware | 20.00 | 20.00 |
| 3 | Fixtures | Ace Hardware | 5.00 | 15.00 |
| Total Cost | $311.20 | |||
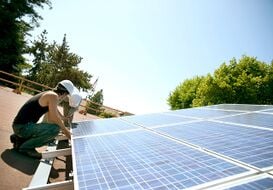
Installation[edit | edit source]

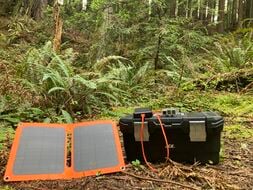
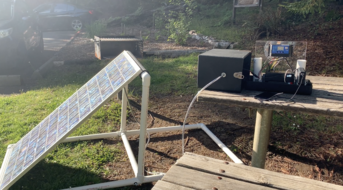
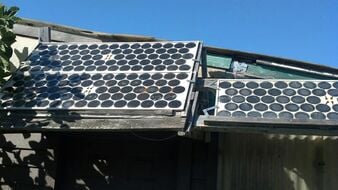
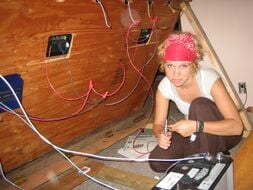
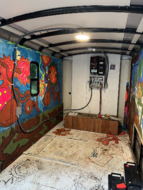
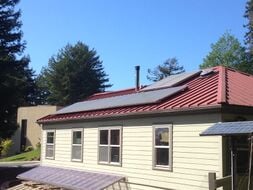
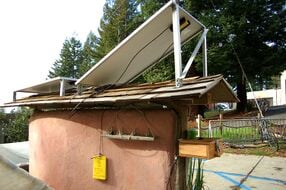
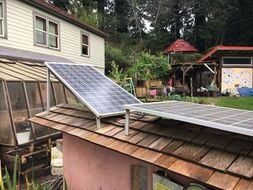
The installation of this system began with mounting the 100W panel on the roof of the greenshed. We chose an area on the roof that would get the most sunlight, and attached the panel with clamps and aluminum framing. We tilted the panel approximately 45 degrees due south, because the roof of the greenshed faces East and would not receive much sunlight otherwise. We then selected a small area of the roof just below the solar panel where we drilled a hole to allow the wiring to pass into the main building. We used conduit to protect the wiring from damage, and passed it through a rubber "boot" which we then secured into place over the previously drilled hole in order to protect the greenshed from leaking during the winter months. After we had selected our battery, we placed it inside a small plastic storage bin, and cut holes in the side of the bin to allow the wiring to pass in and out of it. The wires running out of the battery were then ran along the ceiling to their desired location, at which point the lights themselves were attached.
- Completed Project
-
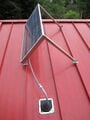
Mounted solar panel.
-
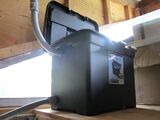
Battery container
-
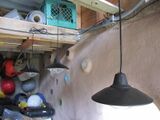
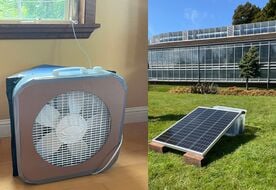
Mounted lights


Conclusion[edit | edit source]
Testing results[edit | edit source]
The location of the greenshed receives about 4.48 hours of full sun per day. During the winter months, this value drops to just over an hour of full sun per day. Because of this, we had the option of using several small solar panels which would be connected to their own individual battery pack and power separate strands of lights. Our second option was to use a larger 100W panel connected to a larger 12 volt 12 amp hour gel cell battery which would power the entire light set up. We chose the second option because the larger panel would generate more electricity than the smaller panels combined and, given the rather small amount of solar insolation, be the best option for providing an ample amount of stored energy in the larger battery. Because of the low number of full sun hours, we had to choose LED lights whose combined power usage was just over several watts. Lights that used more energy would exhaust the battery much more quickly, and we feared that CCAT workers could potentially be left in the dark if we chose this option.
Discussion[edit | edit source]
In conclusion, this project was a success. The 100W solar panel provides enough energy for the lights to be used after dark, and illuminate the greenshed when it's dark outside for tool returns etc. Since the greenshed will not need to be lit for extended periods of time, the chosen battery will provide enough power for limited usage.
Lessons learned[edit | edit source]
While installing a photovoltaic system can seem difficult at first, it is reasonably straight forward. The task, at first, seemed a bit daunting, but tips from local solar contractors quickly put us on the right track. Also, people and/or business' are often more than wiling to offer time or donate materials for projects. We were constantly met with positive responses when requesting donated materials or help. All we had to do was ask.
Maintenance and Next steps[edit | edit source]
The solar system installed in the CCAT green shed will require minimal maintenance over the course of its lifetime. The photovoltaic panel on the roof should be cleaned on a monthly basis to ensure that the solar energy falling on it is not being blocked by dust or other debris. Should a problem with the lighting arise, the wiring can easily be checked via an access box on the underside of the solar panel. The battery for this system is located inside the greenshed, and has been placed in a plastic storage box to prevent foreign objects coming in contact with the battery terminals. This box is easily accessible, and can be opened in order to check on the wiring within. If any of the actual lights dim or go out completely, they can easily be removed and replaced with another identical light, which are currently at CCAT.
There are several potential future additions which may be of interest to future students. A motion sensor could be installed for convenience, as well as ensuring that the lights turn off by themselves in case they are left on by accident. A USB charger could also be put in place. It would draw power from the battery, and could charge devices such as cell phones, small lights, cameras, etc.
Video[edit | edit source]
Here is a video outlining the set up and components of the CCAT green shed PV lighting.
Update: October 2013[edit | edit source]
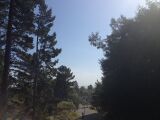
The Solar Panels have been working well without any issue. Due to tree blockage, the sun does not hit the panel until the afternoon each day, however no adjustments have been made to the panel's angle or location.
In interview of one of the CCAT co-directors, Linnea said: "The battery holds about 20 minutes of life." This was a great feat and surpassed their expectations of the project. She went on to say: "It's good for putting away tools at the end of the day. We don't have to be shuffling around for headlamps after the sun sets."
-
The shed is used as storage mostly. The lights are great for putting tools away at night after sun down.

With a life expectancy of 50,000 hours, and an average use of three hours per day, the installed LEDs are expected to last two years in total before having to be replaced.
-
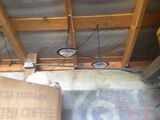
A picture of the lights off.
-
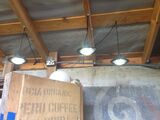
A picture of the lights on.


Not much maintenance is expected to be required in the next few years of operation. The small amount of maintenance required will be a regular cleaning of the cell cover, which includes clearing leaves and wiping dust that may have collected on the glass. With this maintenance, the cell should last around 40 years before a replacement will be required, according to www.ga4.org. Future plans, as stated under Maintenance and Next steps above, may require the installation of additional solar cells and/or a bigger battery in order to ensure a sufficient energy supply.