
CCAT Beach Grass Clay Slip Wall

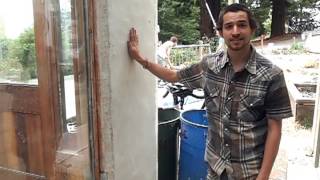
This Spring 2013 project by Elisabeth de Jong, Cheyenne Celada and Jacob Ferdman is a re-envisioning and remake of CCAT greenhouse natural wall.
This project is the second incarnation of a freestanding wall made from natural materials as part of CCAT's greenhouse project. The wall's interior is made from packed beach grass and clay slip. The exterior is a lime and clay plaster which protects the interior of the wall. The project was completed in 2013 and provides the structure and thermal mass for the CCAT greenhouse.
Objective[edit | edit source]
Similar to the objectives of the previous attempt, the objectives of this project were to create a sturdy, functional and aesthetically pleasing back-wall for the CCAT greenhouse. Therefore, the project we undertook was three-fold. First, we researched and collected a local invasive species of beach grass and other locally available materials. Second, we analyzed insulating techniques to fill in the spaces in the frame that the previous group created. Finally, we created a natural plaster that will seal in the insulation and provide an aesthetically pleasing wall.
Criteria[edit | edit source]
This section was designed to assist in the determination of the different aspects of this project. The group chose these criteria based on the expectations of the client, the class and personal interest. Weighing the criteria allows for focus on certain elements of the project to ensure satisfaction with the final product.
| Criteria | Constraints | Our Weight (0-10) |
|---|---|---|
| Infill | ||
| Data Collection | Must have moisture sensors | 2 |
| Durability | Must withstand Humboldt elements, impact, pressure | 10 |
| Educational | Must have a truth window | 6 |
| Locality | Humboldt County materials | 8 |
| Plaster | ||
| Aesthetics | Bottle bricks, Color, Smoothness | 8 |
| Compatible with Straw slip | Does not fall off | 10 |
| Durability | Moisture and impact resistant | 10 |
| Natural | No cement | 8 |
| Functionality | ||
| Cohesion | Designed appropriately with the greenhouse layout | 7 |
| Modular Garden | Allows for interchanging planter beds | 7 |
| Simplicity | Must be easily re-creatable | 5 |
Video explanation[edit | edit source]
Literature review[edit | edit source]
Climate[edit | edit source]
Humboldt County experiences considerable precipitation and moderate temperatures. Near the coast, temperatures reach 32°F and lower during the winter and during the summer a temperature that exceeds 80°F is rare. Temperatures along the coast vary only 10° from summer to winter. Humboldt County experiences rainfall in each month of the year. 90% of the vast region's rainfall occurs between the months of October and April. The seasonal total amount of rainfall experienced is approximately 40 in/year in drier regions and 100 in/year in regions of high precipitation. Stable seasonal temperatures and a high moisture content cause high levels of humidity.[1] The annual average of relative humidity is 86.5%.[2]
Straw-Slip[edit | edit source]
Straw-slip originates from a building technique developed during the 1920's in Germany known as, Leichtlehm ('light loam' in German). Leichtlehm or Straw-slip is a mixture composed of straw and watered down clay, and is typically used as the infill for walls.[3] This building technique was founded for the purpose of building durable walls on a cost efficient budget. Clay is soaked in water so that it may easily be applied to straw upon mixing. This straw and clay mixture may then be rammed into form directly into the wall between the frames or it may be used to form bricks. If the mixture is rammed into form with more force it will become compressed and create a more durable wall. However, highly compressed walls formed out of this mixture attain less air within the wall and make for less efficient thermal insulators. Straw-slip does not possess structure, therefore a frame or alternative structure is required. It is essential that a good surface treatment is applied to straw mixed with clay upon drying to ensure protection. For walls constructed on sites that are vary exposed, an extra layer of surface treatment may be applied.[4]
Straw[edit | edit source]
Wheat, rice, oat, barely or rye straw may be used in straw-slip mixtures. To achieve maximum thermal insulation it is best to use straw with thick stiff stalks such as rye. Thicker stalks help retain more air within the wall.[5] Straw used should attain no sign of decay or insects[6]
Alternative Materials to Straw[edit | edit source]
Straw is not the only material that maybe used for producing an effective clay-slip mixture. Alternative Cellulose materials maybe used in substitute, such as wood chips[7] or other natural resources that possesses qualities similar to straw.[8]
Ammophila Arenaria[edit | edit source]
Ammophila Aernaria is most commonly known as European beach grass or marram grass. This plant is native to Europe, the Mediterranean, and coasts of the Black sea. Ammophila Aernaria is able to undergo long periods of drought and withstand erosion. It is known to be invasive and detrimental to native plant life along the dunes of Northern California. This particular species of beach grass is able to reproduce swiftly often weeding out native species. Along with taking over native plants habitat, Ammophila Aernaria also attracts pathogens that are fatal to native plant life.
Friends of the Dunes[edit | edit source]
Friends of the Dunes is a non-profit organization in Arcata, California that focuses on involving community in coastal conservation. Workers and volunteers at friends of the dunes have taken on the task of removing Ammophila Aernaria from the Samoa Sand Dunes in Arcata, California, in hopes of conserving native plant species. The beach grass, is collected, dried, and then burned.[9]
Plaster[edit | edit source]
Clay and lime plasters maybe used on both the interior and exterior of Straw-slip walls. Gypsum plaster is also an additional option for an interior plaster. Plasters maybe applied directly to straw-slip upon drying. Due to their susceptibility to rain damage, clay plasters are often finished with lime plasters to add additional protection.[10]It is natural for mold to form on the top layer of clay-slip during the first stages of drying. Once the clay slip has fully dried and all moisture has evaporated, no mold will be able to grow on the surface.Due to high levels of humidity present in the city of Arcata, California, it is vital that the final plaster is applied as soon as the infill has completed the drying period.[11]
Lime Putty Sand Mortar[edit | edit source]
Lime putty sand mortars are beneficial because of their slow setting rate that allows movement or settling of walls without causing damage. Unlike plasters that contain cement, lime putty sand mortars do not retain moisture from rain, this provides a breathable wall. High-Calcium lime putty can be expected produce a durable mortar that attains a rapid dry time in all climates.[12]
River Sand in Mortar[edit | edit source]
The role of sand is to provide structural strength in a natural mortar. Sand should be attain a sharp angular structure, this will ensure that sand particles are able to interlock appropriately. Sand that attains a round structure will not interlock and mortar will be become less adhesive.[13]
Clay[edit | edit source]
There are three main types of clay; montmorillonite, illite, and kaolinite. Each of these variations attains a different lattice structure,directly effecting the way the clay reacts with saline and sodium. Montmorillonite clay is affected the most by sodium, causing it to disperse and swell upon reacting. Kaolinite clay attains the the weakest reaction to sodium of these threee clays and is less likely to experience dispersion or swelling.[14] When choosing the specific type of clay to use for a straw-slip mixture it is important to choose one that attains a clay content of no less then 50%.[15]
Slaking Clay[edit | edit source]
Slaking refers to the breakdown of air-dry soil aggregates into smaller aggregates that occurs upon the immersion of water. This forms a clay-slip. The final consistency of clay post slaking depends on soil water content, soil texture, type of clay, organic matter, amount of water added, and the rate at which the water is added.[16]
Borax[edit | edit source]
20 Mule Team Borax contains 99.5% sodium tetra borate. This chemical is resistant to flame and pests. Sodium tetra borate prevents the growth of mold or mildew.[17]
Cobb[edit | edit source]
Cob is a form of earthen construction composed of sand, clay, and fiber (usually hay). Cobb's components are similar to that of adobe. In comparison to adobe, cobb allows for me freedom of shape in construction. Cobb's flexibility makes it a good material to use for patchwork prior to the application of a natural plaster.[18]
Sodium[edit | edit source]
Upon reacting with sodium, clay undergoes swelling and loses structure. A mixture that contains high levels of sodium would not be ideal for the consistency in which we want our beach grass-slip to withhold.[19]
Salinity[edit | edit source]
Soil water salinity levels depend on the type of soil. Soil water salinity leads to flocculation, causing small particles to bind together and form aggregates.[20]
Process[edit | edit source]
Timeline[edit | edit source]
| Week | Cheyenne | Elisabeth | Jake | Overall | Realistic Timeline |
|---|---|---|---|---|---|
| Feb 11-17 | Research for test materials | ||||
| Feb 18-24 | Upload:Objective | Build test frames | |||
| Feb 25- Mar 3 | Upload:Literature Review | Test bricks | |||
| Mar 4-10 | Collect beach grass | Collect beach grass. Upload:Timeline and Criteria | Upload:Budget | Test plaster | |
| Mar 11-17 | Collect beach grass/make test bricks | Collect beach grass/make test bricks | Start packing the wall | Test bricks (wall under construction) | |
| Mar 18-24 (Spring Break) | Make Final Test Bricks/Research/Lit Review | Continue packing the wall | Start packing the wall | ||
| Mar 24-31 | Finish packing the wall | ||||
| Apr 1-7 | Start plastering | Continue packing the wall | |||
| Apr 8-14 | Test plaster | Remove fencing | Test plaster | Finish packing the wall | |
| Apr 15-21 | Cobb in critical areas | Prepare for plaster | |||
| Apr 22-28 | Plaster | ||||
| Apr 29- Mar 5 | Clean, scrape and sweep excess plaster | Clean windows and surrounding walls | Clean tools and equipment | Finished! | Paint the wall with lime, cleanup |
| Mar 6- Mar 11 | Update: Literature Review | Update: Timeline, Budget | Upload: Step by Step | Final layer of plaster with pigment |
How to build your own[edit | edit source]

Acquire Materials:
Beach Grass:
Beach Grass turned out to be an excellent material to use for light clay insulation. The goal with this type of insulation is to create small air pockets that stop heat from passing through by limiting convection. The grass we used is particularly thick and tubular in nature. Unlike other, lighter forms of straw, this beach grass held its shape well throughout the process and dried very strong with many air pockets.

To obtain the grass, we had to drive to the beach (approximately 6 miles from campus) and hike along the beach trail approximately half a mile to the shore dunes. We found that the best way to transport the grass was to bring with us a large, plastic tarp that we would load up with grass and drag with rope in a line back to the truck. While selecting grass, we tried to take the driest grass with the least sand and that was not decomposing. The deeper into the piles we dug, the worse the beach grass was. Later on, we realized that we could get the highest quality grass by picking the dry undergrowth of living plants. This grass was lighter, dryer, and more intact that the dead grass in the piles. Also, this process helped create additional light space for native plants.
While there is no vehicle access to the dunes where the grass grows, there is horse access. Future builders should consider using horse or mule power to gather and transport this grass. Also, the act of picking grass is labor intensive. Utilizing a weed whacker or a scythe would be much more efficient.
Clay:
Finding Good Clay:
Clay is used as an adhesive to hold the grass together in its insulative shape. A clay slip is clay particles that have been suspended in water for application to a surface. There are many different types of clay all over the world and each acts differently. Clay that is found in the ground is usually mixed with sand, rocks and other particles. To test the ratio of clay to their particles, take a piece of the material, mix it up into a liquid slurry in a glass jar until it is blended completely. Then, let the mixture settle overnight. The heavy materials will settle first and you will be able to measure the percentage of clay to other particles. You want to find earth with the highest clay content as possible. We were using a grey clay that was about 90% clay.
Sift Clay: Take a screen of half inch wire mesh and stretch it across a wooden frame to create a sifter. Grate the clay through the mesh while removing large rocks, soil and organic material. You can sift the clay directly into a bucket of water to start the slaking and stack functions

A) Slake Clay: Clay really likes to absorb water but can only take so much. Slaking clay is the process of mixing clay particles with water to facilitate the absorption to its maximum degree. By doing so, you create a homogenous mixture of clay that has little variation in terms of present water. Once the clay is in small chunks you can blend the mixture with a large paint mixer until it is a smooth mixture. Let this sit at least overnight to make sure that all the clay has absorbed all the water that it can. There should be a few inches of clear water above the slaked clay to signify that the clay cannot absorb more water.
B) Mix Clay with water: To create a clay slip, you want to mix the slaked clay with water. For the process of light clay grass insulation, the goal is to coat all surfaces of the grass with a thin layer of clay so that the grass sticks together into one firm form. Too much clay or sand, and the wall will conduct heat through it. Too little clay, and your grass will not be a firm enough structure to support your plastering or future pressures.It takes awhile for clay to slake completely (absorb maximum water.) After about 4 days of slaking we felt confident that it had finished expanding due to its swelling.

Prepare the wall for beach grass slip.
- Prep Wood: because we live in Humboldt County, we want to prep our wood to resist mold before we add the grass slip. The moisture from this process can cause mold to grow and decay the wood studs from within. Therefore we give the studs a borax wash (borax dissolved in water) to protect it from mold.
- Insert Grip Nails: To provide support for the grass-slip panels, it is important to insert nails on all sides of the studs. The nails will then be filled around giving the grass-slip panels something to grip on to during later steps. We used galvanized nails because they are rust proof. You don't need a ton of nails, just scattered ever 3 inches or so.
- attach wire mesh
- using spacers
We hammered 2 inch rust-proof square nails into the wood frame. These nails would provide grip for the grass slip and prevent weakness to pressure. We then screwed wire mesh to the frame supported by random scraps of wood to provide shape for the sections as we filled the wall with beach grass. The wire mesh and wood could be applied haphazardly considering that we would remove it once the beach grass slip was dry.
Mix clay slip, borax and water.In a 5 gallon bucket: Add about ⅓ bucket full Slaked Clay
Add about 3 Cups of borax (if mold is a likely threat)
Add Water and mix until the slip fulfills the following properties: Liquid Enough that is easily flows through and coats all the grass surface and coats all surfaces with a consistent layer of clay even after being shook.

Apply slip to beach grass. Clay-slip mixture should attain a consistency that evenly coats all of the beach grass. Slip mixtures that contain excess water will prevent beach slip from drying as a solid form. Slip mixtures that contain excess clay will impede the drying time of the wall. We used two different methods to apply the clay slip to the beach grass. The first was to fill up a bucket with clay slip and dip loose bundles of tangled beach grass into the bucket. Submerge completely and shake until it is not dripping before packing into the wall. When you grab a bundle of beach grass, the goal is to tangle it so that the blades of grass are no longer aligned in different directions.

The second method we used was a bulk application which turned out to be the faster and better method. Take about a wheelbarrow's worth of beach grass and pile it up on a plastic tarp. Take a buckets of straw slip and gradually add it to the pile of grass. Continuously mix the slip into the grass until it is all completely coated with clay. Similarly to kneading dough, keep mixing the grass until it is all evenly coated before deciding if you need to add more slip.

Fill the wall. Using the wire mesh frames allowed us to simply stuff the wall with the dipped beach grass. We took large handfuls of beach grass, mashed it into a messy and loose ball, dipped it in the clay mix and gently placed it into the wall. In an effort to tangle the straw together we then pressed sections of this down after loosely filling it. This is to prevent small packages of straw from not tangling with other straw. Tight bundles of straw create problems in shape, contracting and drying time. It is important to fill the corners and edges tightly to keep the shape and provide a flat surface for plastering.

Remove the wire mesh and support boards once the beach grass slip is dry and holds its shape. Flashing was used around the windows; see picture below. It can be applied on roof lines, around windows, or at sites where different materials or planes meet. Flashing helps help channel water away from materials protect against leaks and rot. The wall is now ready for plaster.

A) Slake Lime: Slaking lime is similar to the process of slaking clay as described above. Lime needs to be slaked for a substantial amount of time in order to ensure quality. While this amount of time depends on the location, temperature and other factors, we starting slaking the lime about one month before intended use. There should be about one inch of water left on top of the slaked lime when it is ready.
B) Mix Lime: We used a paint mixer to mix the slaked lime until it has about the consistency of yogurt.

Combine the plaster ingredients. We used 1 part slaked lime, 3 parts river sand, and horse manure "to taste", which was about 4 handfuls in our 5 gallon bucket. Combine these slowly while blending with a paint mixer. The final plaster should hold its shape and have noticeable fibers when broken apart.

Something to consider: we inserted a piece of pvc pipe into the wall for putting a hose and/or extension cords through.

Before applying the plaster directly to the wall, it is very important to spray down the wall with water since the lime will absorb moisture, leading to cracks if there is not enough available moisture. We applied this plaster using our hands and cement applicators/scrapers. Pressing the plaster into the beach grass wall at the same time as smoothing a layer that was about 1/4in thick onto the wall worked well for us. We left this layer rough (not smoothed out with tools) in an effort to allow for more grip on the second layer of plaster.

We painted the wall with slaked lime by using paint rollers so that the first layer of plaster would be sealed and presentable until the final layer could be applied.
Budget[edit | edit source]
| Material | Quantity | Source | Cost | Total Cost |
|---|---|---|---|---|
| Beach Grass | 6 truckloads | Collected from Friends of the Dunes | donated | $0 |
| Clay (90% clay) | ¼ cubic yard | Found on site | $0 | $0 |
| Borax | 4 | Co-op | $6 | $24 |
| River Sand (plastering sand) | ½ cubic yard | Hensel's Material | $35 | $35 |
| Lime (Type S-hydrated) | 200 pounds | CCAT | $15/50 pounds | $60 |
| Moisture Meters | 3 | ValueTesters.com | $50 | $150 |
| Building materials | hammers, nails, screws, power drills, etc. | CCAT | donated | $0 |
| Chicken and ½ square in. mesh wire | 150 square feet | Ace Hardware | $30 + donated | $30 |
| Buckets | various sizes (1gal-55gal) | CCAT | donated | $0 |
| Tarps | 2 large | Acquired through CCAT | donated | $0 |
| Horse manure | 20 gallons -shredded | Mad River Stables | donated | $0 |
| Painting materials | Rollers, scrapers, brushes, mixer | CCAT + Ace Hardware | $30 + donated | $30 |
| 6 tubes | Caulking | Ace Hardware | $3 | $20 |
| Gasoline/Driving costs | 20 miles/gallon | local gas stations | about $4/gallon | $16 |
| Safety equipment | goggles, gloves | CCAT | donated | $0 |
| Total | $365 |
R-value[edit | edit source]
R value expresses the insulative properties of components used in building measured through its resistance to heat flow.[21] Calculating the r-value of a wall involves calculating the various components of the wall as they are situated in and on the wall. The r-value is affected by the ratio of clay to straw in the infill as well as the properties of the plaster. When the components are layered horizontally (i.e. plaster covering wood) we simply add the r-values together. If the components are parallel to the floor (i.e. brick base below wood) then we add the inverse r-values of the components.[22]
In order to calculate the r-value of this wall, I calculated the area of the elements that are in series. This includes the two outer layers of plaster (initial and final layers) which sandwich the straw slip infill. I assumed the r-value of the clay slip infill and the plasters from averages of other similar materials. The total r-value is calculated using the individual R values in series:
-
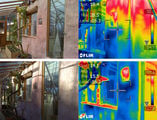 These are photos of the inside of the greenhouse. The top photo was taken when the greenhouse was in direct sunlight. The bottom photo was taken when the greenhouse was not in direct sunlight and the temperature inside the greenhouse was 11 degrees cooler.
 -
 These are photos of the back wall of the greenhouse. The top photo was taken when the sun was directly on the interior wall of the greenhouse. The bottom photo was taken 3 hours later when the sun was beginning to set. The temperature of the back wall dropped 5 degrees and the temperature inside the wall increased 10 degrees between these photos.


Update October 2013[edit | edit source]
Since Spring 2013, the CCAT Beach Grass Clay Slip Wall has proven to be durable and well constructed enough to not need major changes or repairs. The wall has humidity sensors measuring the humidity inside the wall, outside, and inside the greenhouse. These sensors occasionally need the batteries replaced, but otherwise work well at displaying the difference in humidity. The structure of the wall, specifically the clay and lime plaster, has protected the beach grass insulation from deterioration. Since Spring, the wall has been painted on both sides. In the future there may be an occasional repair to minor cracks, but currently the wall proves to be a sturdy, well-designed project.
-
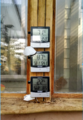
 Sensors measuring humidity
 -
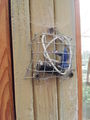 Humidity sensor outside greenhouse.
 -
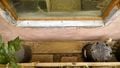
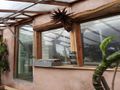 Image of wall inside of the greenhouse.
 -
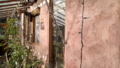
 Image of wall outside of the greenhouse.
 -
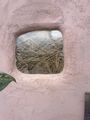 Truth Window displaying the beach grass clay mixture.


Update October 2014[edit | edit source]
The CCAT greenhouse remains in great condition and is actively used for teaching and year round growing. From our site analysis and interview with the knowledgeable crew we learned what has been done to maintain the greenhouse structure as an efficient growing environment.
Maintenance of the greenhouse seems to be consistent and sufficient. Three walls of the greenhouse are made of redwood and have handled the weather well. The North wall is a free-standing clay wall with a cutaway to the beach-grass lined interior (truth window), which also appeared to be in excellent condition. The CCAT crew said that they annually apply an oil-based preservative to seal the interior wood and that nothing has to be done to preserve the earthen wall. The hydraulic pressure roof windows seem to be working as well, although the crew mentioned that in the summer the doors need to be opened as the heat becomes too much and can damage plants. One thing we noticed was the application of a silicone-based caulking to the edge of the roof where some of the vents attached. It is possible that the wood of south-facing structure slightly morphed over the years causing a few small leaks or that the low-pitched roof allowed for wind-driven rain to enter. The greenhouse has regular gardening attention, but they should remember to cutback grass/weeds along inside and outside of greenhouse to prevent mold and moisture coming into contact with the siding.
In addition to maintenance, there are organic growing classes that take place weekly. The plants seemed to be growing quickly, and there appeared to be many more young plants on the way. Having a year-round controllable growing environment offers a valuable teaching tool which contributes food and flora to the CCAT and campus community.
Overall the greenhouse is an inspiration. In a place like Humboldt County, greenhouse growing creates a more stable atmosphere which improves yields and extends the season by protecting plants from the elements. We replaced some batteries for the hygrometer so that the crew can continue to monitor internal humidity, external humidity, and humidity of the earthen wall.
-
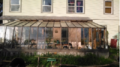 Greenhouse Exterior
 -
 Greenhouse Interior
 -
 Hygrometers
 -
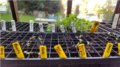 Seedlings
 -
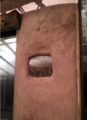 Truth Window
 -
 Interior Window Fix


References[edit | edit source]
- ↑ http://web.archive.org/web/20170122174759/http://co.humboldt.ca.us/portal/about.asp
- ↑ http://www.usa.com/humboldt-county-ca-weather.htm
- ↑ http://www.green-destinations.com/glossary.html
- ↑ Ecology of Building Materials
- ↑ http://books.google.com/books?id=FJP6Bx_8xF0C&pg=PA289&lpg=PA289&dq=leichtlehm+building&source=bl&ots=-s9f2j1C4j&sig=1Qan3uP-c58um7xxChlX8Wzg1HY&hl=en&sa=X&ei=KG5LUe_yCoa32wWt7YDoCQ&ved=0CEUQ6AEwBA#v=onepage&q=leichtlehm&f=false
- ↑ http://www.econesthomes.com/wp-content/uploads/2012/01/IBC_LightStraw-Clay_FINAL12-31-11.pdf
- ↑ http://www.econesthomes.com/wp-content/uploads/2012/01/IBC_LightStraw-Clay_FINAL12-31-11.pdf
- ↑ http://www.econesthomes.com/wp-content/uploads/2012/01/IBC_LightStraw-Clay_FINAL12-31-11.pdf
- ↑ http://www.issg.org/database/species/ecology.asp?si=1518&lang=EN
- ↑ http://books.google.com/books?id=FJP6Bx_8xF0C&pg=PA289&lpg=PA289&dq=leichtlehm+building&source=bl&ots=-s9gWa_u1h&sig=7RnYYFjJOe7kcFiUCHCY5JdI4xA&hl=en&sa=X&ei=4AxNUZKiF-Tn2QW-9YCgBQ&ved=0CEUQ6AEwBA#v=onepage&q=leichtlehm%20building&f=false
- ↑ Building Green,Second Edition, Lark Books A Division of Sterling Publishing.2009
- ↑ http://www.traditionalandsustainable.com/TSB/Lime_Putty_files/Lime_Use_Guide-2.pdf
- ↑ http://www.traditionalandsustainable.com/TSB/Lime_Putty_files/Lime_Use_Guide-2.pdf
- ↑ [1]
- ↑ http://www.econesthomes.com/wp-content/uploads/2012/01/IBC_LightStraw-Clay_FINAL12-31-11.pdf
- ↑ http://www.dpi.nsw.gov.au/__data/assets/pdf_file/0008/127277/Slaking-and-dispersion.pdf
- ↑ [2]
- ↑ https://www.appropedia.org/Cobb
- ↑ [3]
- ↑ http://web.archive.org/web/20150430073527/http://waterquality.montana.edu:80/docs/methane/basics_highlight.shtml
- ↑ [4]
- ↑ [5]