This page explains how to upload an image and how to use it in any page.
How to upload an image[edit | edit source]
-
To upload a new image, click on the tool icon on the top bar and select "Upload file".
-
Click "Select files to upload".
-
Choose the images you want and click "Open".
-
Once the files are uploaded and accepted, click "Continue".
-
Specify the release rights of the images.
-
If they are not your own work, please make sure you are allowed to use them and select under which license they were released.
-
Click "Continue" and describe the images.
-
If you are uploading many files at once, you can use the "Copy information" tool.
-
Once you are done, click "Publish files" and a new window will appear showing how to use them inside a page or link them.
How to use an image[edit | edit source]
Visual editor[edit | edit source]
-
To access the visual editor, click on the blue "Edit" button or on the pencil icon on the top bar and select "Edit".
-
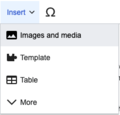
Once you are on the visual editor click on "Insert" and select "Images and media".
-
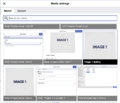
If you've already uploaded your file previously, look for it on the "Search" tab.
-
If you haven't uploaded your file yet, click on the "Upload" tab and drop your image or select it manually by clicking on "Select a file".
-
Make sure you own the rights to upload this image. If thats the case select "This is my own work" and then click on "Upload".
-
Give a name to your file and click save.
-
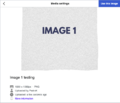
Check all the information is correct and click "Use this image".
-
You can now choose if you want to add captions to your image .
-
You can also edit parameters such as position, type or size on the "Advanced" tab.
-
After clicking the "Insert" button, the image will show on your page and you'll be able to use it and save.
Source editor[edit | edit source]
This section describes the image markup language, i.e. the set of "markers" (rules or conventions, coded expressions) to add images, illustrations, and graphics to Appropedia pages. After having uploaded an image (of your creation or an open-source license image), you can insert it by referencing the filename as an internal link, for example:
[[Image:Example.jpg | thumb | Caption for the image.]]
For instance, if you just uploaded a file named AEFprevfilt2.jpg, you can insert it by typing [[Image:AEFprevfilt2.jpg where is the image filename, thumb is a parameter for the default formatting of the image, and caption is the short text that describes its content. The following table will describe some of the options that you may use to format your images.
Galleries[edit | edit source]
Use galleries to organize images in a grid.
<gallery>
Image:Example.jpg | Caption 1
Image:Example.png | Caption 2
</gallery>
Using images from Wikimedia Commons[edit | edit source]
Images hosted on Wikimedia Commons can be easily used on Appropedia. For example, you can display this image hosted on Commons on Appropedia by using the standard wikitext code: [[File:Rocket-Stove-Envirofit-G3300.JPG|thumb|center|Rocket-Stove-Envirofit-G3300]] (notice that it only requires the filename, similar to a local image). The image will appear on the page as a local image. The copyright licenses on Appropedia are compatible with Wikimedia Commons, but we advise you to always check the licenses of all external content.

See also[edit | edit source]
External links[edit | edit source]
- Wikipedia:Help:Pictures - A much more detailed page


