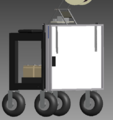
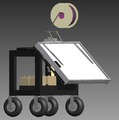
Mobile solar powered 3D printer
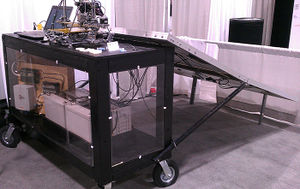
The objective of this project is to design a charging cart for a 3D printer that is completely mobile, and runs solely on renewable energy.
Project Overview[edit | edit source]
This was a joint project between:
- Sustainable Energy Applied Research Centre of St. Lawrence College
- Queens Applied Sustainability Group
Project created and supervised by:
- SEARC's lead researcher Adegboyega Babasola
- Dr. Joshua Pearce, adjunct professor of Queens University
Project Student Research Assistants:
Linked Project(s):
Related Publications[edit | edit source]
- Debbie L. King, Adegboyega Babasola, Joseph Rozario, and Joshua M. Pearce, "Mobile Open-Source Solar-Powered 3-D Printers for Distributed Manufacturing in Off-Grid Communities," Challenges in Sustainability 2(1), 18-27 (2014). open access

RepRap Background[edit | edit source]
For the project, a RepRap Mendel running on gen6 electronics was chosen. The RepRap is a low-cost 3D printer, designed by Dr. Adrian Bowyer. It runs on open-source software. And is self-replicating. More information on the RepRap can be found on the RepRap at: RepRap.org/wiki
Designing the Power Circuit[edit | edit source]
Power Considerations[edit | edit source]
Two 220W solar panels were donated by Queens University for the project, therefor the power circuit was designed around them. PV power modelling software was used to possibly reduce the number of panels needed to only one. But that was not a viable solution for the power objectives. 2 DC power supplies are required:
- 12V
- 14-24V
Max power consumption
- 50 - 60 Watts (RepRap)
- 60 - 70 Watts (Computer)
Days of Autonomy Required = 5 days @ 7 hours of operation per day
Power Circuit[edit | edit source]
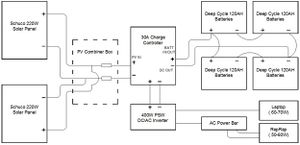
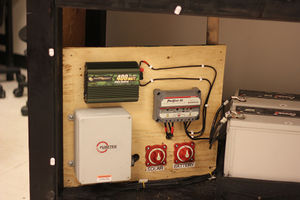
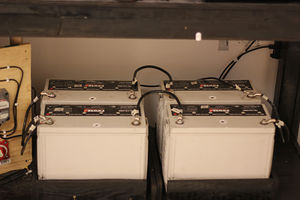
See Figure 2 for power circuit wiring diagram. Figure 3 & 4 are the component board and the battery layout. The power circuit, and the following power write up, was designed by David Carter, a former employee of SEARC. The following components were used to build the circuit.
- 2 x Schüco 220W Polycrystalline Solar Panels (Model: MPE 220 PS 09)
- Fusetek 4-Pole Combiner Box
- MorningStar ProStar 30A Charge Controller (Model: ps-30)
- 2 x 20A Fuses for Over Current Protection
- Powerbright 400W PSW DC/AC Inverter (Model: ML400-24)
- 4 x Power Deep Cycle 120AH Batteries (Model: TC-12150C)
- 2 x Single Circuit On/Off Battery Switches (added April 10th, 2012)
Both panels are capable of producing 220 Watts and have a VOC of 37 volts. When wired in parallel the module amperage (7.38A) combine to make a maximum 15 amp circuit. The wires from the panels are 12 gauge weather rated cable which are connect using finger safe MC4 connectors. When modeling the system for the college's geographical location, two modules were needed to provide enough power to meet the autonomy requirement. Only one panel is needed when sending the printer to locations near the equator due to the increase of solar irradiance.
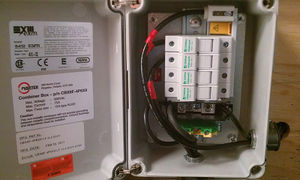
Each panel will be fused individually using a 4 pole combiner box which will also be used to connect the modules in parallel. The box used was made locally by FuseTek in Kingston, is CSA approved (See Figure 5.) The box has been rated for outdoor conditions and weather proof grommets will be used seal penetrations for the wire. The fuses are rated at 20 Amps which is well over what each panel is capable of producing however still under the maximum amperage input to the charge controller.
The solar modules and battery charge level are controlled using a Morningstar Prostar 30 Amp solar controller. This controller has one input for the solar panels which is rated for approximately 60 Volts DC and 30 Amps. The fuse box which is carrying the power from the panels will be connected to the controller using the same wire type for the panels. There is an indicator light which will let the user know when the panels are producing power. The controller is capable of running either a 24 or 48 Volt DC system, this system will only be using the 24 volts. There are also three battery settings which allow for a variability of storage technologies such as gel, sealed or flooded cells. A battery charge statues indicator has also been installed to allow the user to see the depth of discharge (DOD). There are four stages of charging that the device offers which are full charge, power width modulation (PWM), float and equalize. These charging states change automatically depending on the time of day or amount of sunlight being converted to electricity. The controller has a large heat sink on the back which requires that the controller be mounted in a vertical position with adequate space for ventilation above and below. There is a night safety feature which will automatically disconnect the solar in order to prevent feedback from the batteries. This equipment is designed to work specifically with solar and may be damaged another input is used. The controller has one load output which will be going to the inverter chosen for the project. The wires used to run from the controller to the inverter are 10 gauge indoor rated wires marked with tape to identify the positive lead.
The inverter selected was a Powerbright pure sine wave (MSW) DC/AC converter with two 120Volt receptacles rated for 15 amps each. The inverter is capable of operating either on a 12 or 24 volt system. A fan and heat sink is used to cool the sensitive equipment so it must be mounted in a position which allows for ventilation. There is a built in 40Amp car fuse which is used to protect the inverter in case a surge may occur. The converter is capable of running many small products such as laptops, cell phones, a number of stepper motors, DVD players etc. It should only be operated in conditions ranging between -20°C and 40°C but works best between 15°C and 20°C. There are three plugs including the laptop, printer and printer heat bed, that need to be plugged in which requires a power bar stationed on the cart. Caution will be used not to exceed the converter's maximum output amperage rating. When there is no sun supplying power to the controller, batteries must be used in order to continue operation.
The batteries used for the project are sealed used in deep cycle applications and rated for 140 Amp hours. They are wired in series parallel to produce a capacity of 24Volts and 280 Amp hours. The terminals are connected together using 3 gauge wires with crimped lugs and bolt that attach to the battery. The positive and negative leads to the controller are taken from opposite corners of the bank to ensure that the energy flows through all cells equally to increase battery life. Each battery weighs approximately 120 pounds and must be situated on the cart so it is balanced evenly.
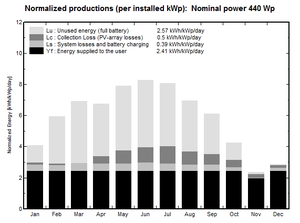
The modeling simulation was done using a combination of two powerful programs called PVsyst and PVDesign-Pro which focus strictly on photovoltaic systems. Both software programs have their strengths and weaknesses towards grid-tied and off-grid systems. PVsyst did not seem to have an adequate inverter database for small off-grid applications however it had the remaining components in the database. This presented the need to import the inverter information manually from PVDesign-Pro and manufacturer specification sheets. Once this was accomplished the proper weather data was selected and the system components were selected the hour by hour result could be produced. The total energy consumption from the laptop and printer is 0.7kWh a day which totaled to 394kWh annually. Results of the annual usage data can be seen in Table 1.
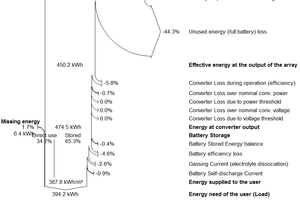
When modeling a photovoltaic system there are many losses which have to be taken into account other those relating to weather. There is a certain amount of unused energy that is simply unused due to over sizing the system. The two Shuco solar modules provide approximately 44% more power than what the batteries are able to store. Smaller modules or less battery storage could have been implemented to reduce waste however due to materials costs and system voltage. The two panels were needed to ensure power production for the year and batteries were selected based on price and capacity. For losses which occur in a system which exclude weather contributions, see Figure 6.
Designing the Mobile Cart[edit | edit source]

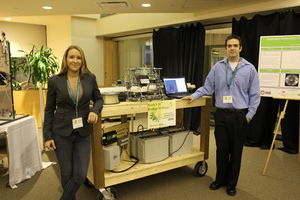
For the cart to be functional, many things had to be factored in. It had to be:
- Sturdy enough to hold the weight of the batteries and panels, approx. 620lb.
- Narrow enough to navigate through doorways.
- Able to move over uneven or rocky surfaces.
- Mobile enough for one or two people to move it.
The cart was built with 3/4" plywood for the table top and shelf, 4"x4" cedar for the legs, and 2"x4"s for reinforcement. Pneumatic castors were chosen for the wheels. Originally two swivel wheels and two static wheels were used on the cart. Although they did work, it was decided, that switching the static wheels for two more swivel wheels would greatly improve mobility, and it did. The real challenge of designing the cart was how to incorporate the panels onto it. When deciding how to mount the panels, many things were taken into consideration, the panels must be:
- Mounted in such a way as to fit through doorways.
- Able to adjust to different inclines for different situations, including 0̊ for southern locations.
- Shielded from damage during transport.
- Adjustable by one or two people.
- Attached solidly enough to avoid bending and damaging while adjusting.
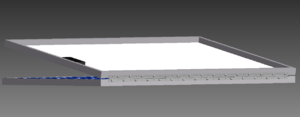
The finished cart can be seen in Figures 7 & 8. To attach the panels, one of the panels was fitted with 3/8" steel flat bar on the inside of the frame for reinforcement (see Figure 9,) to prevent the frame from twisting and possibly shattering the glass while adjusting. Then they were riveted together with piano hinge, so the PV of the panels were facing each other. A beam of unistrut was fit inside the steel reinforced panel, and held in place with four brackets. Four hinges connect the unistrut and panels to the body of the cart.The top panel (the reinforced one connected to the cart) has two square steel tubes attached to the bottom corner of it(see Figure 10.) At the other end of each steel tube is a thick 4" bolt (see Figure 11.) There are three holes at the base of either side of the cart that the bolts easily slide into (see Figure 12.) The holes were drilled out to hold the panels at 0°, 20°, or 30°. There are two legs attached by "L" brackets to the underneath of the other panel's frame (see Figure 13.) The legs were constructed of three pieces of slotted angle bar so they could be adjusted to different heights for the different angle settings. They automatically drop down when the panels are unfolded.
-
Fig. 9-Steel flat bar panel frame reinforcement
-
Fig. 10-Top panel leg connection
-
Fig. 11-Top panel leg bolt
-
Fig. 12-Angle holes
-
Fig. 13-Bottom panel legs
Figures 14-18 demonstrate how the panels open and close.
-
Fig. 14-Panels in closed position
-
Fig. 15-Lifting panels
-
Fig. 16-Top panel locked in place
-
Fig. 17-Opening bottom panel
-
Fig. 18-Panels in open position
Build Your Own Mobile Solar Cart[edit | edit source]
Supply List[edit | edit source]
| Item | Model | Quantity & Size |
|---|---|---|
| Schüco 220W PV Panels | MPE 220 PS 09 | 2 |
| MorningStar 30A Charge Controller | PS-30 | 1 |
| Powerbright Inverter | ML400-24 | 1 |
| Power 120AH Batteries | TC-12150C | 4 |
| Fusetek 4-Pole Combiner Box | 1 | |
| Blue Sea Systems Battery Switch | 6006 | 2 |
| 20A Fuses | 2 | |
| Power bar | 1 | |
| 8" Pneumatic Locking Swivel Casters | 2 | |
| 8" Pneumatic Swivel Casters | 2 | |
| 3/4" Plywood | 4'x8' | |
| 4"x4" Lumber | 12' | |
| 2"x4" Lumber | 34' | |
| Piano hinge | 64" | |
| Heavy duty 3" hinges | 4 | |
| 3/8"x 1 1/4" Steel flat bar | 20' | |
| Rivets | 32 | |
| Galvanized steel slotted angle bar | 7' | |
| Steel 1" square tube | 7' | |
| 1 5/8" x 7/8" Unistrut | P3300T | 64" |
| 3 1/2" x 3 1/2" Steel L Brackets | 8 | |
| 1 1/2" x 3 1/2" Steel L Brackets | 2 | |
| L Flange Brackets | 2 | |
| 4" 3/4" Bolts | 2 | |
| 3/8" x 3/4" bolts | 40 | |
| 3/8" x 2 1/2" bolts | 6 | |
| 5/16" x 2 1/2" Self tapping hex head screws | 16 | |
| #10 3" flat head wood screws | 100 |
Build Instructions[edit | edit source]
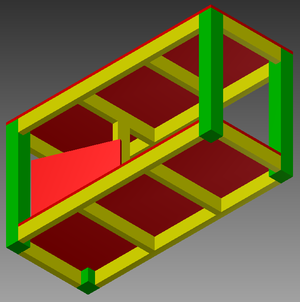


To build the same mobile charging cart, you will first need to obtain the supplies in the supply list. Start by building the actual cart. The dimensions of this cart are 24"x60"x31 3/4". Figure 19 shows a view of underneath the body of the cart, with the plywood in red, 4"x4"s in green, and 2"x4"s in yellow.Next attach the pneumatic casters, the two locking casters on one end.The components (charge controller, inverter, combiner box, and battery switches) can be mounted, and wired to the component board next. The component board is both for ease of use, and because the charge controller must be mounted vertically to function properly. See figure 3, for a possible layout, and figure 2 for a wiring diagram.The batteries must go on before the panels to ensure the cart does not tip over from the weight of the panels. It's recommended that two people load the batteries on to the cart, as these specific models of batteries weigh approx 110lb each. Keep the batteries close to center, but slightly more to the side opposite the side the panels will be mounted on, for even weight distribution. A box can be built around the base of the batteries to avoid any slippage while the cart is in motion. It is recommended to leave the batteries unwired until the end, but they can be connected at this point, being sure to keep the battery switch in the "off" position. Again, refer to figure 2 for wiring diagram, and figure 4 for a picture of the batteries hooked-up.
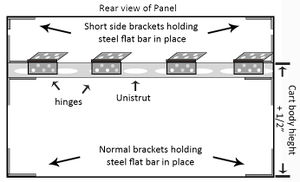
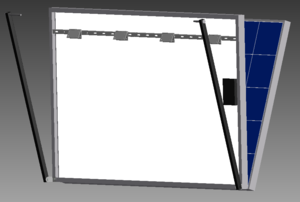
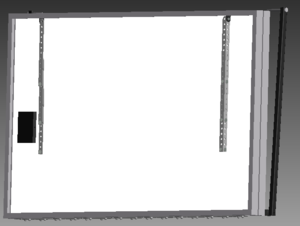
Once the batteries are on the cart, the panels can be put on. The first is to reinforce the top panel with steel flat bar. use two full length 'L' brackets in the bottom corners, and the two shortened brackets in the top corner, with the short ends pointing downward, see figure 20. Measure the height of the cart from the top of the wheel to the top of the cart. Measure that distance from the bottom of the top panel upward, adding an extra 1/2" for clearance. That will mark the top of where the unistrut support bar goes. Connect the four heavy duty hinges to the unistrut as in figure 20, making sure the distance between the outer two hinges is just less than the length of the cart.
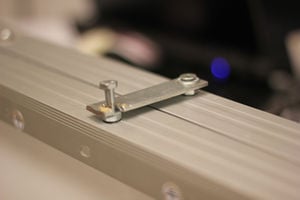
Next hinge the two panels together. Lay the panels on a large flat work surface, with the PV sides facing each other. Use durable piano hinge the length of the panels. Stagger the rivets to every other hole, and opposite holes on each side of the hinge, so the rivets will not be putting stress on each other when the panels are fully opened. See figure 21. On the opposite end from the piano hinge, install some sort of locking system, so the bottom panel stays locked in place when not being used. This can be done with a peice steel bolted onto the top panel at one end, and a hole drilled into the other end, with an opening to allow it to pivot around a bolt place on the other panel. See figure 22.
The panels can now be attached to the cart. At least three people are needed for this job. One person holding each end of the panels, holding them so the hinges sit flat on the cart. This can be made easier by finding or making blocks that are just the right height to put underneath the panels to help with support. The third person then secures the hinges to the cart. It is recommended to hold the panels and first mark the spots on the cart where the screws will be screwed into. Then pilot holes can be drilled without having to hold the panels in place the entire time.
The top panel legs go on now. The legs are two 40" lengths of square tube. Drill a 3/4" hole through one end of each of the legs. This is where the 4" bolts go. Secure the other end of the legs to the bottom of the top panel with the 'L' flange brackets. Using brackets with flanged bearing in them allows the leg to be securely bolted to the bracket, while still being able to rotate freely. Line the bracket up flush with the side of the panel, or a bit past, to avoid the leg scraping against the side of the panel. See figures 23 & 24.
Attach the bottom panel legs to the top of the bottom panel with the last two 'L' brackets, See figures 25 & 26. Each bottom leg consists of three equal lengths of 13.5" slotted angle bar. They are held together at the appropriate lengths with bolts. The top corners of the legs should be ground down, so they don't scratch the panels.
Updates & Plans for Improvement[edit | edit source]
Cart Leg Shading[edit | edit source]
With the current front leg design, unless the cart is constantly rotated to stay inline with the sun, there will always be shading on the bottom panel from one of the legs. This can be alleviated by using telescopic legs. With telescopic legs, they can remain collapsed when the panels are set to a lower angle, to avoid overhang.
- Update (May 28, 2012) - Three equal 13.5" lengths of slotted angle bar were used in lieu of telescopic legs. The shading problem has been fixed.
Wind Shield[edit | edit source]
When printing outside while the cart is charging, wind can cause premature cooling of the filament coming out of the extruder head. This can be fixed by building either a permanent transparent barrier surrounding 3 sides of the printer, or a removable 3 wall barrier that can put in place when printing outdoors.
Recycler Extruder[edit | edit source]
- See Recyclebot
See also[edit | edit source]
- Recyclebot on RepRap wiki
- Mechanical testing of polymer components made with the RepRap 3-D printer
- Development and feasibility of applications for the RepRap 3-D printer
- Life cycle analysis of distributed polymer recycling
- Solar powered distributed customized manufacturing
- Open source 3-D printing of OSAT


