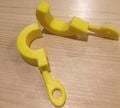
Sanitary medical devices are critical in healthcare. These locking forceps (also known as a hemostat) are considered an appropriate technology because they provide a basic human need, sanitary medical instruments. Many third world countries are lacking basic healthcare infrastructure; these hemostats can help provide a sanitary tool if the bed is disinfected before printing and handled with gloves after printing and during assembly. Once the locking forceps have been used, the old tips can be discarded and new tips can be installed. Additionally, specialized tips can be printed such as towel clamps. Instead of having many pairs of hemostats, this one pair can do it all! As of December 2019, all pairs of 3D printed hemostats and locking forceps have fixed tips. 3D Printing medical tools in developing nations is not a new idea. Voices of Africa have already started 3d printing medical device kits.
Bill of Materials[edit | edit source]
- All parts are fully 3D Printable. To create a functional hemostat, you will need to print:
-
Locking Forceps Arms
-
Locking Forceps Cap Piece
-
Locking Forceps Generic Tips
-
Locking Forceps Towel Clamp Tips
- Source File: File:LockingForceps.scad
- Additional libraries need to be installed in same directory:
- Thread Library: File:PolyScrewThread r1.scad
- Cube Library: File:Roundedcube.scad
- STL files and Source Files can be accessed on Thingiverse here
Tools needed[edit | edit source]
- MOST Delta RepRap or similar RepRap 3-D printer
- Flathead screwdriver, knife, or anything with a thin straight edge
Skills and knowledge needed[edit | edit source]
- No additional skills beyond basic 3D Printing Knowledge is required for creating a pair of locking forceps.
- If you would like to create your own custom tips, knowledge of OpenSCAD will be useful.
Technical Specifications and Assembly Instructions[edit | edit source]
- Print Time Estimates with.2mm layer height and 50mm/s
- Both Arms: ~1 Hour
- Generic Tips: ~1 Hour
- Towel Clamp Tips: ~2 Hours
- Cap Piece: ~7 minutes
- Assembly Time Estimate
- Less than 1 minute
- Assembly:
-
1. Slide each tip onto each arm. The offset pieces should line up.
-
2. Once each tip is slid into place, align the holes of the forceps.
-
3. Insert the screw cap into the hole in the forceps.
-
4. Use a flat head screwdriver (or similar device) to screw the cap in until snug. You can view the completed forceps at the top of this page.
Common Problems and Solutions[edit | edit source]
- All models except the towel clamp tips can be printed without supports. For the towel clamp tips, in the slicing software, remove the support inside of the holes (threaded and un-threaded holes where the cap piece goes through).
- When printing the generic tips, orientate the pointy end of the tips to be on the bed. Be sure to use a brim when printing this part in this orientation.
- If you are encountering issues with overhangs (threaded / non-threaded hole), point several fans towards the model being printed so the plastic can cool more rapidly. You may need to bump up your print temperature if the fan is affecting the temperature of your nozzle. Alternatively, if your printer has a part cooling fan, make sure it is toggled to 100%.
- When assembling, the tips may be a tight fit, you can either use a little more force or scrape the edges of the arms to reduce additional material (I found the side closest to the build plate sometimes has a tiny bit of additional material).
- For maximum strength, print in a more durable material such as PLA+ or PETG
Cost savings[edit | edit source]
- Each pair of locking forceps costs approximately $2
- Towel Clamp Hemostats: $24 (the printed versions can function as multiple types unlike all instruments currently sold on market)
- $22 or 91% savings
Benefited Internet Communities[edit | edit source]
- Kinjez / HESE [1]
- American Red Cross [2]
- World Health Organization [3]
- African Medical and Research Foundation [4]
- African Health Organisation [5]
- ↑ Web Page: Aubenc's "Poor man's openscad screw library" Available: http://web.archive.org/web/20201201093237/https://www.thingiverse.com/thing:8796
- ↑ Web Page: Daniel Upshaw's "roundedcube.scad" Available: https://danielupshaw.com/openscad-rounded-corners/


