

This page discusses Garden Update, a project that involves updating Zane Middle School's garden to better promote its integration into the school system. The Groovy Gardeners, a team of four students, designed Garden Update with Lonny Grafman's Introduction to Design class at Cal Poly Humboldt. Figure 1 shows the final result of Garden Update.
Background[edit | edit source]
The Groovy Gardeners, shown in Figure 2, is a team of four engineering students attending Cal Poly Humboldt and enrolled in Engr205 Introduction to Design for Spring 2014. Included in this team is: Patrick Hassett, Terran Hilden, Kaileigh Vincent-Welling, and Robert Williams. In this semester-long design project, these four students chose the task of updating a local middle school's garden. The client, Zane Middle School is a school of currently 620 sixth-to-eighth graders and is located in Eureka, California. Prior to the Garden Update project, Zane's garden contained twelve large planters growing only garlic. The garden was inaccessible and unused by students and staff. The client wanted the Groovy Gardeners to appropriately update their garden to a new, fairly self-sustaining, low-maintenance garden with curriculum that can be easily integrated into classes. This project was designed in order to establish a stronger connection between the client and their garden.
Problem statement and criteria[edit | edit source]
In meeting with Bernie Levy, a teacher at Zane Middle School who has shown much interest in the garden, the issue at hand was clear. Zane's garden prior to this project was unsuccessful at integrating itself into classrooms, growing a diversity of plants, being tended to, and being occupied and available. Shown in Figure 3 and Figure 4 is the client's garden prior to this design project. In knowing this, The Groovy Gardeners made a criteria list that is necessary for the success of the "Garden Update", shown in Table 1. This table categorizes each criteria next to the weight based on a scale of 1-10, with 10 being the most important criterion.
-
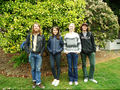
Figure 2 Team Groovy Gardeners (Photo by: T. Castillo)
-
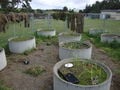
Figure 3 Work in Progress (Photo by: T. Hilden)
-
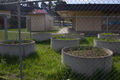
Figure 4 Previous Garden Condition(Photo by: P. Hassett)


| Table 1. Criteria | |
|---|---|
| Criteria | Weight |
| Low Maintenance | 10 |
| Accessibility/Use | 9 |
| Timing/Productivity | 7 |
| Safety | 7 |
| Cost | 7 |
| Integration into Classrooms | 6 |
| Aesthetics | 6 |
Description of final project[edit | edit source]
The Garden Update's final project includes updating different aspects of the garden that was at Zane prior to Spring 2014. We will discuss and relate these aspects. Shown below in Figure 5 is an image of the finished garden.
-
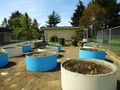
Figure 5 Overview of the Garden Update(Photo by: K. Vincent-Welling)
-
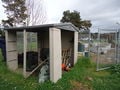
Figure 6 Vandalized Shed Before Torn Down(Photo by: K. Vincent-Welling)


Shed Before starting this design project, the client had a shed set up right outside of the garden, shown in Figure 6. This shed had been bought, initially, to keep tools and seeds in; however, it had been extremely vandalized. Due to the vandalism, the tools for the garden were then kept inside of a locked classroom. To make tools more accessible to people using the garden, the Groovy Gardeners tore down and recycled the vandalized shed and added a storage box inside of the garden's gate. This storage box can hold shovels, seeds, curriculum, and anything usable for the garden. It is durable, cheaper than buying another shed, and encourages people to work in the garden.
Landscaping Fabric
First, landscaping fabric that had been laid across the garden area's ground about ten years ago was ripped up by the Groovy Gardeners, shown in Figure 7. In order to mow the grass inside of the gated garden area, this fabric had to go. In place of overgrown weeds, flowers were planted throughout the entire garden space. These flowers include Marigolds, Sunflowers, and a Wildflower assortment. Removing the fabric gives the garden a cleaner look as well as further lowers the maintenance needed for the garden. If the garden is more aesthetically pleasing, it will in theory, invite more students, teachers, and community members to upkeep it and place it a higher level of importance within the school.
-
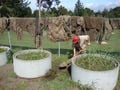
Figure 7 Ripping up Landscaping Fabric (Photo by: T. Hilden)
-
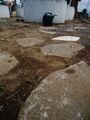
Figure 8 Upcycled Pathway (Photo by: K. Vincent)


Upcycled Path An upcycled pathway made by broken pieces of materials, such as concrete and granite, has been incorporated around the garden area to add to aesthetics as well as to encourage students not to step on the flowers growing around the garden space. It is shown in Figure 8. The upcycled path creates a more aesthetically pleasing garden space, and it categorizes the different planters. This organization will increase order within the garden space, further increasing safety within the garden as well.
The Planters Before this project got started, there were multiple planters of garlic. There are currently different varieties of kale, chard, strawberries, arugula, beets, cabbage, squash, beans, peas, corn, lettuce, brussels sprouts, broccoli, asparagus, and cilantro now growing in the other 11 planters. A view of the planters can be shown in Figures 9 and 10. Each planter has different plants, strategically grown based off of a companion plant method to better promote growth, shown closely in Figure 11. This plant companionship method relates to growing plants (two or more) that benefit each other in the same planter. Both plants grown in the same planter will share a symbiotic relationship, thus promoting one another's successful growth. Not only did the insides of the planter get renovated, but the outsides of them were painted to make them more aesthetically pleasing as well. Shown are AutoCAD drawings of the planter arrangements in Figures 12 and 13.
-
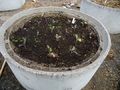
Figure 9 View of Planter (Photo by: K. Vincent)
-
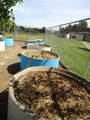
Figure 10 Planters (Photo by: K. Vincent)
-
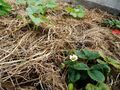
Figure 11 Strawberry Starts (Photo by: K. Vincent)
-
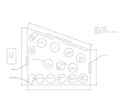
Figure 12 Garden View 2 (Photo by: R. Williams)
-
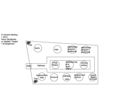
Figure 13 Simple Garden Overhead View (Photo by: K. Vincent)
-

Figure 14 HugleKultur (Photo by: P. Hassett)


.jpg)
.jpg)
.jpg)
Also, an experimental method called Huglekultur was used, as shown in Figure 14, in one planter. This is where rotting wood is buried deep under the planter's soil as to serve to balance the soil's water content. This could be incorporated into the school's curriculum and used as an experiment to observe and test.
Irrigation System
In order to allow the garden to thrive, there needs to be an easy way to get the plants water. The irrigation system decided upon that satisfied the client's criteria, shown in Figure 15, is a basic hose that attaches to the Rainwater Catchment System, shown in Figure 16, located right outside of the garden gate. This introduces a very simple, straight-forward watering method for the garden that will appropriately re-use the caught rainwater. This system will be the most efficient in this project's circumstances.
-
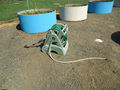
Figure 15 Hose for the Garden (Photo by: K. Vincent)
-
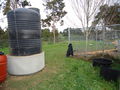
Figure 16 Rainwater Catchment System just outside of the garden (Photo by: K. Vincent)


Curriculum/Information
In order to better persuade teachers and faculty members to incorporate the garden into their classrooms, researched curriculum will be provided for the teachers to give them ideas to use. Not only have lesson plans been provided for the teachers, but charts, tables, and information about how to upkeep the garden are also accessible for the school. Information includes when to plant, when to harvest, how much to water certain plants, and other useful aspects to gardening. All of this information has been collaborated in a binder kept with teacher Bernie Levy, in hope that it will further motivate the school to put their newly updated garden to use. An example chart is shown in Figure 17.

Memorial Site
The memorial site is located just outside of the garden, shown in Figure 18. However, prior to the start of this project, it was covered by overgrown grass and weeds and was unrecognizable. The area was weeded around, and a variety of flowers were planted to emphasize its existence. In addition, a gravel pathway, shown in Figure 19, was installed leading to the site. The pathway gives this area a cleaner look. Figure 20 is an AutoCAD drawing of an overview of the memorial site.
-
![Figure 18 Memorial (Photo by: K. Vincent-Welling)]]](/w/images/thumb/4/4f/Memorial.JPG/120px-Memorial.JPG)
Figure 18 Memorial (Photo by: K. Vincent-Welling)]]
-
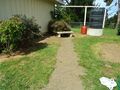
Figure 19 Memorial Site Pathway (Photo by: K. Vincent-Welling)
-
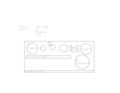
Figure 20 Memorial Site Overview AutoCAD Drawing (Photo by: T. Hilden)
![Figure 18 Memorial (Photo by: K. Vincent-Welling)]]](/File:Memorial.JPG)

.jpg)
Costs[edit | edit source]
Hours The Groovy Gardeners combined and added up the total amount of hours spent on this design project. The total amount of hours spent on the Garden Update is 173 hrs. Figure 21 portrays how many hours spent on each section of the design process, shown below.

Materials
Materials used for this project consisted mainly of the different types of seeds and starts we decided upon planting. Fortunately, there was a portion of donated plants collected and used for the garden, represented in Table 2, below. The total amount of money spent was $198.00.
| Table 2. Material Costs | Quantity | Material | Source | Cost ($) | Total ($) |
|---|---|---|---|---|---|
| 1 | Pack of Quinoa Seeds | Seed Exchange | 0.00 | 0.00 | |
| 1 | Flat of Chard Starts | Bayside Park Farm | 0.00 | 0.00 | |
| 1 | Pack of Kale Seeds | Seed Exchange | 0.00 | 0.00 | |
| 1 | Flat of Kale Starts | Bayside Park Farm | 0.00 | 0.00 | |
| 1 | Strawberry Starts | Farmer's Market | 10.00 | 10.00 | |
| 7 | Varieties of Flower Seeds | Seed Exchange | 0.00 | 0.00 | |
| 2 | Bucket of Paint | Ace Hardware | 15.00 | 30.00 | |
| 2 | Car Loads of Broken Concrete | Alves Inc. | 0.00 | 0.00 | |
| 9 | six-pack of vegetable starts | Pierson's Garden Shop | 0.00 | 0.00 | |
| 1 | Hose | Lonny Grafman | 0.00 | 0.00 | |
| 2 | Paintbrush | Walgreens | 4.00 | 8.00 | |
| 1 | Storage Box (Shed) | Ace Hardware | 150.00 | 150.00 | |
| Total Cost | $198.00 | ||||
Testing Results[edit | edit source]
Testing out the final project will predominantly come only with time. If the garden is to be a success, then it will thrive and be in a stable, healthy state for years to come. Right after the project is finished, the responsibility will be handed over to the school for maintenance. A few different testable areas of the garden were able to be checked including the upcycled path. For the path, the pieces of materials were tested to make sure they were firmly in place and even. Testing results showed that the pathway is safe and appropriately integrated into the garden for people walking upon it. Another aspect that was tested was the irrigation method. The hose was successful in fitting much of the criteria. It is relatively safe, easy to use, and accessible within the garden for students, teachers, and community members.
How to[edit | edit source]
The garden Zane Middle School initially had was not in an ideal state. In order to update the area to our finalized project, there were multiple steps that needed to be taken. The figures below represent the main steps taken regarding the different aspects of the garden.

Prep the soil and pull up any little weeds.

Dig about inch-deep holes, spaced out a few inches apart from each other, and pour a little bit of water in each one to moisten the soil. Water the starts and spread out each start's roots slightly.

Put each start in its own hole in the planter, and then pack soil around it so that the roots are underground and the leaves are not. Feed the starts, now integrated into the planter soil, with a little bit of water, and that is all that needs to be done to plant the starts.

Collect upcycled materials that are available.

Dig a small pit in the dirt to place the material into. This pit in the ground must be even and not higher on the outer part or else the material put into the hole may be more prone to break in half under pressure. Then, fit the piece of concrete into the corresponding hole.
Fill in the empty space around the piece of concrete so that it is stuck in the ground. Continue to do this further and further, and you will have a pathway.

Make a pile of organic matter such as ripped up grass and plants. Let it sit in the pile to allow decomposing.

Separate the weeds out of the mulch- you don't use these. Take handfuls of the rest of the decomposed organic matter and spread it over the soil in the planters BEFORE planting the starts. Spread this mulch in a thin layer.

Move the mulch as you plant the starts, but adjust it back again so that it is surrounding the starts but not covering them.
Video[edit | edit source]

The video shown depicts the Garden Update.
Discussion and next steps[edit | edit source]
Overall, the Garden Update resulted in a finished project the group was proud of. There were many crucial updates that needed to be done in order to transform it into a low-maintenance and successful garden. The next steps? Well, it is up to the school to upkeep their new garden and to integrate it into their classes and school system. If there are more people such as parents and teacher who are passionate about gardening, it will hopefully inspire and motivate others to lend a helping hand in taking care of Zane Middle School's upgraded garden. The Groovy Gardeners left the garden in a state in which it can be easily maintained and integrated into their classrooms.
Update October 2014[edit | edit source]
The updated garden at Zane Middle School appears to be functioning as intended. There has been no wear on the planters that were installed, there are still plants being grown and small amounts of produce have been harvested and used by students at the school. It does not appear that anything in the garden has been vandalized since the project was finished.
Over summer the garden had almost zero upkeep, but apparently there were no major issues. School counselor Trevor Hammons informed us that there are not enough resources to give the garden regular attention. It is evident that there are some weeds growing and some of the plants look like they are dead or dying. The memorial bench is not there and the path leading to it is no longer visible. These minor issues could be remedied through class activities or invitations to members of the community to help on a volunteer basis.


