
My name is Noah Stewart and I am a Junior at Principia College in Elsah, Illinois, majoring in Global Studies. I am orginially from Dresden, Germany, where I grew up and graduated high school in 2017. At Principia College, I am engaged in a variety of activities including being the Co-Director of the 2019 International Perspectives Conference, being the student manager of the Social Assistant Team, and playing the Violin in the College Orchestra and String Quartet.
Prints[edit | edit source]
| Preliminary Print: Hufflepuff Crest | 
|
I got this model off of Thingiverse from user kakhbarth (CC BY 3.0;https://www.thingiverse.com/thing:2384939). To fit onto the Jellybox build plate and for a faster print, I had to scale it down to 40%. I left the print and extrusion speed unchanged. However, because this has quite intricate designs and I scaled it down, I lowered the layer height to 0.1 for maximum detail. I used a skirt to make sure there was no warping. I did not change the number of shells, fanspeed, or infill. |
|---|---|---|
| Replacement Part | 
|
This is the feeder yoke replacement part. I got the design of off the Imade3D website. As it is not a very detailed design, I kept the layer heigt at 0.3 and infill at 20%. |
| Brandenburg Gate | 
|
This is a fun print of the Brandenburg Gate that I made now that my printer is working well. I lowered the layer height to 0.1 to make sure all of the details came out well. That worked out even though the horses pulling the carriage ended up looking like sheep. That is mainly due to the fact though, that I had to scale the model down. I got the design from vandragon_de on Thingiverse.com which is licensed under the Creative Commons - Attribution - Non-Commercial - No Derivatives license |
| Church of Our Lady | 
|
This is a print of the Church of Our Lady (Frauenkirche) in Dresden, Germany. I got the design off of Thingiverse from user vandragon_de and is licensed under the Creative Commons - Attribution - Non-Commercial - No Derivatives license. For the print, I set the layer height to 0.2 and infill to 20% as this was a very detailed design. Additionally, I added a brim to minimize warping as much as possible. |
| Bench Thing | 
|
This was my first design using FreeCAD. The design was made by me following the class instructions. I kept the layer height in Cura on 0.3 and the infill on 20% to save time. It would have been good to print a brim instead of a skirt as I ended up having some warping at the bottom. |
| Penny Trap | 
|
This is my first design using OpenCAD following the in-class instructions. To make the print go fast, I set the layer height to 0.3 and the infill to 20%. Additionally, to minimize any warping I started the print with a brim. This little penny will be trapped forever... |
| Rock Wall Hold Design | This is the rock wall hold I designed using the design from Thingiverse by mfarson licensed under the Creative Commons - Attribution license. I used OpenSCAD to alter the design and make my rock Wall hold unique. To print this design I would recommend using a large layer height and 20% infill as this will provide the most amount of strength to the hold. | |
| Octahedron and Cube Educational Aid | 
|
This is a design to print an octahedron and cube shape. It can be valuable for classes in crystallography to visualize the shape better. Crystals are used to help teach about symmetry. This shape is a physical maniuplative that can be used to help teach those concepts. This is a basically free alternative to the models that are available online which all cost well over $100[1].The blender file needs some fixing. However, the stl file is fixed with the help of netfabb and printable. |
| iPad Stand Corner Pieces | 
|
This is my design for the science project assignment. They are corner pieces for an iPad stand that holds the iPad in place inside the frame. The iPad stand in question has the model numbers SKU IPDLMSSVL3 and GTIN 810878025681[2]. If one were to lose even only one of the corner pieces, one would need to buy a whole new stand for $99 to have a new functioning stand as the company does not sell any replacement parts for it. The STL files for the corner pieces are available on NIH[3]. |
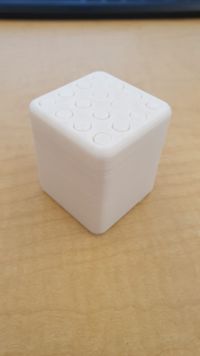
| OSAT Stacking Pins | 
|
This is my OSAT project. It is a cube with different length holes and includes pins in corresponding length. It can be used in occupational therapy for children to develop their dexterity. The STL and FreeCAD file can be found on Thingiverse[4]. |
| Christmas Ornament | 
|
This is a simple Christmas ornament that has a chapel shaped cutout in the middle. The included files let you directly print the ornament with the added "Merry Christmas" writing (stl). If you want to add your own writing, you can customize the FreeCAD file included that doesn't have any writing on it yet.
The cost of printing this ornament at 60% scale with a 0.2mm layer height (in order to ensure detail in the writing) is roughly 40 cents (US). It is almost impossible to get a comparable Christmas ornament for less than $5. |
Stacking Pins OSAT Project[edit | edit source]
Project developed by NoahStewart (talk) 20:56, 18 November 2019 (UTC)
Abstract[edit | edit source]
- This is a commonly requested toy by occupational therapists used for patients to begin building their dexterity while in physical therapy. It consists of a set of pins of different length that can be placed into a block.
Bill of Materials[edit | edit source]
- To print this object, you need regular PLA material. There is no need for other parts or materials.
- The STL and FreeCAD file can be found on the following Thingiverse [5] page.
Tools needed[edit | edit source]
- Jellybox or similar RepRap 3-D printer
Skills and knowledge needed[edit | edit source]
- There were no special skills needed to make the OSAT.
Technical Specifications and Assembly Instructions[edit | edit source]
- Be sure to scale the object to fit your specific printer dimensions. It has been found to still function properly at 30% scale. Additionally, when printing, I recommend attaching it to a brim to avoid any warping during the print process. After printing, make sure to get rid of any brim parts on the sticks in order to avoid them from accidentally getting stuck.
- The print time at 30% scale is roughly 2.5 hours.
- Assembly only involves detaching the brim and should not take longer than 10 minutes.
Common Problems and Solutions[edit | edit source]
- There are no known problems with this OSAT.
Cost savings[edit | edit source]
- The cost of this object depends on the scale you print it at. At 70%, the cost would be roughly $4,50. At 30%, it would be $0.60.
- Commercial equivalents cost upwards from $30 [6]. These objects look different but the therapeutic function is similar.
- You're savings will be around $25 or 83%. You can save even more by scaling the object down without losing functionality.
References[edit | edit source]
- This design is a response to a need voice by Dr. Gershenson on the "Requests for 3-D printable open source appropriate technology"[7] page.
Reflection on Participation in the Open Source Community[edit | edit source]
I have to say that I am fairly new to participating in the open source community. However, as soon as I learnt about it I was fascinated by its innovation. I believe that it is another step in the long-term development of us as a human species coming closer and bridging our differences for the greater good. Keeping innovations and ideas secret is done in order for one group to reap the benefits of it while another does not. As we realize that there is more to this world than competition and the growth of one's own wealth and status, it becomes clear that we must work together and build off of each others ideas to achieve the impossible.
I got to experience the power of open source working by building a Jellybox printer by myself. The community around these printers and the innovations it makes was extremely helpful when, at one point, there seemed to be a missing part which was included in newer generations of the printer but not in the older ones. Thankfully, someone had created and published the design for the part that was needed and we simply printed it with another printer.
In the future, I think that the concept of open source can be expanded to include industries and spheres beyond manufacturing and software. What would be possible if every economic industry and intellectual source were available to anyone? There certainly are clear benefits but in hindsight maybe also some drawbacks of such an environment. Time will tell where the open source communities goes and which blessings it will have on the world.