

This protocol is for the Open source solar spectrum project that helps in collecting data on solar flux variations depending on wavelength and the angle of tilt, differentiating between direct and diffuse solar light.
UV Calibration[edit | edit source]
Since the UV part of the spectrum is not calibrated correctly, due to the low radiation halogen bulb in this part of the spectrum, we have to calibrate the Bolivian detector with a UV lamp, and merge both reference files to get a calibration in the whole spectrum range.
Instead of the calibrated light source, use both lamps (UV reptile and Halogen Bulb) and use the sent spectrums of the lamps as a referece '.lmp' files.
This is a spectrometer calibration using a calibrated light source:MOST
Materials needed for Calibration[edit | edit source]
Step by Step Calibration[edit | edit source]
- Connect one end of the USB cable to the spectrometer, and the other end to the computer.
- Connect one end of fiber optic cable to the spectrometer, and attach the cosine corrector to the other end.
- Connect the fiber cable with the cosine corrector to the calibrated light source, and secure the connection with the Allen wrench.
- Turn on the Calibrated Light Source, turn on the Deuterium lamp, and then wait 40 minutes for the lamp to heat up.
- After the lamp is warmed up, start up the SpectraSuite software, a spectrum graph should be seen on the screen.
- Click on the spectrum graph to put a green line on the spectrum. This will bring up a toolbar underneath the spectrum graph.
- Click the Peaks symbol on the toolbar that pops up, it will be on the lower right corner of the screen. This will put a horizontal line across the spectrum graph.
- Select Manually select numeric ranges from the toolbar above the spectrum graph, and set the Wavelength Maximum to 400 nm, since the Deuterium lamp has range up to 400 nm.
- Set the Boxcar width to an appropriate range. The boxcar width is an averaging of a single data point with the values surrounding it. It smooths out the spectrum, but reduces the signal to noise ratio if pushed too high. A good value for the USB2000+ is 5 and a good value for the NIRQuest is 1.
- Adjust the integration time until the highest peak is at or slightly above the horizontal line from step 7. Remember this integration time.
- Close the spectrum graph that is currently open, usually called Graph (A).
- From File, and then New, select New Absolute Irradiance Measurement.
- A wizard will start. Select New spectral acquisition and click next.
- On the next screen, make sure the correct source spectrometer is selected, and then continue.
- Select New calibration and continue.
- Enter the Integration time from step 10. Enter the Boxcar Width from step 9. Do NOT select Set Automatically. Continue.
- Click the yellow light bulb to take a reference spectrum and continue.
- Momentarily block the light by removing the fiber and covering it with a dark cloth. Press the grey lightbulb to take a dark reference spectrum and then continue.
- Load the calibrated lamp data file (the .lmp file) associated with this calibration and continue.
- On this final screen, select Fiber Diameter and input the fiber diameter. If you're using the CC-3-UV cosine corrector put 3900 for the fiber diameter.
- Before leaving the final screen, be sure to select Save to File to save the calibration.
- Click Finish to finish the calibration. The resulting graph will the calibrated spectrum with absolute irradiances. Compare the irradiances from the spectrometer to the ones in the .lmp file (which can be opened in Notepad). If the calibration was done correctly then the values should be within 10% of the values in the .lmp file.
- Repeat steps 4 through 22 with the Halogen lamp to do the VIS portion of the calibration. Do not set a max in step 8.
- Once the VIS calibration is done, combine the two calibration files for a total UV-VIS calibration by going to Processing, Absolute Irradiance, Combine Calibration Files. Load the Deuterium lamp calibration under the Deuterium Calibration box and the Halogen lamp calibration under the Tungsten Calibration box.
Ideal Calibration Protocol[edit | edit source]
From here on out - this is how we are going to do it:
Calibrate Spectrometer[edit | edit source]
Follow the step by step Calibration in previous section using the calibrated light source:MOST. The spectrometer is a USB2000+ VIS-NIR spectrometer with a range from 350 nm to 1000 nm. The calibration is done using the CC-3-UV-S cosine corrector.
Calibrate Light Source[edit | edit source]
After calibrating a spectrometer, the ExoTerra Repti Glo 10.0 Compact 26W reptile light's absolute irradiance is measured. This reptile light will serve as a calibrated light source for calibrating other spectrometers when the option of using a calibrated light source like the calibrated light source:MOST is not possible.
Reptile Light Measurement Setup[edit | edit source]
The optical set up for the spectrometer should be the exact same as when it was calibrated. Note: if your optics are different the lamp calibration file from MOST is the actual power at each wavelength for your light source, which can be used for any optics setup.
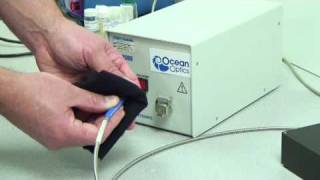
In our case, this was the USB2000+ spectrometer connected to a 600 micron fiber optic cable with the CC-3-UV-S cosine corrector attachment. The reptile light is placed in a common desk lamp. The desk lamp is connected to a Variac Power Supply set to output 120V, which is verified by measuring with a multimeter. All of the irradiance measurements are done within a sealed cardboard box to minimize external light exposure. The desk lamp goes into the cardboard box through a hole cut on one side, and the is sealed in place using black duct tape. Please refer to Figure 1a and 1b. On the other side of the cardboard box is the fiber optic cable with the cosine corrector. Please refer to Figure 1c. The total setup can be seen in Figure 1d. The distance between the reptile light bulb and fiber cable is 50.2 cm.
-
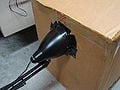
Fig 1a: Reptile Light in Lamp taped to testing box
-
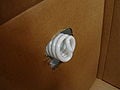
Fig 1b: Reptile Lightbulb shown in testing box
-
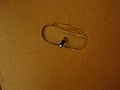
Fig 1c: Fiber Optic Cable with cosine corrector in testing box
-
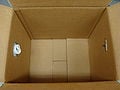
Fig 1d: Complete test setup. Reptile light on the left and fiber cable with cosine corrector on the right.


Step by Step Measurement of the Reptile Light[edit | edit source]
- After setting up the reptile light as described in the previous section, turn on the reptile light and let it warm up for 30 minutes.
- Start the SpectraSuite software.
- Close the spectrum graph which is open, this is usually Graph (A).
- Go to File, New, New Absolute Irradiance Measurement to open up the wizard.
- On the first page of the wizard, select New spectral acquisition and continue
- On the next page, make sure the correct spectrometer is selected and continue.
- Select Get irradiance Calibration from File and continue.
- Select the combined UV-VIS calibration file from the spectrometer calibration and continue.
- Verify that the Fiber Diameter is correct and continue. It should be 3900 micron if you're using the CC-3-UV cosine corrector.
- Set the integration time to 500 milliseconds. Pick a boxcar width of 3. Set the scans to average to 50. Continue.
- Turn off the reptile light and take a dark spectrum reading by clicking on the grey lightbulb. Click finish to generate the absolute irradiance spectrum.
- Save the spectra data by pressing the Save button on the toolbar above the spectra.
- On the save screen, select Processed Spectrum for the Desired Spectrum to save. For the File Type, select Tab Delimited, No Header. Click Save to save the spectrum.
- Rename the resulting .txt file to be a .lmp file.
- Open the .lmp file with Notepad or some other text editor.
- Remove all the entries below 350 nm and all the entries above 800 nm. The spectrometer, the USB2000+ gives very messy results below 350 and there is nothing relevant past 750 nm coming from the reptile light. The resulting file will be the LAMP file for the reptile light and will be the calibrated light source for other spectrometer calibration.
Calibrating a Spectrometer using the Reptile Light[edit | edit source]
- Set up the reptile light as described here
- Turn on the reptile light and let it warm up for at least 20 minutes.
- Follow the steps as described here starting from step 5.
- On Step 9, pick a boxcar width of 3.
- On Step 18, you may simply turn off the lamp to take a dark spectrum.
- On Step 19, make sure to load the .LMP file associated with the reptile light.
- Do not do Steps 23 and 24 since there is only one lamp.
- When using the calibrated spectrometer, be sure to only examine the spectrum up to 750 nm. Because the LMP file ends at 800 nm, the data right around 800 nm will be nonsense.