Welding Wood
This construction manual is about how to interconnect bits of wood in a way that every craftsman would regard very unrealistic. It is simply never done this way, it could not work, it is not strong.
But you may become addicted to it. Indeed it looks like a poor conctruction. Find out its rich potential. And think twice. When your mind really follows what happend when the force on one piece of wood has to be transferred to an other piece, you choose for internonection of the surface areas of both materials. That is precisely done with this way of welding. Better explore Welding Wood!
|
|
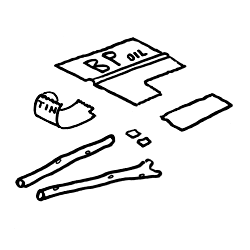
Materials you need for Welding Wood
For a very strong connecting between two pieces of wood, start prepare:
- The two pieces of wood. Make sure the wood is in good condition at the place where the connection is made. It should be clean, no bits of bark or loose paint. No knots, they are too hard for nails. Dimentions of the bits of sheetmetal relate to the diameter of the wooden sticks.
- For the first bond, two bits of thin tin, as can be cut from a small can, length and width equal to the diameter of the sticks.
- For the final connection one piece of sheet metal cut from an oil drum, width 3 x the wood, length 6 x the wood.
- Small nails, 1 cm, for the first connection, nails 2,5 cm for the final connection.
- Cut the tin with a knife, the sheet from the drum with a cutlass, ax or chisel. Cut with the very tip only.
|
|
|
|
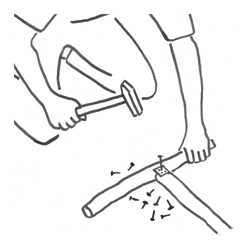
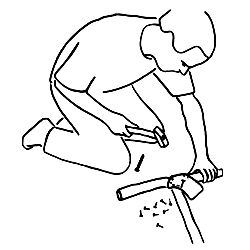
Provisional interconnection
- Find out for yourself the best position for the two wooden part. The parts lay stable on the ground or someone holds the parts in position for you.
- Use the two pieces of thin tin and the small nails to make a provisional connection as shown, on both sides of the wood.
Do not put load on the wooden parts, just use the connection to see if it really suits your plans.
|
|
|
|
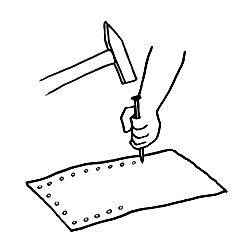
Prepare small holes for the 2,5 cm nails
- Find a sharp pin or nail (ca 8cm). Keep the point sharp when working with it.
- Pierce holes in the sheet cut from the oil drum, not larger that needed for the nails. The little indents you make will later fit the head of the nail, the bur on the back side will later give extra hold when driven into the wood.
- Pierce the holes close to the edge (0.5 cm.) and about 2 cm apart.
|
|
|
|
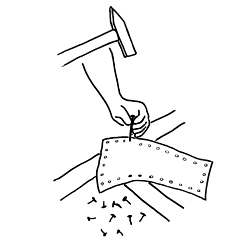
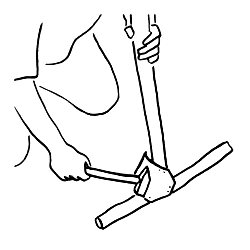
Positioning the sheet on the joint
It takes some experience to do this right, but in general:
- lengthwise the direction of the sheet middles between the pieces of wood.
- The sheet covers the joint between the wooden parts enough to allow the corners to be bent down.
- Then drive in three nails to fasten the sheet in that posision.
|
|
|
|
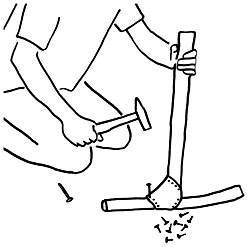
Bent down and fasten the corners at this side
As the sheet is properly fixed into position, you can bent the corners of hte sheet down, hammer the edge of the sheet to nestle it against the wood. Then drive in the nails, at this side of the joint.
|
|
|
|
Hammer the sheat around to the other side
- Now it is possible to lift the joint from the floor and bend the sheet over in a few steps.
- After each bit of bending, repeat to hammer the edge to make it nestle itself against the wood, then fixate it with a nail.
- Continue with bending, nestling the edge and fixating with a nail, until the sheet is wrapped all around the joint.
|
|
|
|
Fasten the sheet all round
The joint is now building up strength. Add extra strenght by:
- Inspecting how the edge flows against the wood. Where there is some opening, close it by driving the sheet down with light hammerblows.
- At such a place pierce the sheet with the sharp pin and add another nail
- Make sure there are no bits of sheet or nails sticking out. If so, hammer them down, so the merge with the wood.
- Inspect the result by letting your fingers glide aound the joint. It should feel smooth all round.
|
|
|
|
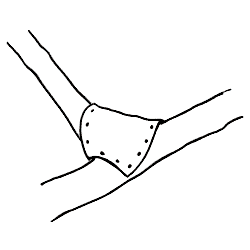
This is as it should look when finished
- The corners of the sheet just overlap. As a result at these corners there are nails that pierce two layers of sheet metal, closing the loop around the wood!
- The corners at the short side of the sheet meet each other. As it works out this way, the sheet is wrapped around in a circle and not in a spiral.
- Only hte corners overlap. If the sheet is to long, cut of a strip of the sheet to correct this.
- Finally inspect again if the joint is smouth at the outside, so it cannot hook into skin or clothes.
- When you are not satisfied, just take the sheet off. This is easy, starting with a knife or screwdriver, then pulling the sheet away from the wood with a pair of plyers. If done with care, the nails come out straigt for re-use. Then you hammer the sheet flat and start anew. As much as with electric welding of metal, welding wood takes some practice to do it well.
|
|
Template:Demotechpage
Cookies help us deliver our services. By using our services, you agree to our use of cookies.


