
The purpose of this project was to design and construct a rainwater harvesting system for Redwood Coast Montessori school in an effort to inspire and educate the students and community on the subject of renewable water sources that can be used to maintain the school's ornamental garden. By designing the system based on key criteria and constraints Team RainBeaus was able to create a functionally safe system that allows the students, with moderate supervision, to access the collected water to be used for gardening. The results of our efforts can be summarized simply by stating the system works effectively and the students are able to efficiently tend to their gardens. The system will be revisited to ensure its capability to withstand the harsh elements out on the peninsula.
Background[edit | edit source]
Redwood Coast Montessori is a school in Manila, CA that prides itself on the education of its students through non-traditional methods including: diversifying student age groups, large blocks of work time, and allowing the students the opportunity to choose how and what they will learn based on a liberal curriculum. Cal Poly Humboldt's Engr205 Introduction to Design class has been tasked with creating a variety of systems to improve the infrastructure of the school while simultaneously influencing the students positively in regards to sustainability, reuse of "waste" materials, and creative problem solving. Team RainBeaus was given the opportunity to create a rainwater catchment system that would help to reduce the school's water needs by storing rainfall to be used by the students for gardening.
Problem Statement and Criteria[edit | edit source]
The objective of this project is to reduce the school's water consumption by designing an environmentally friendly rainwater catchment system using upcycled materials. The system's collected water will be used by the students to tend to the school's ornamental garden. The system must also meet the following design criteria and constraints as best as possible.
| Criteria | Constraints | Weight (1-10) |
|---|---|---|
| Safety | The system must not pose any risk to students. | 10 |
| Educational Value | Encourages student interest in sustainability. | 9 |
| Maintainability | Non-professionals must be able to maintain/fix the system based on a maintenance instruction sheet. | 8 |
| Durability | Able to withstand children and elements for a reasonable time (~5 years). | 8 |
| Adaptability | School administrators must be able to add supplemental tanks if necessary. | 7 |
| Ease of Use | K-8 students must be able to easily retrieve water from the system with minimal supervision. | 7 |
| Building Time | Team RainBeaus must be able to construct the system in a short work period on site. | 7 |
| Cost | Must be less than $400; less expensive is better. | 5 |
| Use of Upcycled Materials | Built with recycled/diverted waste; more is better. | 5 |
| Aesthetics | Professional appearance; fits in with environment. | 4 |
| Number of Gallons Stored | 55-300 gallons; more is better. | 3 |
Description of final project[edit | edit source]
The final solution implemented at Redwood Coast Montessori, the P.V.C. System, was chosen because it meets the stated criteria and satisfies the client's needs and specifications best. The P.V.C. System follows the basic design of most of the other considered alternative solutions with a few variations namely the storage tanks, the conveyance components, and the filtration mechanisms. It is comprised of mostly upcycled materials, with the exception of the PVC piping. Rainwater flows down the school's sloped roof and travels through the existing gutter system into a first flush diverter. This component collects the first bit of rain containing most of the contaminants then, when it is full, the rest of the water is diverted down another section of the piping through screens and into the 55 gallon food drums. Once the students are ready to use the collected rainwater a supervisor must unlock the system and the spigot can be turned on to allow water to flow out. Materials such as the food drums, PVC piping, and cinderblocks are up cycled or purchased cheaply, minimizing our costs.
Costs[edit | edit source]
The following charts illustrate Team RainBeaus' costs analysis with respect to both time spent designing the system as well as money spent on creating the system.
-
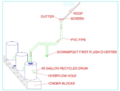
Diagram of the P.V.C. System
-

Time spent building the P.V.C System in hours


| Item | Quantity | Retail Cost ($) | Our Cost ($) |
|---|---|---|---|
| Rain Barrels | 3 | 70.00 | 30.00 |
| PVC Pipes | 3 | 21.00 | 5.00 |
| First Flush Diverter | 1 | 32.50 | 32.50 |
| Mosquito-Proof Mesh | 1 | 3.17 | 3.17 |
| Cinder Blocks | 20 | 131.60 | 65.80 |
| 4 1/8" Hole Saw | 1 | 27.59 | 27.59 |
| UV-6800 Adhesive | 1 | 8.99 | 8.99 |
| Caulk Gun | 1 | 3.99 | 3.99 |
| 3/64" Rubber Sheet | 1 | 11.90 | 11.90 |
| 24" Drum Lids | 3 | 25.36 | 25.36 |
| Zipties | 66 | 7.12 | 7.12 |
| 3" PVC Coupling | 3 | 6.49 | 6.49 |
| 3" PVC Pipe | 1 | 18.65 | 18.65 |
| 45 Degree PVC Elbow | 1 | 5.80 | 5.80 |
| 90 Degree PVC Elbow | 1 | 8.50 | 8.50 |
| 3" x 10' PVC | 1 | 9.20 | 9.20 |
| Bend 1/8 PVC 3" Hub | 1 | 2.69 | 2.69 |
| Coupling 3" PVC | 2 | 3.58 | 3.58 |
| Bend 1/4 PVC 3" Hub | 1 | 5.60 | 5.60 |
| Total Cost | $403.73 | $281.93 | |
Testing Results[edit | edit source]
Team RainBeaus conducted a series of tests in order to ensure the quality of the rainwater catchment as well as to observe how the students at Redwood Coast Montessori make use of the captured rainwater. These results were then considered by the team in order to decide whether it would be necessary to alter the system to improve its use for the students. After careful consideration it was determined that the system would meet the standards the team had set forward in regards to durability and ease of use and therefore it was not necessary to alter the system in any substantial way.
How to build[edit | edit source]
Step by step instructions to creating a rainwater catchment system are given in the table below.

Lay a cinderblock foundation.

Cut holes in the rain barrels to connect via PVC pipes.

Cut holes in main rain barrel for spigot and downspout.

Cut overflow hole in last rain barrel.

Secure rain barrels to cinderblock foundation.

Connect PVC downspout to gutter of roof.

Connect PVC piping to first-flush diverter.

Connect PVC piping to main rain barrel.
Step by step guide to building a rainwater catchment system (w/ pictures).
How to Use[edit | edit source]
- Allow time for rain to collect into the system.
- Open the spigot to allow water to flow out.
- Fill a watering can from the spigot.
- Transport water to garden for use.
If Problems Arise[edit | edit source]
| Troubleshooting | |
|---|---|
| If | Then |
| Water is not flowing into the barrels | Clear debris from gutters and ensure pipes are not blocked by debris |
| Water in barrels is unusably dirty | Flush entire system with water and empty barrels for a fresh start |
| First-flush diverter is not emptying | Unscrew slow leak at bottom and clear away blockage |
| Water does not leave spigot | Remove barrel lids and clear debris that may be disrupting flow |
Discussion and next steps[edit | edit source]
The P.V.C. System has met its design specifications and satisfied the Redwood Coast Montessori students by providing the community with an ample amount of water to be used for gardening. This harvested rainwater has reduced water needs for the school and therefore cut operation costs in regards to water. It has also served as a valuable and inspirational educational tool for students, staff, and community members. The system has also proven its durability by surviving the harsh weather conditions of the dune environment. The system will serve as an model to sustainability and renewability through upcycling and creative design processes and will not be the last system constructed to serve this purpose.
