
Building a Chicken Coop to help educate students at Redwood Montessori. Redwood Coast Montessori and the Community Center of Manila have made agreements with the ENGR215 Fall 2014 class of Cal Poly Humboldt in regards to incorporate the students' class projects into the area of the Manila Community Center so that they may benefit the school and surrounding community. The Chicken Coop project's objective was to house and protect poulty that may be owned by the school. With children in mind, the coop should be easy to use and with a harsh coastal environment the school is located on, the structure must be durable.
Background[edit | edit source]
Founded in 2005, Redwood Coast Montessori is a school located next to the Manila Sand Dunes in Arcata, CA. The first class was held in one classroom on a traditional public school campus in Eureka, CA. In June 2012, the Arcata School District approved Redwood Coast Montessori's charter application to become a K-8 independent public charter school which began on July 1, 2013. Based on the Montessori method, students who attend are empowered with a rich curriculum that focuses on the natural development of the whole child. Redwood Coast Montessori classrooms are based on the Montessori approach of a articulate hands on learning.
Problem Statement and Criteria[edit | edit source]
Specifications and a set criteria were the foundations of how this project was worked on and constructed. These aspects have been conjured up by the team Los Pollos Hermanos with keeping in mind the best interests of the client Redwood Coast Montessori. Based on the school's needs the Chicken Coop and Run design must meet the criteria, and stay within the constraints listed below.
| Criteria | Weight | Constraint |
|---|---|---|
| Safety | 10 | Structures must not cause injury to user |
| Chicken Survivability | 9 | Structures must protect poultry from environment and predators |
| Durability | 8 | Structures shall be built to last with the beach environment |
| Movability | 8 | Structure must have the ability to be relocated |
| Sustainability | 7 | Structures shall be built with sustainable materials |
| Cost | 7 | The project shall not surpass $400 in budget |
| Ease of Use | 6 | The structures shall be easy to clean and use |
| Education | 5 | The project shall give children an education experience |
Description of final project[edit | edit source]
Coop[edit | edit source]
The layout of the chicken coop is a simple 4'x6'x4' box, framed out by 2"x2". The walls and floor are constructed with ¾" sheets of outdoor grade lumber. The coop is being lifted off the ground with four concrete stands located at each corner of the coop. Giving the coop good ventilation, there are two 6"x12" closable openings positioned at the top corners of the side walls. Chickens will be able to enter the coop with a 1'x2' door located on the front side. Once the chickens walk into the coop there are three 6"x9" x1' box like nests placed on both sides. For easy retrieval of the possible eggs being laid in these nests, located on the exterior sides there are swinging doors connected to each individual nest. The doors will be able to pivot of a hinge placed at the top. A single bar that is locked in position and lying across these three doors act as a simple securing system eliminating multiple locks for the coop. Going back inside the coop towards the back there are two roosting bars at different heights giving multiple layers where chickens can roost. The roosting bars are also given a foot space in each direction giving the chickens optimum personal space. Both bars are places on U-shaped frames for the ability of removing them as you lift them up. To make the coop easier to clean, the back wall is turned into a door that is supported by two hinges on the side. Securing the back door so that it cannot be open by anyone is another lock.
Roof[edit | edit source]
The roof is a simple gable style design, measuring at a foot tall, it's made out of the same material as the coop. To make the coop stand up against weather, roofing tile is laid along the top of the rood. This also helps with the insulation.
Run[edit | edit source]
The chicken run is laid out at 5'x10'x4'. As the main support, there is a framework made out of 2"x2". The run itself is made out of chicken wire with one inch opening to give the chickens' proper protection from predators. To add more protection, the wire runs a foot underneath the ground and buried to ward of predators digging. To get into the run, a 18"x5' door is positioned on the side of the run. To connect the run to the coop, a 6" overlap of chicken wire is given and laid over the coop. A simple piece of lumber is then laid over the overlapping wire and the coop and screwed into place sealing off the inside of the run.
-

Fig 1: Los Pollos Hermanos mascot
-
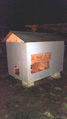
Fig 2: Los Pollos Hermanos Chicken Coop
-

Fig 3: Chicken Coop roof

Costs[edit | edit source]
Design Costs[edit | edit source]
The design cost is the amount of time in hours that the Pollos Hermanos spent on this design project. The design hours were spilt into four categories: design report, group meetings, client meeting, and building. The total hours spent on the design project were 300 hours. The figure below represents the distribution of time and percentages.
Materials Cost[edit | edit source]
The cost of the materials used for the construction of The Good Ship Alice COOPer are outlined in table below.Having the higher priced items be donated, the projected retail cost of this design project is $621and is shown in table Below.
| Item | Quantity | Retail Cost ($) | Our Cost ($) |
|---|---|---|---|
| Bees Wax sealant | 3 | 8.69 | 8.69 |
| Olive oil sealant | 1 | 5.43 | 5.43 |
| Metal Road sign | 1 | 15.00 | 15.00 |
| Roofing Paper | 1 | 21.72 | 21.72 |
| 10 4½" Cutting Disks | 2 | 10.86 | 10.86 |
| Tin Corrugated Panels | 3 | 32.57 | 0.00 |
| Metal Hinges | 8 | 26.06 | 26.06 |
| Lumber beams 4'x10'x2' | 10 | 217.16 | 0.00 |
| Chicken Wire 250 ft roll | 1 | 49.95 | 49.95 |
| Box of Deck Screws | 5 | 32.57 | 32.57 |
| Locks | 4 | 42.57 | 42.57 |
| CDX Wood Panels 4x8 ½" thick | 6 | 175.90 | 117.27 |
| CDX Wood Panels 4x8 ¾" thick | 1 | 36.92 | 36.92 |
| Total cost | $673.43 | 365.07 | |
Maintenance Costs[edit | edit source]
The projected maintenance is based off of research done for this project in the literature review. The chicken coop must be cleaned inside and out once a month which consists on cleaning out each nest by replacing the hay and removing all traces of droppings on the inside and outside of the coop. The inside of the chicken coop will need to be retreated with the bees wax and olive oil mixture recommended once every five years to protect it against the costal dune environment. The cost of these are shown in table below.
| Job | Cost ($) |
|---|---|
| Cleaning Coop | 5.00 |
| Retreat Coop w/ natural sealant | 20.00 |
Video[edit | edit source]
Testing Results[edit | edit source]
At this time Los Pollos Hermanos do have any significant testing data, due to the lack of chickens to test on.
Instructions for Implementation and Use[edit | edit source]

Assemble the floor frame.Assemble two 6' long 2"x2" beams, and two 4' long 2"x2" beams as shown. Screw beams together as shown.

Assemble the wall frame. • Attach the 4' long 2"x2" members to the floor frame as shown in the figure. Once the frame piece has been attached it should be held in place until the upper portion of the frame has been completely attached to all the wall framing.

Attach the upper portion of the frame to the wall frame. • Set the upper portion of the frame on top of the wall's frame members. Do not let go of the upper portion of the frame until it has been completely secured. then attach the ¾ inch 4'x4' plywood floor piece to the floor cross beams.

Building the walls. With desired measurements, cut off your wall panels from the ½" playwood and secure to the frame.

Cut desired door out of back wall. After, mach sure to use stronge higes for door.

Building and installing the chicken nests. Use ¾ inch plywood. The nests are 1'6" x 1' 4" x 1'6" (depth x width x height). Assemble the nests as shown in figure.

Building the roof. Assemble the diagonal roof members and the center longitudinal roof member. Attach the ½" playwood to the frames. Apply roof paper to panels for better seal. Attach tin sheet to top for the last layer on top.

Attach the finished roof to the top of the Chicken Coop's inner framework.
How to use the Alice COOPer chicken coop and run[edit | edit source]
- Collecting eggs
- Get the key for the nesting doors bar locks.
- Chickens might try to jump out when you open the nesting doors, so be ready for this.
- Do not open nest door until you are ready to collect eggs.
- When you are ready to collect eggs, open the nest door, and collect eggs from the nests.
- If a chicken is in the nest do not shoo or push the chicken away. Simply close the nest door and try the next door.
- Secure the nests once you are done collecting eggs.
- Using the Large Rear Door to the coop
- Get the key for the large rear coop door.
- Chickens might try to jump out when you open the large rear coop door, so be ready for this.
- Unlock the coop door lock.
- Open the coop door. Watch out for chickens trying to jump out.
- Secure the large rear coop door when you are finished inside the coop, by putting the lock back in place and locking the lock.
- Going inside the run
- Get the key for the run door padlock.
- Unlock the run door padlock, and carefully pull the run door open.
- Enter the run. Close the door behind you.
- If you are five feet tall or taller, be careful not to bump your head while inside the run.
- When leaving the run carefully close open the run door.
- Watch out for chickens as you open the run door.
- Exit the run.
- Close the run door, watching out for chickens as you carefully close the run door.
- Do not slam the coop door closed.
- Put doorframe latch over the door's D ring.
- Put pad lock through D ring.
- Close the lock and make sure the lock is secured.
How to maintain the Alice COOPer chicken coop[edit | edit source]
- Cleaning the removable roosts
- Open the large access door to the coop. One at a time, lift the roosts up and out of the roost holders.
- Clean chicken poo off of the roosts.
- Place the roosts back into their holders.
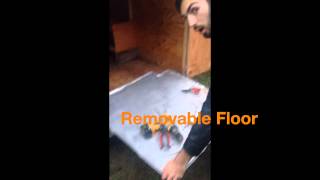
- Cleaning the removable floor
- Open the large access door to the coop, if not already open.
- Slide the removable floor member out of the coop.
- Clean poop off of the removable floor.
- Return the clean floor to the coop by sliding the floor member back into the coop.
- Cleaning the nests
- Access the nests from the interior of the coop, or through the nest doors.
- Remove bedding. Check for poop. Clean up any poop. Sweep up other debris.
- Replace bedding. Secure the coop when you are done.
- Dispose of bedding and debris in the compost or in the trash.
- Maintaining the exterior of the coop and the run
- If desired, re-stain and/or weatherproof the exterior of the chicken coop according to schedule provided by the manufacturer of the stain/weatherproofing material you have chosen to use.
- Check for loose screws. Tighten loose screws.
- Check the chicken wire for developing holes and frayed chicken wire. Mend frayed chicken wire to prevent users from getting poked. Patch developing holes with galvanized chicken wire.
Discussion and next steps[edit | edit source]
Los Pollos Hermanos's nest step is to complete the final touches on the coop itself, mainly focusing on the esthetics. The school will be acquiring chickens in the spring of 2015.