Introduction[edit | edit source]
A pycnometer is an instrument used to measure the volume of solids based on the Archimedes' principle using a gas. There are two chambers of known volume that are pressurized sequentially. The pressure difference compared to that of the empty chamber or calibration volume is used to find the volume of the sample. Helium is the gas most often used since it is inert and the most ideal gas. The density of the sample can be calculated if the mass is known.
Safety[edit | edit source]
Be aware of hazards associated with compressed gas cylinders. Take MSE dept. compressed gas safety training.
Equipment or Bill of Materials[edit | edit source]
AcuPyc1330 V1.02 located in the minerals and materials engineering building room 531. Please fill out log near instrument with name and sample description.
Calibration & Tolerances[edit | edit source]
Can be calibrated using calibration volumes. Was last calibrated July 2019. To check calibration an empty sample container should have a volume ± 0.05% of the full scale
Operation & Procedure[edit | edit source]
- Open He gas cylinder. Do not adjust pressures of any valves. Only open the valve on top of the tank.
- Power on the pycnometer by flipping the switch on the back.

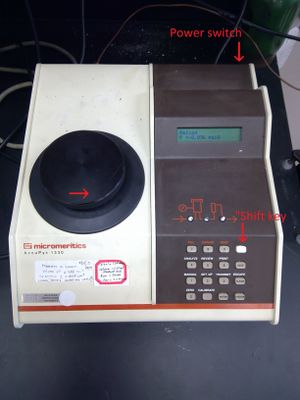
Location of power switch and "Shift" key. Opening rotation direction shown on lid. - Open sample chamber by twisting counter clock-wise and remove sample container.
- Bring sample container and sample to mass balance. Tare balance with container. Add sample and record mass.
- Return sample container to the chamber and close the lid.
- To analyzing the sample:
- Press the white "Shift" key then the "2 (Set Up)" key
- Press "Choice" to find 'Report options'
- Press "Enter"
- Press "Choice" and select 'Volume' or 'Density' by pressing "Enter"
- Press "Save"
- Press the white "Shift" key then "4 (Analyze)"
- Enter a sample ID number and press "Enter"
- Only for density: Input sample mass and press "Enter"
- Press "Enter" to start analysis
- Press the white "Shift" key then the "2 (Set Up)" key
- Reviewing results:

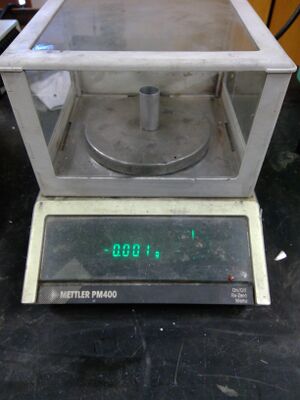
Sample container on tared scale. - Press the white "Shift" key then "4 (Analyze)"
- Enter a sample ID number and press "Enter"
- Only for density: Input sample mass and press "Enter"
- Record density or volume for each run and deviation. Press "Enter"
- Use excel to get the average as it is not reported
- Make sure to record all runs from each analysis as the pycnometer does not keep track of sample ID numbers
- Troubleshooting:
- Analysis did not run and nothing was reported:
- Make sure He cylinder is open
- Increase equilibrium shift:
- The system is considered to be at equilibrium pressure when the pressure sift is less than X.XXX psig/s
- Press the white "Shift" key then the "2 (Set Up)" key
- Press "Choice" to find 'Analysis parameters'
- Press "Enter"
- Press "Choice" and change the 'Equilib' to a higher number then press "Enter"
- By default it is set to 0.005 psig equilibrium
- Increase in 0.0025 increments
- Too high will result in inaccurate results
- Try greasing rubber O-ring on the sample chamber lid:
- Wear gloves
- Grease can be found in drawer below pycnometer
- Apply a small amount to O-ring; try not get grease on the metal
- Density or volume reported has large variance or does not make sense:
- Increase fill pressure:
- Increase equilibrium shift steps 1-3
- By default they are 3 purges and 5 runs with 17.000 psig fill pressure for both
- Press "Choice" and change to the desired number then press "Enter"
- To increase precision and lower the deviation increase the number of runs
- To increase accuracy increase the run pressure in 0.5-1.5 psig increments up to 19.500 psig
- Useful for porous samples or fine powders
- Accuracy can also be affected by the quality of the seal being formed by the O-ring
- Changing purge number of pressure is unnecessary for almost all cases
- Press "Save"
- Find Paul Fraley for help with re-calibrating
- Increase fill pressure:
- Attempt to re-analyze after as few adjustments as possible
- Analysis did not run and nothing was reported:
Shutdown[edit | edit source]
Power off pycnometer and close He gas cylinder.

