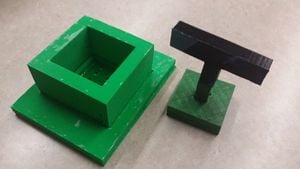
Newspaper Briquette Makers are used by a wide range of people. They are used by people in developed countries mainly to create fuel bricks for fireplaces. However, for people in developing countries, they can be used to create fuel, but also actual bricks used create structures if they are made well enough. Most of the existing designs involve getting down on your knees and applying a great amount of force using only you arms (Commercial Briquette Makers & Costs[1]). This technique thus limits than range and amount of people able to use those makers. Other makers can attach to a wall and be pulled down like a pop can crusher. However, this option my not feasible for people in developing countries who don't have access to a strong, sturdy wall. Therefore, this design was created to be used anywhere with a semi-flat surface and by a significantly larger range of people. In addition, the vast majority of previous designs are comprised of metal, which can be hard to find and expensive in some places, and not molded very easily into the desired shapes. This project uses plastic and a open-source 3D printer and software. This makes the designs of the briquette maker to be modified in order to be better, as well as printed by a minimal number of people and distributed as need be.
Bill of Materials[edit | edit source]
| REQ'D | DESCRIPTION | AMOUNT | COST |
|---|---|---|---|
| (1) | REPRAP 3D PRINTER | 1 | $250 |
| (1) | 1.75mm PLA Filament | 800g | $0.025/GRAM |
| (1) | Super Glue | 5 oz. | $3.00 |
| (2) | Glue Sticks | 2 sticks | $2.00 |
Files[edit | edit source]
- File:Press Base.stl
- File:Press Middle.stl
- File:Press Handle.stl
- File:Press Tube.stl
- File:Tube Base.stl
- File:Table Top.stl
- File:Table Leg(x2).stl
Here is a link to all source code files:
Tools needed[edit | edit source]
- MOST Delta RepRap or similar RepRap 3-D printer
- FreeCAD OS Program or similar program with CAD capabilities
- X-Acto Knife for smoothing out the rough parts of the prints
- Strong Adhesive (i.e. Super Glue)
- Lighter
Skills and knowledge needed[edit | edit source]
No special skills were required to make this project. Only requirements are to be able to print using a 3D Printer, apply glue, press the pieces together, and use a lighter if desired.
Technical Specifications and Assembly Instructions[edit | edit source]
I used FreeCAD for the model, Cura for the slicer, and Pronterface for the controller
- Open the.FCstd files in FreeCAD, and adjust the given parameters to fit your needs. All units are in millimeters
- Compile and render the file into a new.STL file
- Open the.stl file in Cura
- In the support section of the left toolbar, select "support type" to "touching buildplate"
- Choose speeds and layer thickness as ideal for your printer and desired strength
- Save the Gcode and then load it into Pronterface and print
- When it is done printing, carefully remove from print bed
- Use an X-Acto knife to remove excess plastic from support residue
- Glue appropriate pieces together
Print Time Estimates
- Table Top: ~18 hours at 0.8mm Top/Bottom fill and 10% fill
- Tube: ~11 hours at 0.3mm Top/Bottom fill and 7.5% fill
- Press Handle: ~2 hours at 0.8mm Top/Bottom fill and 10% fill
- Table Top: ~3 hours at 0.8mm Top/Bottom fill and 10% fill
Assembly time Estimate
- 30 minutes (including glue set time)
Common Problems and Solutions[edit | edit source]
- With large prints, the probability of a mishap occurring with the print is extremely high. Therefore, the large parts were broken up into smaller prints of varying sizes in order to avoid this, as well as to allow this prototype to be made using the printer available. However, many mishaps still occurred, some unexplainable, such as the print randomly starting the next layer offset from the rest of the part.
- With the long straight lines required, be sure to use plenty of glue (sticks) to keep the filament from sliding around, but also to keep it flat so the print doesn't start to bow and wreak havoc on the extrusion.
- With such long print times, after a while the extruder started to get clogged which made the print suffer, and the axle rods needed to be greased much more frequently than normal also.
Cost savings[edit | edit source]
- Commercial Equivalent: $25.00
- Approximate Cost: (($20.00/1000 grams)[2] x 800 grams) + $5.00 for glue = $25.00
- Approximate Savings: $25.00 - $25.00 = $0.00
- Approximate % Savings: (25/25) x 100 = 0%
References[edit | edit source]
- ↑ http://www.compare99.com/compare.html?q=briquette-maker&ort=Briquette-Maker-Sale&adid=iaCkp56k1ZqjqMbW15ZfgMLNyKNYosyfpaObpNbH16WXYK7DzpakWdSfypKnpofFy5KkcMM%3D&baa=B2&utm_source=bing&utm_medium=cpc&utm_campaign=B_12&utm_term=+Briquette%20+Maker
- ↑ http://www.amazon.com/s/?ie=UTF8&keywords=pla+filament&tag=mh0b-20&index=aps&hvadid=1322302777&ref=pd_sl_7f9yhyz3fb_p