==MOST Delta Auto Bed Leveling==
Project developed by Erik Wachlin and Lee Southerton
Abstract[edit | edit source]
Bed leveling is a pain for delta style printers. It is not intuitive, and therefore takes a long time to do. With the addition of this auto leveling system your prints will be much better quality and leveling will take next to no time.
Note: This process works specifically for a printer using the following:
- Melzi 2.0 Board
- Repetier Host
- Arduino Firmware for Melzi
Bill of Materials[edit | edit source]
| Part | Supplier | Part # | Cost/Part | # of Parts | Total |
|---|---|---|---|---|---|
| M4 9mm long bolts | McMaster | 90128A212 | $0.07 | 1 | $0.07 |
| M4 9mm long bolts | McMaster | 90128A212 | $0.07 | 1 | $0.07 |
| M3 lock Nut | McMaster | 90576A102 | $0.04 | 2 | $0.08 |
| Micro Limit Switch | Amazon | a13111300ux0087 | $1.12 | 1 | $1.12 |
| Limit Switch Bracket | You | libre3d thingiverse Alternative design by minad Alternative design by Marius G | $0.20 in filament for 20% Infill sliced with Slic3r | 1 | $0.20 |
| Total | $1.60 |
Tools needed for fabrication[edit | edit source]
- MOST Delta RepRap or similar RepRap 3-D printer
- Philips head Screwdriver
- Repetier Host
- Arduino IDE
- Firmware for this modification is based on this.
- 1 ft. Long Dowel Rod
- Calipers for measuring offset height
Skills and Knowledge Necessary[edit | edit source]
- Need to understand how to edit firmware within Arduino.
- An understanding of how Delta Most 3D Printer works electrically and mechanically.
Technical Specifications and Assembly Instructions[edit | edit source]
Code Editing[edit | edit source]
In order to calibrate delta printer correctly Copy and Paste the following code over your current code in configuration.h (The fastest way to find the correct place is Ctl-F, then your subject matter)
/* Z-Probing */
#define FEATURE_Z_PROBE true
#define Z_PROBE_PIN 18 //63 35 is pin a2
#define Z_PROBE_PULLUP true<br>
#define Z_PROBE_ON_HIGH true<br>
#define Z_PROBE_X_OFFSET 5.22<br>
#define Z_PROBE_Y_OFFSET 1.71<br>
#define Z_PROBE_BED_DISTANCE 5.0 // Higher than max bed level distance error in mm
// Waits for a signal to start. Valid signals are probe hit and ok button.
// This is needful if you have the probe trigger by hand.
#define Z_PROBE_WAIT_BEFORE_TEST false
/** Speed of z-axis in mm/s when probing */
#define Z_PROBE_SPEED 10
#define Z_PROBE_XY_SPEED 150
#define Z_PROBE_SWITCHING_DISTANCE 1.5 // Distance to safely switch off probe
#define Z_PROBE_REPETITIONS 5 // Repetitions for probing at one point.
/** The height is the difference between activated probe position and nozzle height. */
#define Z_PROBE_HEIGHT 33.76
/** Gap between probe and bed resp. extruder and z sensor. Must be greater then inital z height inaccuracy! Only used for delta printer calibration. */
#define Z_PROBE_GAP 30.0
/** These scripts are run before resp. after the z-probe is done. Add here code to activate/deactivate probe if needed. */
#define Z_PROBE_START_SCRIPT ""
#define Z_PROBE_FINISHED_SCRIPT ""
/* Autoleveling allows it to z-probe 3 points to compute the inclination and compensates the error for the print.
This feature requires a working z-probe and you should have z-endstop at the top not at the bottom.
The same 3 points are used for the G29 command.
*/
#define FEATURE_AUTOLEVEL true
#define Z_PROBE_X1 0
#define Z_PROBE_Y1 80
#define Z_PROBE_X2 69.28
#define Z_PROBE_Y2 -40
#define Z_PROBE_X3 -69.28
#define Z_PROBE_Y3 -40
You will need to edit x y and z offsets within the code to ones that are appropriate for your printer.
You will also need to enable eeprom within configuration.h
Your code will look like this.
#define EEPROM_MODE 0
You want it to look like this.
#define EEPROM_MODE 1
Enabling eeprom allows Repetier host to hard code into the arduino so that it can calibrate correctly.
Next set up your pins that you are going to use. For right now, I am using a selector switch to use the same port as my z upper endstop. In order to do this, find in pins.h
/****************************************************************************************
* Melzi pin assignment
*
**************************************************************************************** /
# if MOTHERBOARD == 63
# define KNOWN_BOARD 1
# ifndef __AVR_ATmega644P__
# ifndef __AVR_ATmega1284P__
//#error Oops! Make sure you have 'Sanguino' selected from the 'Tools -> Boards' menu.
# endif
# endif
# define ORIG_X_STEP_PIN 15
# define ORIG_X_DIR_PIN 21
# define ORIG_X_MIN_PIN 18
# define ORIG_X_MAX_PIN 18
# define ORIG_Y_STEP_PIN 22
# define ORIG_Y_DIR_PIN 23
# define ORIG_Y_MIN_PIN 19
# define ORIG_Y_MAX_PIN 19
# define ORIG_Z_STEP_PIN 3
# define ORIG_Z_DIR_PIN 2
# define ORIG_Z_MIN_PIN 20
# define ORIG_Z_MAX_PIN 20
# define ORIG_E0_STEP_PIN 1
# define ORIG_E0_DIR_PIN 0
# define ORIG_E0_ENABLE_PIN 14
# define PROBE_PIN -1
Change the last one to the following:
#define PROBE_PIN 18
This will allow the computer to use the same pin to read for bed leveling and for homing.
BE VERY CAREFUL WITH THIS THOUGH BECAUSE IF YOU HAVE IT SWITCHED TO THE WRONG LIMIT SWITCH WHILE HOMING OR WHILE BED LEVELING YOU WILL CAUSE IT TO CRASH.
Connecting your Z-Probe Switch[edit | edit source]
- Using one of the homing limit switch ports, connect the z probing limit switch in series with the existing limit switch.
- Since both limit switches should be in the normally closed setup, the loop will open if either switch is triggered. (The firmware does not care if a home switch is thrown during z-probe and bed leveling operations.
- Once you have them connected check to see if the switches are working before you do anything else to make sure your firmware is correct and the switches are wired properly.
- Use the command G31 with the switch both open and closed, It should go from H to L.
- If this does not work, first check to make sure the home limit switch is not tripped (move the carriage down).
- Second check to make sure the resistance across the series goes from 0 to inf when the switch is tripped.
- If all else fails you need to check the firmware.
- Use the command G31 with the switch both open and closed, It should go from H to L.
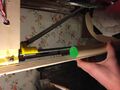
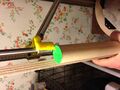
Nozzle Centering[edit | edit source]
The nozzle must be in the true center in order for bed leveling to work for a delta style printer. Therefore, use the following commands to put your printer at true center.
- G28 -Homing the printer
- G131 -Removing any extruder offsets
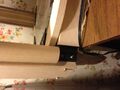
- M84 -Turns off power to stepper motors, so that you can slide them to position on the dowel rod as shown in the gallery images.
- NOTE: Slide slowly so as not to generate too much electricity and break your board.
- After the sliders are positioned correctly type G132 S1 to store the true center.
Z-Probing[edit | edit source]
Before bed leveling, home the machine and bring it down so that the extruder is approximately 50mm above the bed. Moving it down eliminates interference that can happen from the endstops. This is very important and you will get inaccurate values if you do not do this.
Next type G32 S2 which will conduct bed leveling and save the values to eeprom
For the rest of the bed leveling follow the instructions here
Only follow the directions for the Delta Printer, using the dowel rod to position the bearings at exactly the same height above the bed.
Resetting Values in case you make a mistake or want to recalibrate[edit | edit source]
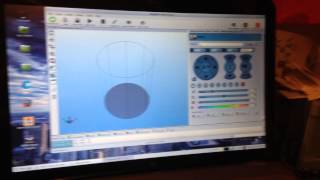
The eeprom is saved within Repetier Host. It has all of the values that are received from running the auto probing system. If you make a mistake the first time and things look very off there are multiple ways to change things.
First of all you can type M322 and this will reset the offsets if those offsets are way off and you can see visually see that you need to run the z probing again. Once you run M322, you can run the z probing again and it should fix the problem.
If you want to edit the eeprom, if you try to do it within Repetier Host the program will crash. Therefore, export the eeprom, edit it within a text document and then import that edited eeprom and that will change all of the values.
In case your print bed is smaller than ours, you can change the locations that the printer probes by editing the eeprom. Here is how you do it.
Here is the math to calculate locations. They are currently set up to be at a radial distance of 80mm from the center.
Make sure calculator is in degrees!
- Point 1
- X1=0
- Y1=R (Radial distance you choose)
- Point 2
- X2=R*sin(120)
- Y2=R*cos(120)
- Point 3
- X3=-R*sin(120)
- Y3=R*cos(120)
Here is how to input those values into the eeprom.
- Within Repetier Config->Firmware EEPROM Configuration-> Export EEPROM Settings
- Open up your EEPROM file and edit Z-Probing X1,Y1,X2,Y2,X3,Y3 with the values calculated above. Use control-f to find these values and edit them.
- Save the EEPROM.
- Now go back into Repetier Config->Firmware EEPROM Configuration-> Import EEPROM Settings.
Cost savings[edit | edit source]
It was found that bed leveling took between 2 and 4 hours to complete. With this modification bed leveling can be done in approximately 5 minutes. This gives a time saving of more than 95% in just calibration alone. This modification also offers time savings with fewer prints that must be thrown away.
Gallery[edit | edit source]
-
Switch Bracket
-
How to position dowel
-
Top Alignment
-
Bottom Alignment