The hardening of steel is done by heating up a workpiece to near its melting temperature then quickly quenching it. This heat treatment process causes significant changes in the microstructure of the steel which directly corresponds to its metallic properties. The MartensiteW structure that is formed is responsible for the increased material hardness. The main methods of hardening are flame, induction, and laserW hardening. Laser hardening is especially attractive for surface hardening of complicated shapes or large objects because it allows for absolute control on the surface hardness and texture.
How it Works[edit | edit source]
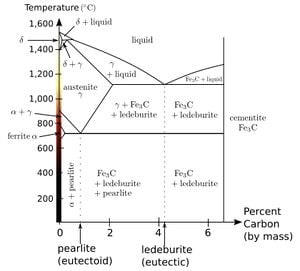
Light Amplification by Stimulated Emission of Radiation (Laser) can be used to provide the heat necessary for the treatment process. The absorbed radiation from the laser heats up the surface layer to a temperature where AusteniteW can form. This is dependent on the composition of the base material. The specimen moves below the table at a constant feed rate. As a point moves down from exposure to the laser it is rapidly QuenchedW by the cooler regions surrounding the laser-heated area in the part. In the case of a thin part, water can be used to speed up the cooling process. This Quenching causes the change in microstructure from Austenite to Martensite. Martensite is formed when dissolved carbon atoms are trapped within the austenite face centered cubic structure during quenching. The phase diagram of steel can be seen in the phase diagram of steel. As the temperature is dropped, the Austenite becomes mechanically unstable and rearranges to form a body centered tetragonal crystal structure that is much harder then the original material.[1]
Laser Types[edit | edit source]

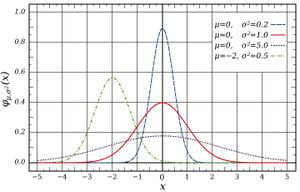
Two main types of Laser used in heat treating are gas lasers and solid state lasers. Carbon dioxide lasers are usually used as they can provide hundreds of kilowatts of power output which increases the rate of heat addition to the workpiece. However, their 10.6 μm wavelength often makes it difficult for absorption in metals therefore necessitating a pretreatment of the material. Gas lasers provide a relatively simple Gaussian profile of radiation which can lend itself to accurate simulation modeling. Yttrium Aluminium Garnet (Nd:YAG) lasers operate at 1.06 μm so have much better absorption characteristics. However, they have a much lower electrical efficiency which necessitates higher electrical power input. The radiation profile of a solid state laser is much more complicated then that of a gas laser, therefore making it more difficult for computer modeling to accurately predict how the laser would interact with the surface of the workpiece.
Currently, large high powered lasers are being utilized. Significant research is going into using smaller lasers which are more cost effective
.[2] Experimentation is being done with pulse lasers which allows the work peace to cool between intermittent irradiation. The most significant change in laser technology is the utilization of high power diode lasers (HPDL). With wavelengths of 0.8 and 0.94 μm, they have significantly better absorption characteristics. Also, HPDLs have a much higher electrical efficiency (30-50%) which makes them much smaller than other laser types with the same output power. Their radiation profile provides a preferable hardened zone due to it's top-hat profile.[3][4]
Control Systems[edit | edit source]
The most important and difficult component of laser surface hardening is the control of the laser. It is extremely difficult to predict the effect the laser has on the surface because so many different factors are involved in the process. These include: material composition, type of laser, speed of laser, power of laser, thickness of material, and material geometry. For simple parts and geometry, the control systems get a lot simpler. The most commonly used control systems use a fixed rate feed system and fixed power output. The depth of the hardened layer and effective hardness can then be determined experimentally or mathematically. However, problems occur when the material is not a certain thickness because the part does not have enough bulk to quickly cool the heated region. This often occurs at the edge of the part or changes in geometry and is evident by surface melting.
More advanced control systems are being developed which utilize more complex computer systems and real-time data acquisition.
Infrared[edit | edit source]
InfraredW systems are one possible way to determine the real time hardness of a sample with a relatively simple implementation. An infrared monitor is used to determine the radiation produced at the weld. Testing a sample that has been processed at different feed rates can be used to determine the surface hardness in relationship to the feed rate. This can be used to determine the necessary feed rate to achieve a desired surface hardness. Using this data for calibration, a system can be put in place to vary the feed rate based on real time IR readings. This provides a way to laser harden a workpiece of unusual geometry because if the IR reading changes suddenly, the feed rate will adjust accordingly. This system can also be used to monitor the hardening depth using a similar device.[5]
Finite Element Analysis[edit | edit source]
Finite Element AnalysisW use differential equations based on part geometry, material properties, and laser characteristics to determine part feed rates and laser output powers that are required for a particular hardness and depth of penetration. These calculations are very complicated and require a large amount of processing power to compute. As computer technology increases, these systems will become more accurate and more widespread. Systems like the Abaqus and ANSYS have already been used to accurately predict phase content and microhardness.[6][7][8]
Proportional Integral Differential Equations[edit | edit source]
Proportional integral differential (PID) equations use mathematics similar to those used in Finite Element Analysis. However, they do not take into account the geometry of the part. Instead they use realtime data that is affected by part geometry. Most commonly, they use surface temperature measured by a pyrometerW. PID systems uses this data to calculate the ideal output power that is required to achieve consistent hardening. Conditions are put in place to ensure that the surface temperature does not increase above the materials melting temperature.[9]
Apparatus[edit | edit source]
The most simple design involves a stationary laser with a working table underneath. The workpiece is fixed to the 3-axis stage. The computer controlled stage moves back and forth along a predetermined path with some overlap. No cooling is necessary because the workpiece acts as a heat sink which quickly cools the treated area. However, this is not possible for a complicated part such as a gear as it is not a simple surface that is being treated. This requires a more complicated setup such as a 4 or 5 axis machine that can rotate the gear during the process to keep the working distance consistent (distance from the laser).[10]
Surface Coating[edit | edit source]

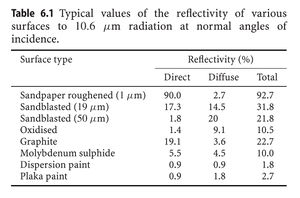
One way to improve the efficiency of the laser hardening process is to ensure that all the radiation directed on the workpeice is absorbed. This can be rather difficult because the materials that are usually being hardened are extremely reflective. One way to avoid this is to texture the surface or use a surface coating. The latter is much more effective and can reduce the reflectivity to as low as 2.7%.[1] The problem with these coatings is they usually have to be applied by hand especially for complicated parts like gears. They also can be detrimental to surface quality and can make real time analysis much more complicated. Surface coatings can be avoided by using a laser with a smaller wavelength such as a HPDL. Another option is to use a higher power laser(50% more power) and an inert gas to oxidize the surface. This oxide layer has a significantly higher absorption so can then easily be hardened.
Energy Analysis[edit | edit source]
For laser hardening to be an effective method of hardening for commercial applications it must be more economical then current hardening methods. Currently, the most common method of hardening used in industry is induction hardening. The following is an energy analysis for induction hardening and the most common laser being used in industry (CO2 lasers).
| Property | |
|---|---|
| Laser Type | Continuous Wave CO2 |
| Workpeice Material | AISI 1036 (EN 8) steel |
| Absorptivity | 0.8 |
| Melting Temperature | 1470 degrees C |
| Phase Transition Temperature | 775 degrees C |
| Thickness of Gear | 25 mm |
There are many factors involved in the energy required to laser harden a gear. The following energy analysis is done for the hardening of a AISI 1036 (EN 8) steel gear. It was found for hardening to a depth of 0.1mm the maximum mean power density that could be used was approximately 2.15- 2.5 * 10^4 W/ cm^2. This means that for a laser beam diameter of 3.7 mm powers above 2310 W cannot be used. For power levels between 500 - 2500 W a maximum scanning velocity of between 2- 10 cm/s is acheived.[11]
| CO2 | Nd:YAG (diode pumped) | Diode | |
|---|---|---|---|
| Average electrical efficiency | 10% | 10% | 30% |
For a spur gear containing 42 teeth, with a thickness of 25 mm, and a tooth depth of 6 mm; using the above parameters results in approximately a 23% overlap in passes. At the maximum optimal power output of 2310 W and feed rate of 10 cm/s each face of each tooth would take 0.5 seconds to harden to a depth of 0.1 mm. At this rate the total hardening of a 42 tooth gear takes only 42 seconds of laser output (this time does not include movements of the workpiece while the laser is off). For a CO2 laser the electrical efficiency is only 10%. This means that for an output power of 2310 W, 970.2 kJ of energy are used to harden the part. It should be noted that this hardening technique provides surface hardening which is optimal for gears as the inner portion of the gear remains ductile. Only a small amount of material is converted into martensite so there is almost no deformation in the part (martensite has a lower density so the volume increases during treatment). Because of the minimal deformation most parts do not have to be reworked after treatment. Specifically for gears, it was found that for gears of an accuracy class below 7 the distortion was too small to influence it's accuracy class. This means that in most cases the gear does not have to be reworked after heat treating.[12]
This same gear can be hardened using induction hardening. This process takes a comparable amount of time however much more energy is required. Typical induction hardening is done in 4 steps: preheat, dwell, final heat, and quench. The preheat is used to prevent cracking due to sudden shock induced by rapidly heating the part. It is done with a power level of about 30 kW for a period of 30-35 s. During the final heat step a much higher power level of 350 kW for a period of 0.4 - 2 seconds is used.[13] This corresponds to a total maximum energy use of 1750 kJ. The exact heating times depend on the size of the gear, material type, and pitch of the gear teeth. This process also changes the microstructure of the entire part, with the most significant microstructure changes being on the areas of the gear closest to the coils (the gear teeth). The biggest loss in energy is from the machining required to return the part to the desired shape which is necessary because deformation within the part during hardening is so significant. The process to machine gears can be very difficult and costly especially in gears with complicated profiles (like helical gears).
Although the capital cost of laser hardening apparatus is significantly higher than that of an induction hardening apparatus the savings in energy is incredibly significant. It is even more beneficial because not only is it more sustainable, it also results in a better gear while removing the necessity to rework the part. Laser technology can be made even more economical by using some of the techniques listed on this page to improve efficiency. Just by changing the laser type to a diode laser which has a much higher electrical efficiency is enough would vastly decrease the energy required to process a part.
References[edit | edit source]
- ↑ 1.0 1.1 Steen, W.M. & Watkins, K. Laser Material Processing, Springer.
- ↑ Ganeev, R.A. 2002, "Low-power laser hardening of steels", Journal of Materials Processing Technology, vol. 121, no. 2-3, pp. 414-419.
- ↑ Pashby, I.R., Barnes, S. & Bryden, B.G. 2003, "Surface hardening of steel using a high power diode laser", Journal of Materials Processing Technology, vol. 139, no. 1-3, pp. 585-588.
- ↑ Kennedy, E., Byrne, G. & Collins, D.N. 2004, "A review of the use of high power diode lasers in surface hardening", Journal of Materials Processing Technology, vol. 155-156, pp. 1855-1860.
- ↑ Xu, Z., Leong, K.H. & Reed, C.B. 2008, "Nondestructive evaluation and real-time monitoring of laser surface hardening", Journal of Materials Processing Technology, vol. 206, no. 1-3, pp. 120-125.
- ↑ Obergfell, K., Schulze, V. & Vöhringer, O. 2003, "Simulation of Phase Transformations and Temperature Profiles by Temperature Controlled Laser Hardening: Influence of Properties of Base Material", Surface Engineering, vol. 19, no. 5, pp. 359-363.
- ↑ Komanduri, R. & Hou, Z.B. 2004, "Thermal analysis of laser surface transformation hardening—optimization of process parameters", International Journal of Machine Tools and Manufacture, vol. 44, no. 9, pp. 991-1008.
- ↑ Yánez, A., Álvarez, J.C., López, A.J., Nicolás, G., Pérez, J.A., Ramil, A. & Saavedra, E. 2002, "Modelling of temperature evolution on metals during laser hardening process", Applied Surface Science, vol. 186, no. 1-4, pp. 611-616.
- ↑ Homberg, D. & Weiss, W. 2006, "PID control of laser surface hardening of steel", Control Systems Technology, IEEE Transactions on, vol. 14, no. 5, pp. 896-904.
- ↑ Benedict, Gary F. (Chandler, AZ) 1985,Method and apparatus for laser hardening of steel.
- ↑ Komanduri, R. & Hou, Z.B. 2001, "Thermal analysis of the laser surface transformation hardening process", International Journal of Heat and Mass Transfer, vol. 44, no. 15, pp. 2845-2862.
- ↑ Zhang, H., Shi, Y., Xu, C.Y. & Kutsuna, M. 2003, "Surface Hardening of Gears by Laser Beam Processing", Surface Engineering, vol. 19, no. 2, pp. 134.
- ↑ Chatterjee, Madhu S. (Carmel, IN) 1987, "Single frequency induction hardening process", Patent No.4639279