


Introduction[edit | edit source]
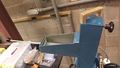
The mill in forestry is a device that will break down solid materials into smaller pieces primarily by grinding and crushing the material into a metal mesh. This mill is about 30 years old and the main bolt to hold it shut is instead replaced with a vice grip for easy access to the milling chamber. It is powered by electricity from a plug behind the mill.
Grinding happens when the external mechanical forces overcome the internal bonding forces. There are several mesh sizes available for use with the mill. They range from approximately 5mm to 0.5mm. This allows for highly controlled particle size reduction.
If there are several materials of different mechanical properties(primarily hardness) in the composition to be reduced this method may be employed to separate aggregate material. Although this process is not the primary function of the mill and should be avoided if possible.
The primary benefits of milling material for engineering purposes are:
- Increasing the surface area of a solid
- Creation of a solid with a desired grain size
- Pulping of resources
Safety[edit | edit source]
In order to work in the forestry plant one must have safety training through the forestry department.

Safety glasses are required and earplugs are recommended during operation of the mill. Before any operation of the mill, the milling chamber must be inspected to ensure that the rotary blades are not binded and that material will flow correctly once added to the feed port on top of the mill. Then plug the mill into the wall outlet behind the mill and ensure that the milling chamber is closed and locked into place with the vice grip.
Now the mill is safe for use. Always turn on the mill first and then add in material to be milled, otherwise the rotary blades could bind and damage the mill.
Mill components[edit | edit source]
-
Feed port, wooden weight handle and black handled weight screw
-
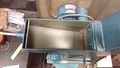
Feed Port Capacity top down view
-
Weight used to push material into rotary blades, or held with screw to increase mill chamber capacity
-

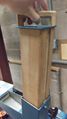
Mesh placement and examples


Calibration & Tolerances[edit | edit source]
Calibration
The mill should be flushed with cleaned with compressed air before use so that any residual aggregate material residing in the mill is removed. This will reduce contamination with the first batch. Regardless the first batch of material run through the mill in a given session should be a expendable batch.
Tolerances

The material added should be quite small (<5mm) with the largest mesh size otherwise the mill could be damaged. The hardness of the material should not surpass wood as a safety factor in order to protect the mill itself and prevent catastrophic failure.

Operation & Procedure[edit | edit source]
- After going through the safety protocols go through the calibration protocols.
- Ensure the mill chamber is free of debris
- Install the proper mesh for the material to be milled
- Close and lock the chamber with a vice grip so that it is quite snug
- Ensure the collection bucket is attached to the bottom of the mill and is clear of residual material
- Plug in the mill and press the black button to turn it on
- Pull back the feed slot handle and load material to be milled
- Pull up on the wooden weight and slowly push the feed slot handle to push the material into the mill chamber
- Adjust the weight height to change the chamber volume which will modify the pressure exerted on the mill by the material to be milled
- Once the mill sounds as if the blades are only rotating and not coming into contact with material press the red button to turn off the mill
- One the mill has stopped moving remove the collection bucket from the bottom of the mill and recover your now reduced material
- Run this material through the mill again following the above steps at least two more times for uniformity in particle size
- Once satisfied with uniformity, change the mesh size to one size lower and repeat the process
- Continue until needed size is reached
- Be careful to not overheat the mill as a hot mill may react differently with different materials
Shutdown[edit | edit source]
- Turn off the mill
- Remove collection bucket and save your sample
- Open the milling chamber by removing the vice grip
- Use air to clean the mill and remove residual material
- Close the chamber and reapply the vice grip
- Unplug the mill to cut the power
- Clean the area around the mill with a broom
Tricks[edit | edit source]
Polymer based materials
- Be especially careful/observant when milling these materials in a mill.
- The temperature of the mill is quite important for these materials to be milled correctly. As particle size decreases friction between the milled particles and each other/the mill increases. This may increase the temperature of the mill quickly. If the temperature of the milled material approaches 0.6*melting temp then the material may bond together and cause the mill to bind up and stop milling.
- Only mill these materials with a cold mill(generally up to 1.5 or 2 hours into the milling session
Wood materials
- More runs per mesh may be needed to obtain uniform size distribution due to the tendancy for wood to be reduced to a sliver shape.
- Wood can be milled by a hot mill as long as the temperature does not exceed 200C(wood will start to spontaneously combust)
- Upon milling ultra-fine sawdust will develop in the center of the rotary blades and may be harvested by turning off the machine and removing the vice grip.