.jpg)
This fruit crusher project is designed for less developed countries that do not have access to the technology that other countries have. It was designed with the use of local simple tools and scraps that would already have been acquired. It fulfills the need to crush fruit down for cooking and baking that would otherwise be a laborious task as well as a time consuming one. No previous designs have been found and commercial designs are found to be around $100.
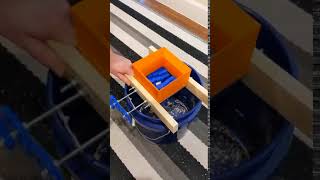
Image of completed print[edit | edit source]
Below is an image of the completed assembly.
Bill of Materials[edit | edit source]
Materials On Hand Already[edit | edit source]
| Material | Quantity | Image | Notes |
| Bucket | 1 |  |
Recommended 4 or 5 Gal |
| Wood Pieces | 2 |  |
Scrap wood can just be used |
Materials Bought[edit | edit source]
| Material | Quantity | Image | Notes |
| Threaded Rod | 2 |  |
1foot long |
| Hex Nuts | 20 |  |
1/4-20 inches |
| Stop Nuts | 10 |  |
1/4-20 inches |
| Washers | 12 |  |
1/4 inches Screw Size |
| Hex Cap Screws | 4 |  |
1/4-20 x 3/4 inches |
Pieces 3D Printed[edit | edit source]
| Material | Quantity | Image | Link to Source Files |
| Hopper | 1 |  |
Yeggi Link |
| Handle | 1 |  |
Yeggi Link |
| Bottom Box | 1 |  |
Yeggi Link |
| Drive Gears | 2 |  |
Yeggi Link |
| Shreader Gears | 10 |  |
Yeggi Link |
Tools needed[edit | edit source]
- MOST Delta RepRap or similar RepRap 3-D printer
- Drill
- Set of drill bits
- Hacksaw (a tool to cut the threaded rod if needed)
- 2 7/16 Box End Wretches
Skills and knowledge needed[edit | edit source]
- Some basic skills and familiarity with tools necessary for assembly.
Technical Specifications and Assembly Instructions[edit | edit source]
Steps for Assembly[edit | edit source]
Step 1[edit | edit source]
Buy necessary parts needed. See BOM for those used.
Step 2[edit | edit source]
Lay out all necessary tools and components.
Step 3[edit | edit source]
Use box base to mark hole locations on selected wood pieces.
Step 4[edit | edit source]
Starting with a small drill bit and ending with 1/4" drill bit, drill out holes in wood. Set these aside for later.
Step 5[edit | edit source]
Put hex bolts in mount holes with the head on the inner side of the bottom box.
Step 6[edit | edit source]
Put washer, lock nut, washer, 5 shredder gears, washer, lock nut, washer on the threaded rod and put through the hole in the bottom box. In that order.

Note: Ensure that the teeth for the shredder gear face inward for both.
Step 7[edit | edit source]
Put two hex nuts on the outside section of the threaded rod to use in a later step.
Step 8[edit | edit source]
Using the 2 box end wrenches, inch the set of nuts and shredder gears so that the rod protrudes through the other side of the box base.
.jpg)
Step 9[edit | edit source]
Repeat Steps 4-6 for other shredder gears.
Step 10[edit | edit source]
Push base bottom into hopper, ensuring that the alignment is correct. This should be a tight fit. Small taps with a hammer might be necessary.
Step 11[edit | edit source]
Put wood on 2 bolts and threaded rods on both sides.
Step 12[edit | edit source]
Put a washer on the wood side of each bolt and threaded rod.
Step 13[edit | edit source]
Put a lock nut next to washer on each bolt and threaded rod.
Step 14[edit | edit source]
Tighten nuts using 7/16 wretches.
Step 15[edit | edit source]
Take earlier used hex nuts off (4 total) that were used to help tighten components.
Step 16[edit | edit source]
Thread one lock nut per threaded rod on one side to position drive gears.
Step 17[edit | edit source]
Put a washer, hex nut, drive gear, washer, hex nut -starting from the closest to the wood.
Step 18[edit | edit source]
Repeat this for other threaded rod.
Step 19[edit | edit source]
On one axel put another washer, hex nut, handle, washer, hex nut - starting from side closest to the wood.
Step 20[edit | edit source]
Place on top of bucket
Step 21[edit | edit source]
Insert fruit and turn handle clockwise
Step 22[edit | edit source]
Enjoy crushed fruit!!
Print Time Estimate[edit | edit source]
19 hours - Hopper 35 minutes - each shredder gear 20 minutes - each drive gear 2 hours - Base Box Total Print Time: 27 hours and 30 minutes
Assembly Time Estimate[edit | edit source]
1 hour
Common Problems and Solutions[edit | edit source]
- The most common problem is measuring a piece incorrectly. Just remember to measure twice and cut once.
- Other common problems were 3D prints coming out defective. This is overcome by changing the speed and temperature settings. What works for one person might not work for you. The solution to this is printing many test prints until you get your desired outcome.
- If you don't have a bucket in your location other vessels may be used. Whatever you have on hand that can act as the container to grab the fruit as it is crushed will work.
- If the 3D printed hopper is not ideal for you think about using a smaller (or larger depending on what you need) container or cup with the bottom cut out of it. The hopper is just there to direct the fruit towards the shredder gears.
- If the fruit is not getting chopped up properly or is clogging the shredder. Try cutting the fruit into smaller pieces before putting the fruit in the hopper.
- Take your time to ensure best quality work.
Cost savings[edit | edit source]
Estimation of Costs:
- From ACE Hardware
- $4.39 - Medium-Strength Steel Hex Nut (Grade 5, Zinc-Plated, 1/4"-20 Thread Size) Amount Needed: 20
- $1.79 - Aluminum Washer (for 1/4" Screw Size, 0.265" ID, 0.688" OD) Amount Needed: 12
- $3.49 - Grade B16 Medium-Strength Steel Threaded Rod (1/4"-20 Thread Size, 1 ft long) Amount Needed: 2
- $7.49 - Hillman 1/4 in. Zinc-Plated Steel SAE Nylon Lock Nut 100 pk Amount Needed: 10
- 3D Printing Costs
- $2.61 - 43.86m/332.60 m of 1.75 mm PLA filament - Matterhackers Filament $19.99
Total Cost: $19.77
Commercial Equivalent - $89.99 - Amazon Fruit Crusher
Calculate $ savings and % savings
Total Cost of 3D Printed Version: $19.77 Cost of Commercial Version: $89.99
Cost Savings: $70.22
Percent Saved: 78.03%
References[edit | edit source]