 Bicycle trailer with rain cover
I decided to build a bike trailer for personal use. Because I live in Arcata, I find it easy and fun to ride my bike everywhere - except when I need to transport things that don't fit in my backpack. So a bike trailer would be the logical solution to my problem. It will allow me to be independent. For use in bad weather, a rain cover will be included in the design because it rains a lot here.
Contents
Conditions of the project
criteria
- Cost (less than 50 USD)
- Weight
- Simplicity (Simpler to build is better. Most importantly, the trailer should be easy to connect and disconnect)
- the durability of the building material (more rainproof is better)
- Number of moving parts (less is better)
- Availability of building materials locally (closer to Arcata is better)
Schedule proposal
- March 13, 09: Completing the final project design
- March 15, 09: Purchase of all materials completed
- March 22, 09: Completing the trailer – assembling all parts and attaching to the bike
- March 30, 09: all troubleshooting completed, final project finished
- April 16, 09: Completion of the final report, completion of the website
design
An Instep stroller was found at the Arcata Angles of Hope thrift store. It was purchased for $20.00 USD. The stroller was disassembled and a bike trailer was built from the parts.
The tongue of the trailer:
The front part of the cart, which originally housed the front wheel, has been converted into the front part of the trailer, the "tongue", which hooks onto the rear bike rack (Figure 1).
I took the front wheel mount and installed a 6" x 5/8" bolt. Washers were used to hold the bolt in place. Then a 1 1/4" chain was pulled over the bolt and held in place by 4 washers and 2 nuts. So there are a total of 6 washers to hold the pull chain in place. A total of 4 nuts were used (Figure 2).
Then a securing chain was added from the shank of the bolt to a strut of the frame (Figure 1). The chain is held in place by a bolt through the strut. Rubber washers were placed between the strut and chain, then a washer and then a nut were added to hold it in place (Figure 1).
The frame between the rear axle and the tongue was already attached. To turn it into a trailer, it was turned upside down, leaving the wheels attached. Then an L-shaped bar was added to fix the angle between the tongue and the frame (Figure 3). Previously, holes were drilled with a 1/4" HSS drill.
Then a screw was put into the holes to hold the parts together. Rubber washers were inserted between the screw head and the frame - and opposite, between the frame and the nut that tightens the screw.
The basket was attached to the frame with three U-clamps (Figure 3).
The stroller rain cover was attached to the basket with four Velcro straps (Figures 4 and 5).
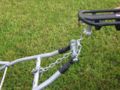
Figure 1: "Tongue" of the trailer
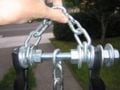
Figure 2: Bolt for hooking the trailer to the rear bike rack
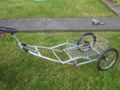
Figure 3: Trailer without rain cover
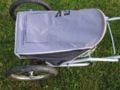
Figure 4: Top view of the rain cover


Cost
budget
| Ragmen | Hardware |
|---|---|
| $50.00 | $25.00 |
I did not spend the entire budget. Only $20.00 was spent on the frame of the trailer. The entire $25.00 was spent on parts. This included bolts, nuts, washers and the chain.
Conclusions
Overall, the project was a success. Converting the "instep" stroller was easy. Only 2 holes had to be drilled and there was no welding. The basket supports at least 200 lbs while the trailer is motionless. The design criteria were met. The trailer cost less than $50.00. Since the trailer was made from the stroller, it is very lightweight and durable. The stroller was purchased at a local thrift store, so the material was available locally.
A disadvantage of this design is that a bike rack is required to couple the trailer and that modifications must be made to the bike rack itself to easily couple the trailer.
When going uphill with a 20lb load there was a lag between the trailer and the wheel. So the trailer would pull back a little. I found that a simple bungee cord eliminated this problem. Unfortunately this caused the trailer to hit the rear wheel, which was not happening before. So I removed the bungee cord and am thinking of ways to eliminate the lag.
The rain cover was tested by leaving the trailer outside in the rain for 12 hours. An object was placed in the basket under the rain cover. When I checked the object after 12 hours I found that it was not wet. So I must say that the rain cover is a success.
literature
Ayre, Michael. (1986). "The design of bicycle trailers." Intermediate Technology Publications Ltd. 9 King Street, London WC2 8HW, UK.
- A great resource for a bike trailer beginner. Covers everything needed to build your own bike trailer including design, hitch system, load, frame, wheelset, and utility.
Ballantine, Richard, Richard Grant. (1992). "Richards' ultimate bicycle book." Dorling Kindersley, INC. New York.
- Report for easy bicycle maintenance and repair. Carrell, Al. (1973). "The super handyman's big bike book." Prentice –Hall Inc,. Englewood Cliffs, New Jersey.
- Good recommendation for bike parts, tools and maintenance.
War, Martin. Help map the national bicycle greenway. Plans, Community bike cart designs and Instructables. http://www.bikeroute.com/WhyTrailer.php#Sources
- If you follow the "Society Bicycle Trailer Designs" link, you can find many design plans for the other trailer options. More design plans can be found under the "Instructables" link.