This document presents the comprehensive final course project undertaken during the Spring 2023 semester for 535 (Development Technology), a graduate course at Cal Poly Humboldt. Student team collaborated with the Schatz Energy Research Center to develop air quality monitoring technology to deploy in remote, wildfire-affected areas. The objective assigned to our team was to successfully ideate, design, prototype, construct, and test a solar-powered air quality monitoring system for use in off-grid homes. The deployment of this project is expected to take place in Orleans, situated in Humboldt County, CA.
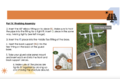
This page contains our final product design, construction manual with video and user manual as well as complete instructions and suggestions for appropriate usage. Please view our team's final report on the right for additional information, including a literature review and a detailed methods section on our approach to designing this project.
Our criteria and constraints for this project are based on our best understanding of the stated needs of our client. The most important criteria for this system are reliability, durability, and ease of transport. This system must collect PM2.5 data reliably and as consistently as possible. It must be resilient to wildlife and moderately resilient to weather. Finally, it must be relatively easy to collapse and transport in the trunk of a car. The final design will be thoroughly assessed using a series of tests to determine fit to the criteria outlined by the team. The testing and results section of this report will provide information on how the system fits the criteria.
Table 1. Criteria and Constraints
Criteria
Constraints
Weight
Reliability
Sizing: the system must run 24/7/365.
Connectivity: must be able to collect PM2.5 data without significant interruptions.
10
Durability
Must be resistant to wildlife, weather, and other external influences.
9
Ease of Transport
Must be relatively easy to transport from place to place in a car.
8.5
Ease of Use
The construction and user manuals must be clear and easy to use.
The system must be easy to use.
8
Safety
System must not be a hazard to users during construction or use.
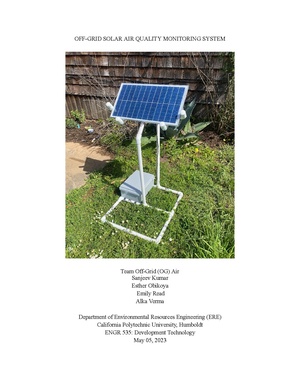
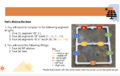
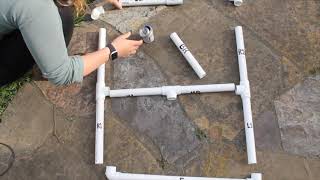
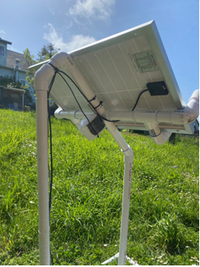
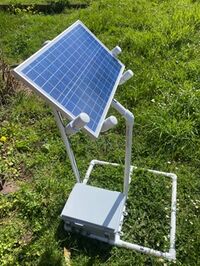
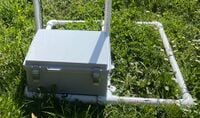
The final design for this project consists of a 30W panel, a 128Wh battery, a 30A charge controller, a DC-DC Buck converter, the Purple Air sensor, and a PVC mounting structure. This system is expected to successfully power the Purple Air sensor 24 hours a day, 7 days a week, and 365 days a year, with expected days of autonomy of approximately 3 days. The physical system is constructed using schedule 40 1” PVC pipe and fittings, assembled using PVC cement. The final system includes a 14.6"×10.6"×5.9" junction box which holds the battery, charge controller, buck converter, and other moisture-sensitive wiring.
A 3-foot USB to micro-USB cord is connected to the charge controller to power the Purple Air sensor. Both the micro-USB and the PV wires inside the junction box are fed through a PG7 cable gland. Additionally, a set of 16 1.5” galvanized metal U-pins serve to stake the base into the ground to ensure structural integrity. Any loose wires are fastened taunt to the PVC mounting structure using high-quality, outdoor-grade zip-ties. Zip-ties are also used to fasten the junction box and PV panels to the PVC frame. A complete list of materials and cost breakdown is provided below.
We suggest to anyone looking to replicate this construction to view our thorough step-by-step guide and final construction manual attached by clicking the Construction Manual thumbnail. Download the PDF and view online or print out the packet and use the physical version to guide you as you are building the system. Check out the video for the construction of the PVC structure.
The standalone Purple Air sensor is a device that measures and reports real-time air quality to the Purple Air sensor’s website. This system uses a solar panel, charge controller, and battery to power the Purple Air sensor. The purpose of the user manual is as follows:
Provide instructions to install, operate and maintain the standalone air quality monitoring system.
To understand the critical safety features and the system's technical specifications.
A. Off-grid solar PV system installation[edit | edit source]
Ensure the area has access to sunlight (south-facing) and is not blocked by trees, structures, or other objects before installing the device.
Ensure that the system is installed at a place free from nearby pollutant sources (don’t install near a garage, a gravel road, a fire pit, smoking areas, building exhaust, etc.). Pollutants such as vehicle exhaust, dust from gravel roads, and smoke from fire pits can negatively impact the air quality in the system's installed area. It is recommended to install the system at least 50 feet away from any potential pollutant sources mentioned above.
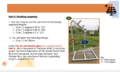
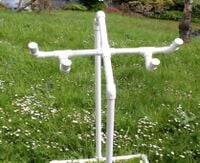
Place the constructed PVC mounting structure on the ground considering the conditions stated in 1 & 2 above, as shown in Fig 1.
Fix the 1.5” galvanized U pins across the base of the PVC mounting structure as shown in Fig 2.
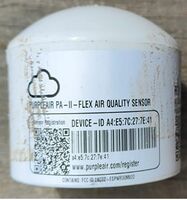
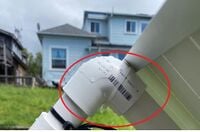
Take a picture of the device id of the Purple Air sensor, as this would be needed for registration, as shown in Fig 3.
Fig 1. PVC mounting structure placed on the ground.
Fig 2. Fixing 1.5” galvanized U pins
Fig 3. Picture of the device id of the Purple Air sensor
Place the Purple Air sensor in the middle of the top of the mounting structure with the help of zip ties, as shown in Fig 4
Place the Solar PV module (30 watts) at the top of the mounting structure, as shown in Fig 5.
Fasten the solar PV module using zip ties, as shown in Fig 6.
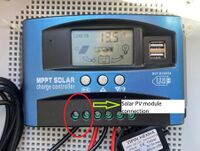
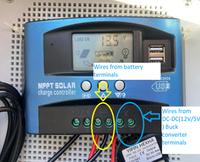
Take the wires from the PV module and the micro USB cable through the PG7 cable connector of the junction box. Connect the red wire from the solar panel to the + terminal and the black wire from the solar panel to the -ve terminal of the charge controller, as shown in Fig 7.
Fig 4. Purple Air sensor placed in the middle of the top section using a zip tie.
Fig 5. Solar PV module mounted on the PVC mounting structure
Fig 6. Solar PV module fastened with mounting structure using zip ties.
Fig 7. Connecting solar PV module to the charge
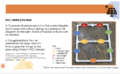
10. Connect the red wire having a 5A fuse and the black wire to the + and -ve terminal of the charge controller meant for the battery and connect the DC-DC buck converter to the Charge controller “load” terminals as per the polarity( red to the + terminal and black to the -ve terminal) as shown in Fig 8.
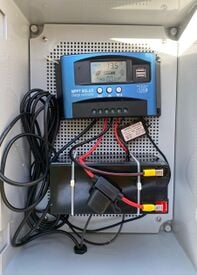
11. Place the battery(vertically) and charge controller on the mesh of the junction box using zip ties and place the mesh in the junction box, as shown in Fig 9. Tighten the screws in the junction box.
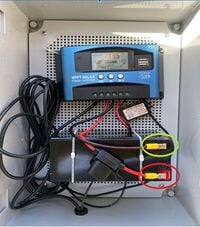
12. Connect the battery wires from the charge controller to the battery terminal, as shown in Fig 10.
Fig 8. Connecting battery wires and DC-DC buck converter to charge controller
Fig 9. Placing the battery and charge controller inside the junction box
Fig 10. Connecting the battery to the charge controller
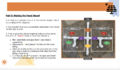
13. Connect the micro USB cable to the micro USB port of the Purple Air sensor, as shown in Fig 11. Check for the red LED; it shows that the Purple Air sensor is ON.
14. Adjust the wire length and close the junction box and place it on the base of the PVC mounting structure, and, using zip ties, fasten it to the base of the structure, as shown in Fig 12.
15. Fasten the wires from the solar PV module and the micro USB cable to the mounting structure using zip ties, as shown in Fig13.
Fig 11. Connecting the micro USB cable to the micro USB port of the Purple Air sensor
Fig 12. Fixing the junction box to the base of the mounting structure
Fig 13. Fastening the wires to the mounting structure using zip ties.
Note: The user may use a USB-micro USB cable plugging the USB cable into the USB output of the charge controller and the micro USB to the Purple Air sensor by using a PG 13.5 or the higher cable connector. We have used a DC-DC buck converter(12V/5V) as we don't have the PG 13.5 cable connectors.
Ensure that the LEDs of the Purple Air sensor are ON, as shown in Fig 11.
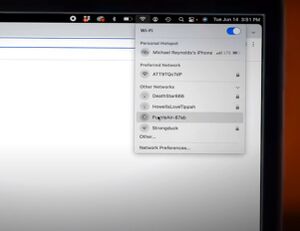
Fig 14. Purple Air sensor hotspotConnect to the sensor's hotspot by opening the network settings on your Wi Fi-capable device (phone, computer, etc.). The hotspot's name will be Purple Air-****, as shown in Figure 14.
A popup can show up depending on the Wi Fi-capable device being used. Open a web browser and type "http://192.168.4.1/config" into the address bar if it still does not display. Try momentarily stopping or disabling mobile data on your Wi Fi-enabled device and retyping the URL above if it still does not appear.
If the hotspot doesn't appear on a Wi Fi capable device, wait for 10 minutes and try again, as it may take a while for the Purple Air sensor network to appear.
If the sensor's Purple Air-**** network is not visible even after 10 minutes of power on, it may already be Wi-Fi-configured.
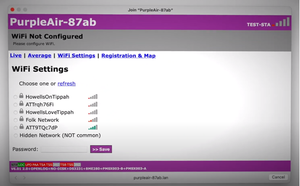
Fig 15. Connecting the Purple Air sensor to an available Wi Fi networkIn the popup window or http://192.168.4.1/config page, from the list of accessible networks, choose the one to which you are attaching your sensor. Input the Wi Fi network's password after that and select "Save," as seen in Figure 15. It may take a while for the connection to be established. “Looking Good” will appear at the top of the page after the Wi Fi is established.
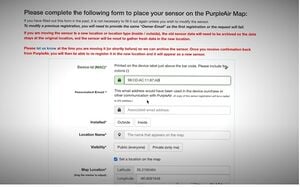
Go to www.purpleair.com/register to register your Purple Air device.
First, type in your device-id from the picture you have taken, as shown in installation steps A-5.
Type in the email associated with the purchase of the device.
Select whether the device is located inside or outside.
Name the location where the device is currently located. (like, 879 Union Street).
Select Visibility: public (everyone).
Fig 16. Device id, associated email address, location and its name for registrationSet the device's current location by moving the red indicator bubble on the map or typing in the location's coordinates as shown in Fig 16.
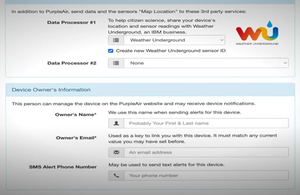
Skip the Onboard LED Options and Data Processor sections.
Fig 17. Owner name and email information to be filled for registrationFill in the Device Owner’s Information section with the necessary information as shown in Fig 17.
Agree to the terms and conditions and click on
2. Check whether the Purple Air sensor is visible at https://map.purpleair.com.
0–50 (Green): The air quality is acceptable, and after 24 hours of exposure, there is little to no risk from air pollution.
51–100 (Yellow): Acceptable air quality. Some individuals, particularly those with an abnormally high sensitivity to air pollution, may be at risk after 24 hours of exposure.
101–150 (Orange): After 24 hours of exposure, members of vulnerable populations may develop health impacts. It is less likely that the general population will be impacted.
151-200 (Red): After 24 hours of exposure, certain members of the general public may experience health consequences; people in vulnerable groups may have more severe health impacts.
201-300 (Purple): Health warning: After 24 hours of exposure, everyone is at higher risk for health consequences.
>300 (Maroon): According to the health warning for emergency conditions, everyone is more susceptible to harm after a 24-hour exposure period.
The system requires significantly less maintenance. Still, follow the below-mentioned steps and frequency for the maintenance of the system:
Check and clean the solar panel- Monthly; Solar panels must be cleaned regularly to ensure maximum efficiency. Clean it with a soft cloth.
Check data transmission - In case of a Wi Fi outage. The Purple Air automatically connects to the Wi Fi once configured, but it is advised to check when there is a Wi Fi outage to ensure real-time data for the air quality. If there is any problem, then follow the troubleshooting steps.
Conduct routine maintenance- Every three months; Conduct routine maintenance on the monitoring system, checking the cables and connections and ensuring that the system is securely mounted.
For any issues and problems related to the air quality monitoring system, try the following troubleshooting steps:
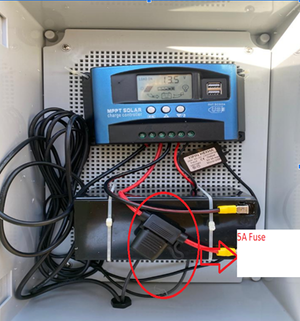
Fig 18. 5A fuse between the battery + terminal and the charge controllerCheck for the 5A fuse between the charge controller and the battery-positive terminal as shown in Fig 18. If the fuse is blown, replace it with another 5A fuse or proceed to the next step.
Check the solar panel for any shading or dust deposits; if any, clean it with a soft cloth (preferably cotton).
Check for any wiring issues (i.e. break in wiring).
Check the charge controller if the battery voltage is above 11V.
Check the sensor connectivity with the Wi Fi (by checking for the sensor over the Purple Air sensor cloud network). If not, follow the steps to reconnect as mentioned above in installation B.
If the sensor AQI readings are incredibly high on regular days, check for a nearby pollutant source. If no pollutant is observed, gently wipe the Purple Air sensor with a clean, dry cloth.
Even after trying the above troubleshooting steps, if the system is still not online, please contact our system support team by
Email-
Phone-
While contacting our customer support, please keep this information handy.
To guarantee that the final design meets the criteria and objective, our team has conducted a series of tests to ensure transportability, ease of use, replicability, and reliability. The system has been tested in various environmental conditions to ensure it can withstand the elements and function successfully. You can view the results of these tests in further detail, along with all the figures cited, in our Final Report.
We have tested the system’s 30W PV and 128Wh battery for charging time. The battery charging test was conducted on a day with good solar radiation. The time taken to charge the battery was about 300 minutes from 20% charge. The solar PV module also powered the PA sensor during charging, which indicates that the battery charge will be utilized only during nights or low solar radiation.
The ongoing discharging test has shown that 80% of the battery charge is consumed with the PA sensor over 78 hours and 18 minutes. The setup consumes 30Wh over 24 hours, i.e. 1.25Wh/hour. Our system will be autonomous for about three days once the battery is charged and will be kept charging with the available solar radiation. Based on the discharge test of the final system, the load requirement for the PurpleAir sensor may vary slightly from the manufacturer’s specifications.
The test results suggest that the system is resilient for about three days. The certainty that the system can operate autonomously for up to three days with a fully charged battery and the battery can fully charge within 5 hours with average solar radiation means that the user does not need to monitor the system constantly and adjust the system for proper functioning. Additionally, using a DC-based system in the final product design will make connecting and operating the system easier since it improves efficiency by eliminating AC-DC conversion. Overall these results suggest that the system is both efficient and easy to use, making it a feasible option for users looking for a reliable air quality monitoring system.
The product design has been carefully constructed with ease of replicability in mind. The construction manual includes detailed instructions on each step: cutting pipe to the correct length and joining PVC pipe and fittings using PVC cement. The segment lengths required for the prototype are clearly defined, and users can assemble the prototype without gluing as per the diagram to ensure all pieces are of the correct lengths. Once the user has ensured the assembly of the prototype, the user can glue them along with the fittings using PVC cement. To further enhance replicability, the construction manual has included pictures of all the fittings: the bottom, the top and the support limbs. This will provide the user to visualize the components individually and compare them to their construction.
The product design has been developed with the accessibility of materials in mind. The materials required for the construction of the system are commonly available at hardware stores and online, making it easy for users to get access. The design is relatively simple, consisting of PVC pipes and fittings. The simplicity and low barrier to entry make it easy for users to obtain and work with the materials for designing the product. In addition, users will be provided with an interactive user manual for building the product without any expertise.
Additionally, the team provides a video of the entire construction process, which can be viewed on Appropedia; this will boost the replicability of the design. The construction manual and visuals of each component will make it easy for users to replicate the product design. In addition, the team has tested the construction and user manuals on five subjects with varied experience in building or construction ranging from none to significant experience. The construction and user manuals were given to each participant, who was asked to rate the understandability of the manuals. Participants were provided with the construction manual and pre-cut PVC pipe (labeled) and fittings and asked to fit each piece according to the diagrams in the manual. All 5 participants were successfully dry assembled both the base and the panel mount in varying amounts of time ranging between 15-30 minutes. Due to limited material availability, we could not ask participants to glue the system. The average rating for the construction manual between 5 participants was 8.5 on a 1-10 scale. It is important to note that only the construction of the PVC structure was tested for replicability.
Based on our criteria, the system must be easily transported from place to place inside the average passenger vehicle. The system has been physically moved from one location to another in a medium-sized SUV without dismantling. While the team considers this to successfully fulfill the transportability assessment, transporting the entire system proved to be somewhat burdensome. Upon further adjustments to the final design, the team decided to refrain from gluing the supporting lengths of pipe to the base and panel mount so that the system can be partially disassembled for ease of transportation. The construction manual details exactly which joints are to be left unglued. The team believes that this will not affect the structural integrity of the system as long as enough force is applied when inserting the lengths of pipe into the fittings where glue is not present. To prove this to be the case, the team performed extensive durability testing on the final system.
The team identified the need for the system to be durable as an important criterion. The region of potential deployment is remote and surrounded by a vast forest ecosystem, meaning that the system must be able to endure interactions with wildlife, sustain expected weather such as rain or snow, and other external influences. Following the construction of the final system, the team tested for structural durability by asking volunteers to physically push, throw, and shake the system to simulate wildlife encounters and high winds. All components of the system remained intact and the system continued to function. Additionally, the system was left outdoors for multiple days, during which it endured strong rain and winds. The zip ties used to fasten the junction box to the base and the solar panel to the panel mount proved satisfactory in securing the components of the mounting structure. The structure may sway side to side during extreme winds, but the team believes this will be to the advantage of the system's durability, as the flexibility of the pipes will reduce the chance of breakage.
The system's reliability was tested by ensuring that PM2.5 data were consistently collected and visible on the PurpleAir real-time air quality map. The team conducted a reliability test by simulating power outages by shutting off and turning on the wifi the PurpleAir sensor was paired with and ensuring the sensor would pair back with the wifi and continue collecting data. This test was successful, and the PurpleAir sensor reconnected to the wifi after the wifi was turned back on. The Wifi was turned off at 19:00 and again turned back on, and after that, the PurpleAir sensor automatically connected to the wifi and started transmitting the data. So it is evident from the test result that the final system is reliable.
The results suggest that the product design is simple and capable of real-time air quality monitoring, even in places with limited grid connectivity. The other significant advantage of the design is its low cost, making it a highly accessible option for individuals and communities who don't have the resources to afford expensive air quality monitoring systems. Using a PurpleAir sensor and solar PV makes the system highly reliable. Using PVC pipes and fittings for construction also makes replicating, designing and installing easy. The results also demonstrate that the system is easy to use and requires no specialized knowledge or training. The highly interactive user manual provides step-by-step instructions on constructing and operating the system.
Overall the results suggest that the design has the potential to significantly contribute to efforts for monitoring AQ and making informed decisions for protecting public health. The system can be deployed in various places like schools, individual homes and community spaces. The low cost makes it an attractive option for individuals and communities looking for a simple and affordable solution for air quality monitoring. However, the system has certain limitations. For instance, it may be affected by certain environmental factors such as extreme temperatures and heavy snow. Further testing is needed to determine how these factors impact the system's performance.
Additionally, the product design was tested in Arcata, with no shading over the solar PV and moderate wind speed. Testing the system in different locations, such as wildfire-prone areas, is essential to determine its effectiveness. The team also suggests collecting feedback from end users who have constructed and used the system to identify any challenges or issues with the proposed design to make necessary improvements.
We recommend this system to others who want to set up an air quality monitoring system in their homes or communities. The following provides important considerations for users:
If constructing the system, consult the construction manual and follow the instructions carefully for proper design.
Consider that PVC glue is extremely fast drying and irreversible mistakes can be made without dry-fitting all parts prior to gluing.
Ensure that the setup is placed appropriately so the solar panel gets sunshine without shading. Also, the PA sensor must be connected to the nearby available wifi to visualize the data over the cloud in real time. In the event of any issue with the system, consult the user manual for troubleshooting tips and contact customer support if needed.
While transporting the assembled system, ensure no damage to the sensor and other components. The system can be transported fully assembled in a medium-sized SUV but could be transported partially assembled in a smaller vehicle if needed.
Ensure the system is functioning properly by regularly checking the system.
If the system is used for research purposes, it is recommended to validate the accuracy of sensor data with a nearby air quality monitor.
Solar off-grid air quality monitoring systems provide an innovative solution to the difficulties of monitoring AQ in remote or off-grid areas. Key characteristics, such as solar power source and real-time AQ monitoring capabilities, make the team’s proposed system a reliable and cost-effective alternative for industries and regions seeking to gather AQ data and safeguard public health. Concerning the project's objective, which includes successfully designing, constructing, and testing a solar-powered air quality monitoring system for use in off-grid homes, our team presented a design and structure that satisfies all the criteria. Based on the testing conducted by the team, future recommendations include testing the system in an off-grid location and further exploring the potential of material alternatives.
The standalone solar-powered air quality monitor system is a valuable device for keeping track of the outdoor air quality index, especially during wildfire and smoke conditions, and thus providing reliable information to the community so that proper mitigation and precaution could be taken to protect them from wildfire hazards. The user should follow the above instruction to ensure the system's satisfactory performance and protect the user from possible hazards. It is a good investment for homeowners and commercial users to observe the air quality and take necessary precautions or mitigation measures for protection from hazardous smoke events, which may cause respiratory illness, cardiovascular illness and other serious health issues.
.jpg)