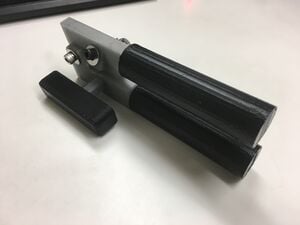
- OSAT 3D Printed Can Opener
-
-
-
Bill of Materials[edit | edit source]
This can opener is made up of 6 printed pieces in addition to several purchased hardware components.
The printed components are:
- *Main Body - Top
- *Main Body - Bottom
- *Grip (x2)
- *Stepped Pin
- *Handle
Purchased parts:
- *6mm ID 10mm OD Washer (x6)
- *6mm ID 8mm OD Washer (x3)
- *6mm x 40mm bolt (x2)
- *20mm Gear w/ 30 degree flare (x2)
- *20mm Circular blade (x1)
- *20mm Gear w/ short fine teeth (x1)
All STL files as well as source files can be found Here
The cost of filament used is based on a $20.00 / Kg of PLA filament price:
| Quantity | Part Name | Material (grams) | Cost ($) | Total ($) |
|---|---|---|---|---|
| 1 | Top Body | 36.00 | 0.72 | 0.72 |
| 1 | Bottom Body | 47.00 | 0.94 | 0.94 |
| 1 | Handle | 21.00 | 0.42 | 0.42 |
| 2 | Grip | 28.00 | 0.56 | 1.12 |
| 1 | 3D Printed Pin | 3.00 | 0.06 | 0.06 |
| 2 | Bolts | N/A | 0.60 | 1.20 |
| 2 | Nuts | N/A | 0.17 | 0.34 |
| 9 | Washers | N/A | 0.14 | 1.26 |
| 3 | Gears | N/A | 0.79 | 2.37 |
| 1 | Blade | N/A | 0.75 | 0.75 |
| Total Cost | $9.18 | |||
Tools needed[edit | edit source]
- MOST Delta RepRap or similar RepRap 3-D printer
- A Power drill
- 2 Drill bits (6mm and 10mm)
- Small adjustable wrench
- Small set of Hex keys
Skills and knowledge needed[edit | edit source]
- Using a power drill is necessary, simply modeling and printing out the through holes did not yield clean enough results for the pin or rotating bolts.
Technical Specifications and Assembly Instructions[edit | edit source]
- The total print time of this device is approximately 9 hours total
- An assembly time of roughly half an hour is required after having all of the necessary components printed and purchased. This includes the time to locate and drill through holes and assemble all components.
- The first step is to locate where the through shaft for the blade will be drilled on the "Top Body" component, this is roughly in the center of the angled cube.
- Next step is to assembly the bolt, washers, gear and blade on the Top Body through the newly drilled hole.
- Work in progress*
Common Problems and Solutions[edit | edit source]
Be very careful when drilling out the holes as there are a few different ways this could go wrong.
- *First pre-drill the hole with a smaller drill bit as starting with a larger drill bit may cause the main body to crack.
- *Locate the holes carefully as incorrectly placing the hole for the hinge may prevent it from opening and closing.
- *Be sure to drill all holes as straight as possible as angling any hole may prevent it from working properly.
Be careful when starting a new can because being too forceful can cause the pin to shear.
Cost savings[edit | edit source]
Overall, the way I built and assembled the can opener may not have been the most economical way possible. A similarly sized can opener would generally cost around $15 [simh hd bw b1DNT p79 d20 i1?pf rd m=ATVPDKIKX0DER&pf rd s=merchandised-search-4&pf rd r=Z3HCRBQRSSM4PC4PFTMM&pf rd t=101&pf rd p=a33bde39-acdd-59ad-8190-5b4f22ff67f8&pf rd i=289755|An example can be found here]. Despite this though even using the exact components I used the total cost was $9.18, which is over 50% savings.
Costs can be reduced by repurposing other bolts, washers, nuts, gears and a blade. The only limiting factor on bolt size is the inner diameter of the gear and blade chosen, otherwise the person building it has the ability to use whatever they can find. The gearing also does not require any specific component as long a the outer diameter is approximately 20mm and the two gears used are the same because both the upper and lower portions need to rotate at the same speed. If the hardware is from repurposed sources and not purchased it would farther reduce the cost to $3.26, which is a 460.12% savings in cost.


