
Hello, and welcome to our Spring 2013 Appropriate Technology project at Cal Poly Humboldt (HSU). Our team is comprised of Ivan Diankov and Alex Kato. We will be designing and constructing an erosion control system on the slope behind the CCAT yurt house at HSU's Campus Center for Appropriate Technology (CCAT). Erosion control and slope management come in many forms. From retaining walls to bio-engineered erosion control (BEC) techniques, there are various methods to maintain and control a hillside. The use of BEC techniques specifically provides avenues to enrich the surrounding area with more plant life and thus more stability than a traditional retaining wall.
Problem Statement[edit | edit source]
The Campus Center for Appropriate Technology (CCAT) at HSU is a student run facility for both education and hands-on experience. On site are many examples of sustainable and appropriate building and living. The Yurt house, located on the hill adjacent to the main house, is one example of promoting a sustainable living household. Several problems have arisen from the location of the Yurt House.
- Complete access around the house perimeter is severely restricted due to the small space between the hillside and the side of the house and the large amount of vegetation that grows within and about that small space.
- There is concern over possible damage to the Yurt from erosion as well as concern over how the hillside is being currently used. As of January 2013, the area behind the Yurt comprises of two large fern patches crisscrossed with footpaths.
-
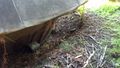
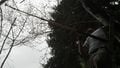
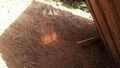
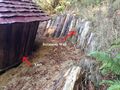
Work space between Yurt wall and hillside as of Jan 2013. Not a lot of room!
-
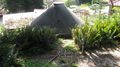
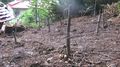
Area behind yurt, Jan 2013. White post marks edge of CCAT boundary.


Our project is to clear a small space from the perimeter of the Yurt and to stabilize the surrounding hillside to prevent further erosion. The goal is to reinforce the hillside using bio-engineered erosion control techniques involving live stakes and branch packing.
Literature Review[edit | edit source]
Bio-engineered Erosion Control Methods[edit | edit source]
Branch Packing[edit | edit source]
Branch packing is a technique that introduces roots into small sloped areas. The layering of branches traps sediment flow and the growth of a root network solidifies the earth into a connected mass. A layer of crisscrossed live branches (0.5in-2.0in diameter) covers the surface. Live stakes are placed at intervals (2ft-3ft) throughout the area. A cover layer of soil no greater than 12in is applied and compacted.[1]
Live Stakes[edit | edit source]
Live stakes are a natural and locally sourced tool for erosion control. Stakes 2-3ft in length and 1-2in in diameter are prepared and then tamped into the ground somewhere between 1 ½ - 3 ft. Stakes stabilize a slope by absorbing water from the soil and by providing addition root structure. By choosing a shrub or tree species that roots quickly, a slope can benefit from live staking within a season. For excessively wet environments, live staking alone is not sufficient for slope reinforcement.[2]
Live Fascines[edit | edit source]
Live fascines are bundles of live branches that are places at the bottom of a slope or at the line of a river bank. The perpendicular growth of the roots provides structural support at the base of a slope and can act as a sediment catchment system. Fascine bundles can also be constructed with dead branches to help control sediment and water flow. Fascine bundles are prepared as 6-8in diameter bundles that are fastened with twine. They are installed in shallow trenches that follow the contour of the slope. In our original ideas for this project, we envisioned using fascine bundles to line the bottom of the slope. Our final project did not incorporate them into the design. This was due to lack of materials and necessity.[1]
Other Retaining Systems[edit | edit source]
Log Retaining Wall[edit | edit source]
Logs are a popular material to use for retaining walls. Their intrinsic strength and durability make them appropriate resources for retaining large amounts of earth. Their natural aesthetic can add visual appeal to the landscape. An existing vertical log retaining wall at CCAT served as inspiration for our wall.[3]
Project Evaluation Criteria[edit | edit source]
The following Criteria will be used to assess the success of this project. These criteria were chosen based on the suggestions of the project coordinator as well as the diligent students who are working on the retaining wall. The scale (1-10) represents the importance level of meeting the constraint of each listed criteria.
| Criteria | Constraints | Weight (1-10) |
|---|---|---|
| Safety & Placement | Over engineered for strength and durability | 10 |
| Eco Groovy | Efficient use of recyclables and waste materials | 10 |
| Budget | Must not exceed our budget of $300.00 | 9 |
| Aesthetics | Must be pleasing to the eye and look professional | 8 |
| Educational Aspect | Must include an educational piece for community (something to explain or highlight the construction of the retaining wall) | 7 |
Tentative Time Line[edit | edit source]
A proposed work schedule detailing the progress of this project. An unexpected change to the design has modified and extended our timeline.
| Project | Started | Completion |
|---|---|---|
| Meet with CCAT to Finalize Design | February 25 | March 2 |
| Sourcing of Materials | February 23 | March 2 |
| Building Materials (as approved by CCAT) | Tentative | Tentative |
| Relocation of Vegetation | March 2 | March 12 |
| Beginning Excavation | March 12 | March 23 |
| Soil Erosion | March 23 | April 23 |
| Testing and Error Correction | Apr 23 | May 4 |
| Design Change by Client | Apr 19 | Apr 21 |
| New Excavation | Apr 19 | Apr 26 |
| Collection & Assembly of Logs | Apr 26 | Apr 29 |
| Soil Erosion Control (live stakes) | Apr 29 | Apr 30 |
| Tamping and Back-fill | Apr 30 | May 1 |
| Chainsaw | Apr 1 | May 3 |
| Finalize Project | May 1 | May 3 |
Design[edit | edit source]
Preparation[edit | edit source]
Fern Relocation[edit | edit source]
The first step in our project was to relocate the existing vegetation. Our site was covered in large fern patches that needed to be removed before any work could be done. These fern patches also contributed to the restricted access around the Yurt, so their removal was necessary for Yurt maintenance. We used shovels and pickaxes to remove the ferns. Once removed, we planned to relocate them beyond the CCAT property line. HSU Plant Operations expressed their desire to make the foot trails behind CCAT more narrow and discreet. Thus, we planned to relocate some of these ferns along the trail.
Live Stake Preparation[edit | edit source]
Live stakes are crucial for our soil erosion control system. They are also very expensive. The alder trees that line the CCAT property border are a perfect resource for our live stakes, as there are many large branches crowning their tops. We plan to cut these branches using a large ladder and an extendable tree pruner. Each branch will be stripped of its offshoots, and cut down to size. We will need about 50 stakes that are 2 – 3 ft. long and ½ - 1 in. in diameter. Each stake needs to have a flat and a pointy tip. These cuts will be made using a table saw. All small branches, offshoots, and other alder leftovers will be used for branch packing. Finally, all stakes will be preserved in a bucket of water for at least 24 hours prior to use.[2]
Slope Grading and Shaping[edit | edit source]
After the site has been cleared of plant material, the slope will need to be graded. One of the objectives of the project is to ease concern over soil erosion therefore lessening the slope steepness will contribute to that goal. We plan to remove soil from the slope starting from the back of the site and working toward the Yurt and relocate it off site. In addition, the slope will be pushed back about a foot from the Yurt. We will do this by shoveling the earth away from the Yurt and relocating it off site.[1]
Installation[edit | edit source]
Installing the Live Stakes and Branch Packing[edit | edit source]
In order to implement the branches for the branch packing system, we will remove up to 1 ½ ft of soil from the slope. Once the soil is removed, we will install the live stakes. The stakes will be spaced in a 2 ½ ft square grid and tamped into the soil to a depth of 2ft. Once all of the stakes have been put into place we will lay the live branches into position. The live branches will be laid in a crisscross pattern across the site, in between the stakes. Once a layer of branches is in place will be fill the site back with the 1 ½ ft of soil we initially removed. This soil will then be compacted and wet. An additional layer of live branches may be laid down and covered, but this depends on the amount of material we can gather. If any extra live branches are left over, it is an idea to make live fascine bundles. These bundles will then be placed in a shallow trench that lines the bottom of the slope.
Construction[edit | edit source]
Preparation[edit | edit source]
Fern Relocation[edit | edit source]
The two large fern patches contained about a dozen large ferns and several small ones. Shovels were used to dig around the ferns and expose their roots. Pickaxes were then used to gently hack away at the ball of roots and free them from the soil. As each fern was pulled out of the ground, a new hole was dug nearby to accommodate it. This task proved much harder than anticipated.
-
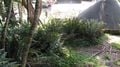
First patch of ferns.
-

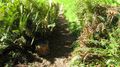
Second patch of ferns.


We asked CCAT for some volunteers on a Friday. CCAT volunteers drastically reduced the time it took to relocate our ferns. However, even with the extra workers, this first phase of construction took several weeks.
-

Ivan, Alex, and the volunteers at CCAT.

It is important to note that a lot of care was taken to preserve the ferns and incorporate them into our system. Half of the ferns replanted were used to shape the foot trails on the edge of the CCAT property line. The other half were used to fill void space in the surrounding hillside.
-
The footpath behind the Yurt.

We also thought it would be super eco groovy to incorporate some of the ferns into our branch packing part of our soil erosion control. Two whole ferns were saved and, later, stripped of their branches. The branches were incorporated into our branch packing to decrease top soil erosion. The remaining root masses were replanted around the area
Live Alder Stakes[edit | edit source]
Harvesting our live alder stakes was done concurrently with the fern relocation. A large aluminum ladder was secured to an alder by a piece of rope. A large extendable tree pruner (12 ft. reach) was used for the cutting of the branches. In addition to its cutting tip, our tree pruner has a large saw blade at the tip. This blade was covered up with newspaper and taped up to prevent any injury. The cutting phase was extremely dangerous, and a lot of care was taken to prevent injury. The felled branches were taken to a processing area where they were stripped of their offshoots, and cut down to size with a table saw. Each felled branch yielded 2 - 3 finished stakes and plenty of smaller branches and offshoots. A 44 gallon trash can was filled with water and used to soak about 60 stakes, pointy tip down. All smaller branches, offshoots, and other alder leftovers were set aside and treated with water every other day until used for branch packing.
-
Ivan cutting alder branch.

Hillside Excavation[edit | edit source]
Some last minute changes by the client required us to make the Yurt all around accessible, according to the Americans with Disabilities Act (ADA). The desire was a five foot clearance between the Yurt and the hillside. Thus, an actual retaining wall structure, and not just a soil retaining system, was required. This was a very challenging change to our design, and excavation began immediately. An area around the Yurt was excavated to about 5 feet wide and almost 6 feet deep. The area was heavily rooted and required the use of Pulaski. Pickaxes and shovels were also heavily used. About a week later, the ADA idea got scrapped by our client.
-
ADA clearance.

Installation[edit | edit source]
Retaining Wall[edit | edit source]
Excavating a large amount of hillside behind the Yurt left us with no real option but to continue with the construction of a retaining wall structure. The decision to erect a vertical, rather than horizontal, log wall was heavily influenced by our available resources in the area. Piles of decent sized logs littered the hillside behind our work site and would be ideal for vertical building. Also, the height and intensity of the wall made it unrealistic to consider contour wattling.
We selected our logs based on strength and desired length for the different sections of our wall. The center pieces have to provide the most structural support so we chose the largest and sturdiest of the logs. We started building at the center and worked our way out. The side of the hill was carved out to accommodate the log's dimensions, and a 1 ½ - 2 ft. trench was dug at the bottom of the wall. We fit each log into the trench and tinkered until everything was snug against the wall, before filling with dirt. A tamper was then used to tamp each log into place. Lastly, the logs and the soil around them were tamped, watered, and tamped again.
-

Finished retaining wall, left side.
-

Finished retaining wall, right side.
-
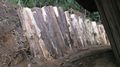
Finished retaining wall, up close.


Slope Grading and Shaping[edit | edit source]
The log retaining wall negated the initial design requirement of grading the slope. Instead, grading was incorporated into our live stake installation, and began after most of the log retaining wall was installed. We used shovels to dig about 1 ½ ft. deep into our soil erosion grid. The recovered soil was relocated close by for later use. We started digging near the back of the grid, and moved toward the retaining wall. This helped naturally back fill soil behind our logs and helped better secure them into the ground.
Live Stakes[edit | edit source]
The installation of our live stakes was done after the 'grading' of our slope. The alder stakes were positioned 2 ½ ft. from each other in each direction. A long heavy metal pole, called a digging stick, was used to poke holes in the soil a little over a foot deep. The stakes were inserted pointy tip first, and tamped down with a rubber mallet. Only 40 out of our 60 stakes were used, which gave us the opportunity to be a little selective. The remaining stakes were incorporated into the retaining wall structure or into the branch packing system. The larger stakes were used to fill some of the gaps between the logs in the wall. This will prevent soil erosion through the cracks while providing proper drainage for the wall. The smaller stakes were used in the final layer of branch packing
Branch Packing[edit | edit source]
The installation of our branch packing system was done right after stake installation. All of the smaller branches, offshoots, and other alder leftovers were laid down in crisscross patterns across the site and covered with a layer of soil. Another layer of fern branches was laid out in crisscross patterns and finally filled with the remaining soil. The soil was lightly compacted and saturated with water.
-
Layers of branches and brush.

Finishing Touches[edit | edit source]
The soil retention system was almost complete, but we felt there were still a few things that needed to be worked on. A lot of watering was done to help promote the rooting of our alder stakes and help to further secure the logs in the ground. The soil around the logs sank further in with each watering. We continued to water and tamp around the wall until no changes were observed. Last of all, we decided to use a chainsaw to shave a little bit off the tops of some of the logs to create a nice tier down the wall.
Finalized Product[edit | edit source]
January 2013


May 2013


Update October 2014[edit | edit source]
Most of the retaining wall is working well; however, the edges of the wall are letting some of the soil into the path area. The soil that is falling from the retaining wall is currently not enough to warrant immediate action, but the heavy rain fall of this environment could cause problems eventually and the retaining wall would do well to be improved or rehabilitated sometime soon. Additionally a number of the logs used in the retaining wall appear to be rotting, the rain and high humidity of the environment that the wall is in would allow for degradation of the wood faster than that of a dry environment, still logs appear to be the best material for the job, they may require more maintenance than other materials but they are the most available materials for the best price. It should be stressed that the wall is holding back just about all the soil at this time and the improvements or rehabilitation of the wall would be good future projects. A good number of the Live stakes appeared to be standing and in satisfactory condition.
-
Retaining Wall October 2014
-
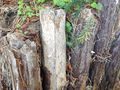
Close up of the Wall


References[edit | edit source]
- ↑ 1.0 1.1 1.2 Eubanks, C.. "Soil Bioengineering Techniques." A soil bioengineering guide for streambank and lakeshore stabilization. San Dimas, CA (444 E. Bointa Ave., San Dimas 91773): U.S. Dept. of Agriculture, Forest Service, Technology and Development Program, 2002. 75 - 131. Print.
- ↑ 2.0 2.1 Gray, Donald H., and Robbin B. Sotir. "Brushlayering." Biotechnical and soil bioengineering slope stabilization: a practical guide for erosion control. New York: John Wiley & Sons, 1996. 231. Print.
- ↑ "Patios and Courtyards." The complete backyard book. New ed. Sydney, NSW: Murdoch, 2002. 99. Print.