
The Cal poly Humboldt ENGR 205 design class collaborated with CCAT (Campus Center for Appropriate Technology) in spring semester 2024 to create a wireless charging station for CCAT as the client with ENGR 205 team Fig-Newton consisting of William Monohan, Aidan Barrett-Wells, Elijah Ramirez and Nicolas Myles Peinemann. The team work together with materials provided by CCAT and the fabrication ENGR 123 class's workspace and materials to create a outdoor wireless phone charging station. CCAT and their volunteers that work on cite will use this station to quickly and easily charge there mobile devices.
Background[edit | edit source]
In spring 2024 CCAT which exist on Cal poly Humboldt campus by the BBS building, commissioned Engineering 205 to create a new wireless solar powered charging station to replace the previous charging station that was stolen, using CCAT's pre existing solar panels. This is to allow CCAT personal and volunteer Friday members at CCAT to quickly, easily and cleanly charge their phones while working on Campus.
Problem statement[edit | edit source]
The objective of this project is to make use of the pre existing unused solar panels at CCAT to create a long lasting clean energy wireless charging station that will let CCAT members and volunteers charge their phones while on cite.
Criteria[edit | edit source]
| Criteria | Description | Weight (1-10) |
|---|---|---|
| Safety | Reduce the chances of damage or injury from any part of the project while using it as intended. | 9 |
| Functionality | Should charge as many phones as are needed with the most efficient use of energy possible. | 8 |
| Ease of Use | Should be intuitively useable to everyone without instruction and easily reapirable. | 8 |
| Longevity | The station, panels, and wall should last and be able to stand up to rain or other expected damage | 7 |
| Low Embodied Energy | Should prioritize materials and processes with minimal environmental impact | 6 |
| Theft Resistance | Reduce the chance of any part being stolen | 6 |
| Aethetics | Should be visually appealing and match the existing enviorment | 5 |
| Cost | Should be kept low with reuse of available materials | 4 |
Prototyping[edit | edit source]
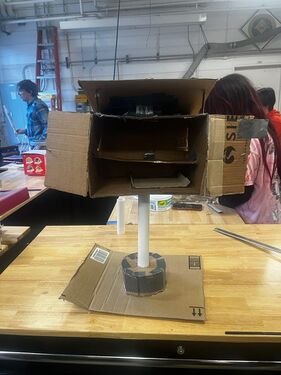
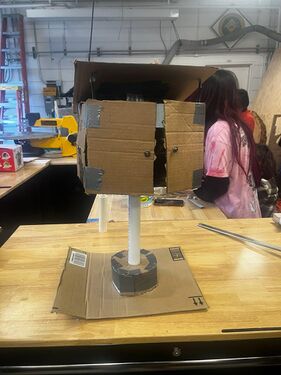
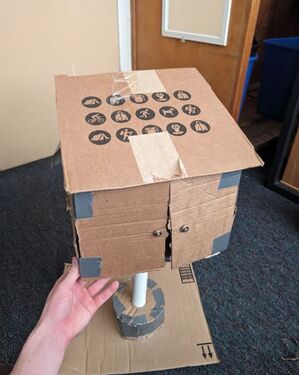
The prototype went through multiple iterations through sketches and mock-ups in AutoCAD before the physical prototype was built. Only one physical prototype was needed, as the client approved the prototype with one small change to the orientation of the roof. All prototypes were constructed with the notion that the main part of the station would be made out of wood. Additionally, the client had the base of a tetherball pole on-site, so most iterations of the prototype, as well as the final design, include this as the main support structure. The original sketch prototype had three drawers and stood atop two supports made out of tetherball pole bases. These bases are metal poles sticking out of a tire filled with concrete. The second iteration had a single swinging door with a latch and sat atop one support made out of a tetherball pole base. This iteration included a separate construction to house some of the more expensive electrical components of the station for the sake of security. This idea was scrapped in favor of placing all of the electrical components within the box, as this was ultimately deemed safer and more secure. The physical prototype combined ideas from both of the previous prototypes, featuring two swing doors with a latch between them, doorknobs, and an internal pull-out drawer where the charging pads sit. This too would be shown to sit atop the tetherball base on-site.
- Prototypes
-
-
-


Final product[edit | edit source]

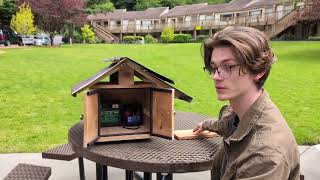
The final product of the wooden box with a metal roof. It uses cedar planks and plywood to withstand the rain, as well as insulation to stop water from getting in. It includes two charging plates with three chargers each of six phones which can charge at once. It sits on a large heavy base in order to prevent theft by making it impractical to move. The metal roof protects the box for direct rain as well as water that flows from the panels to the wall to the box.
Construction[edit | edit source]

1. The Frame[edit | edit source]
Cut two 11.5"h x 15"L and one 11.5"h x 13.5"L planks of wood, either using cedar or plywood. Attach the two long pieces at opposite sides of the shorter wall with right angle braces and screws. Then make two 15" by 15" pieces of wood for the floor and roof of the box. These pieces are make of two rectangular pieces each which are joined together with wood glue, as well as mending braces on the floor for reinforcement. Attach these pieces to the walls with screws.
2. The Doors[edit | edit source]
Cut two 11.5"h x 6.75"w pieces for the doors. Attach them to the side walls with two hinges so that the doors can swing. Sand doors where they make contact with each other so that they can close cleanly. Then attach the doorknobs and clasp to the outside of the door with screws and weather strips to the inside of the door with glue.


3. The Roof[edit | edit source]
Cut three long rectangular pieces for the frame of the roof, assemble into two U shapes. Then attach the metal sheets for the shingling with nails. The roof pieces are nailed onto two trapezoidal supports which are attached to the box. The front support is screwed to the roof of the box from the inside, the screws are driven deep enough that they don't block the door. The back support is glued to the box since a screw would need to be inserted at a difficult angle in order to get past the back wall. The pieces have two cuts with different slants in order to match the slants of the roof.

4. The Interior[edit | edit source]
Cut two 6"L x 1"W pieces of wood and screw them to the side wall of the station about half way up. Then make two 13.25"L x 6"W boards for the shelves the phone chargers sit on. Place one on top of the pieces of wood and place the other on the floor of the box. The battery and inverter sit behind the shelves so that when the shelf is removed the electronics can be accessed.
5. The Base[edit | edit source]
The base of the box is a tetherball pole which has been cut to be about three and half feet long not including the ten inch tire. Tire is connected to the box by a circular flange which is screwed onto the box. The thin end of the flange is inserted into the hollow interior of the pole and then secured with Steelstik. A hole is drilled into the bottom of the box which goes into the inside of the flange. The cables are run though this hole and then the pole itself until they exit from a hole at the bottom just above the ground. Finally, the concrete base is buried more then a foot deep so that a few inches of dirt cover the top of it.
6. The Electronics[edit | edit source]
The power from the panels flows to a charge controller which regulates the power to the battery. The battery stores and transfers power to the inverter which converts it into AC power for the phone chargers. Finally, the chargers transfer power to the phones. The battery, inverter and chargers all sit inside the box.
Bill of materials[edit | edit source]
Items donated are given approximated costs
| Item | Amount | Cost per unit | Total |
|---|---|---|---|
| 1 1/4" Steel Flange — Get at Peirsons | 1 | USD 10.00 | USD 10.00 |
| Cedar Wood — 1' x 8' | 1 | USD 70.00 | USD 70.00 |
| Mending Braces — Available from Ace Hardware | 1 | USD 4.59 | USD 4.59 |
| Door Knobs — Available at Ace Hardware | 2 | USD 5.99 | USD 11.98 |
| Safety Hasp — Available at Ace Hardware | 1 | USD 5.99 | USD 5.99 |
| Door Hinges — Available at Ace Hardware | 2 | USD 5.99 | USD 11.98 |
| Wireless Charging Pads | 2 | USD 39.99 | USD 79.98 |
| Power Inverter — Donated | 1 | USD 30.00 | USD 30.00 |
| Battery — Donated | 1 | USD 40.00 | USD 40.00 |
| Charge Controller — Donated | 1 | USD 16.00 | USD 16.00 |
| Grand total | USD 280.52EUR 241.25 <br />GBP 204.78 <br />CAD 347.84 <br />MXN 5,848.84 <br />INR 20,996.92 <br /> | ||
Operation[edit | edit source]
The following is a short video explaining the basics of how to use and maintain the system. This includes how to use it to charge phones, the purpose of the electronics, some simple repairs, and other minor details to know about the project.
Maintenance[edit | edit source]
The maintenance of the includes two parts, the maintenance of the electronics and the maintenance of the structure. The electronics must always be securely connected to each other and protected from outside damage. These parts will also need to be replaced every few years, depending on the expected lifespan of the individual part. The maintenance of the structure requires occasional inspections for damage, as well as examining the interior for things like water leaking in.
Maintenance schedule[edit | edit source]
This is when to maintain what. Please keep the format the same as it populates the kiosk in CCAT.
- Daily
- Unlock charging station as needed.
- Relock charging station after all phones are removed.
- Weekly
- Unlock and open charging station on Fridays for volunteer usage.
- Relock after volunteers have left on Fridays.
- Monthly
- Check for minor damage
- Cleaning the station
- Yearly
- Test the effectiveness of the electronics
- Every 5-10 years
- Replace solar panels as needed, expected remaining life span in 20 years.
- Replace parts as they break.
- Check weather damage after 5 years.
- Rebury base if dug up by rain drilling over time.
Conclusion[edit | edit source]
Testing results[edit | edit source]
When first assembled, electronics for the charging station were able to charge 6 phones at once. It was even able to charge all 6 phones consistently when one of the panels was covered and not outputting energy.
Discussion[edit | edit source]
The station was able to withstand the maximum expected strain on the system with only half of the maximum output. This indicates that the panels will still be able to output enough energy to charge the phones and keep the system running on cloudy days. The station will mostly be used during the colder parts of the year so it needs to be able to work with a reduced energy input.
Lessons learned[edit | edit source]
Given a second attempt we would have spent more time troubleshooting our design before construction. There are a lot of small details in the project that weren't fully considered during the initial prototyping, so we had to reconsider those elements during construction. This includes things like incorrect measurements for electronics which would be incompatible with the rest of the system. If these problems had been addressed earlier we could have significantly shorted our construction time.
Next steps[edit | edit source]
The next step is to finish the installation at CCAT, including attaching the station to it's base and putting in the final connections for the electronics. Once the system has been installed the burden falls onto CCAT to repair and maintain it during regular use. The station has been built to be sturdy enough that it should run for a while without needing to be repaired, but eventually it will need significant repairs.
Troubleshooting[edit | edit source]
| Problem | Suggestion |
|---|---|
| Phone chargers won't charge phones. | Test to see if chargers have broken by testing them with a
different power source |
| Phone chargers aren't getting power | Test to make sure that the inverter is working properly |
| No power in the system | Check the charge controller to see if energy is flowing in.
If it isn't, make sure that the connection between the panels controller is secure. |
| The system has power, but energy
isn't flowing |
Make sure that the connections to the battery are secure.
If they are, make sure the battery is stull functioning. |
Team[edit | edit source]
Introduce team and semester in the following format:
- Aidan Barrett-Wells
- Nicolas Myles C Peinemann
- Elijah Ramirez
- William D Monohan
References[edit | edit source]