
Background[edit | edit source]
CCAT, the Campus Center for Appropriate Technology, has installed a rainwater catchment system on both the main building, as well as a garden shed. The rainwater catchment system was originally created and installed in 2008. In 2014 a group of students, from Humboldt State's Engineering 305 course, updated the system to fix initial errors. These two rainwater systems operate independently of each other. The system installed on the main building has begun to pose some issues due to overflow and age, so needs to be updated. This main building system consists of newly installed rain gutters all around the roof of the building, draining in one central location. At this location, a screening system has been created to keep leaves, and debris from entering the rain catchment system. This water then flows through a series of pipes where it reaches the first flush system and the main storage tank. The first flush system consists of a fifteen gallon tank that collects the first bout of rainwater from a storm and keeps it separate from the main tank, as this water usually contains high levels of dust and pollen. Once this tank fills up, the float device then diverts the rainwater into the main storage tank that has the capacity of 1,500 gallons. CCAT is looking to increase their water storage capacity and potentially install a new tank on site to ideally double their capacity. They are also interested in an update of the piping system as well as the overflow relief valve.
Their second rainwater catchment system is in place on their garden shed. There is one gutter, with a screening system, that collects water and deposits it into a large tank next to the building. This tank sits level with the grounds, and so the CCAT team is looking to redesign the system in order to increase water pressure for watering purposes, and increase storage capacity.
Problem statement[edit | edit source]
The objective of this project is to redesign the current rainwater catchment system on the main building of CCAT, the Campus Center for Appropriate Technology. Our goal is to increase their storage capacity, and redesign the conveyance system from the house gutters, to the storage tank. We also will update the relief valve and create appropriate and easy to read instructions and labels for all portions of the rainwater catchment system.
The secondary objective of this project is to completely redesign the rainwater catchment system for the garden shed. This system needs to have a first flush system installed, as well as a new storage tank placed higher up on the hillside above the garden shed in order to provide adequate water pressure for watering purposes on CCAT's grounds. To accomplish this, a solar water pump system needs to be designed, as well as appropriate pipes and float systems. The purpose of this catchment system is to pump water from the downhill storage tank up to the uphill storage tank during the day with the solar pump. We will need to design a float system in order to automate the pump and keep the top tank from over filling, and the downhill tank from pumping while dry.
Literature Review[edit | edit source]
This is a review of the available literature pertinent to the CCAT Rainwater Catchment project.
CCAT[edit | edit source]
In 1978, a small group of students saved the rundown Buck house, on Cal Poly Humboldt's campus, from being destroyed. They remodeled the house with the intent to use it as a live-in demonstration house and education center. In 1980, they moved in and became an Associated Student program known as the Campus Center for Appropriate Technology (CCAT). Over the past thirty years, the center has been a live in laboratory for creating and designing a multitude of appropriate technologies. These include green building designs, organic gardening, a photovoltaic system, and many more sustainable living techniques.[1]
Climate[edit | edit source]
Precipitation data shows that Eureka, CA received just over 36 inches of rain between October 1, 2017 and January 28, 2017. This is 166% of the estimated 'normal' rainfall for these months. Similarly, the same time period received approximately 31.5 inches in 2016, 144% of 'normal' rainfall. This is a large portion of the rainy season for Humboldt County. In addition, the greatest recorded amount of precipitation in a 24-hour period for Eureka, CA during 2016 is 2.74 inches, so CCAT can expect that they may not receive more than this in any given day.[2] The average recorded wind speed in 2016 for Eureka, CA was 4.9mph.[3] So far for January 2017 in Arcata, CA the total precipitation is 11.03 inches, and the highest recorded wind speed is 50mph.[4] Most long-term climate information is only available for Eureka, rather than Arcata where CCAT is located. This will mean that there will be some expected error in our estimates for precipitation and wind over periods larger than any given month.
Rainwater Catchment Basics[edit | edit source]
Uses of Rainwater[edit | edit source]
Rainwater catchment systems are by no means a 'new' technology. Evidence of their use dates back to early Roman times. The three main types of systems are roof, under-ground, and rock/watershed run-off collection.[5] When rainwater is harvested it can be used for many purposes. The main use for stored rainwater is watering agricultural crops or livestock. Another option is to use the water in a residential setting by filtering the water for drinking/washing or reusing it as non-drinking water(toilets, outdoor hoses, etc).[6]
Components & Maintenance[edit | edit source]
Typically, roof catchment systems are made up of gutters surrounding the roof that empty into a downspout. This downspout connects to the storage tank. In more rural areas, where metal gutters cannot be installed, wood, stone, or cement ridges are used on the roof instead. For the tank, there is no ideal design that will work in any situation. Materials available, skill, cost, and personal preference will decide the tank design. However, there are key requirements that will ensure a functional catchment system. These key requirements include: a watertight design that will keep out bugs and sunlight, screened inlet filter and overflow pipe, a ladder or means of accessing the system for cleaning, a pump or clean way of removing water from the tank, and a 'soakaway' that will prevent water from eroding the soil underneath the tank. Some other suggestions are to prevent pressure buildup by limiting maximum tank height to two meters, implementing a sediment trap or flush system, and equipping additional storage for overflow.[7]
Sizing[edit | edit source]
Making sure you have the proper sizing specifications dialed before you begin construction is a key component to any effective rainwater catchment system.
Roof[edit | edit source]
To determine the proper sizing for your system, there are many considerations including where the rain will land. The area of your rainwater collection surface (oftentimes a roof or a tarp), will be a limiting factor in how much water you plan on collecting. The material of this surface will also determine how efficient it is as a collector, since some materials will absorb more water than others. Ultimately, the size of your roof and the amount of rain that your specific location receives will determine just how much rainwater you will be able to capture.
One easy back-of-the-card calculation for monthly total volume is as follows:
			V = R x A x k x e

			V= Catchment Rate (gal/day)
			R= Precipitation Rate (ft/month)
			A= Area of collection surface (ft^2)
			k= Conversion factor (7.48 gal/ft^3)
			e= Efficiency of Collection surface
				 ~ 0.75 (soil), 0.8 (moderate absorbers), 0.95 (metal)
For more useful information, visit Basic rainwater collection calculations
Gutters[edit | edit source]
Another limiting factor to the amount of water one might collect is also dependent on the size of the gutters or pipes carrying the water from the catchment surface to the storage tank. If the roof is collecting water faster than the pipes can transport it to the tank, then the system is inefficient and will result in excess overflow and less water reaching the storage tank. One rule of thumb is to have 1cm^2 of gutter per 1m^2 of catchment area.[8] For the gutters, first flush, and storage tank sizing, it is recommended to always 'round up' when computing sizing due to unforseen parameters, or unusually intense rainfall patterns.
First Flush[edit | edit source]
First flush systems are essential to ensuring that the water which enters the main storage tank is clean and clear of any debris. As a storm hits and rain intensifies, the first coat of rain to hit the collection surface will act as a transport medium for particulates such as dust, sticks, leaves, and even potentially animal feces. One way to ensure these do not make it into your main water tank is through this first flush system. These systems

divert a certain amount of water (depending on your catchment area), into a separate tank to later be discarded of- hence the name 'first flush.' The easiest way to do this is to have the first flush tank connected to both the gutters, and the main tank. This ensures that the first flush system will be filled before any rainwater enters the main storage tank. Emptying the first flush system is done manually, and is recommended after each major storm. One rule of thumb is to divert a minimum of 10 gallons of rainwater for every 1,000 ft^2 of collection surface.[9] This ensures that whatever water makes it to your tank is clean and clear of debris.[10]
First flush systems are not always 100% effective however, as rain intensity can also play a role in sediment transportation. For example, if a light rain persists for some time and fills the first flush device, you may want to dispose of that water immediately, and only let it fill once the rain has intensified. This however is a personal choice, and will stem from the frequency of your rainfall as well as the condition of your collection surface.
Storage[edit | edit source]
Because the sizing of the first flush system and the gutters are dependent on the catchment area, they are fairly easy to compute. The sizing of the actual water storage is a bit more complex, and a detailed, in-depth mathematical approach can be taken via multiple equations depending on your level of math competency.[11] The reason for this is the increase in factors which will influence the amount of water which will be available for use. These factors include when the rainfall will occur (generally between the summer months of May-August), as well as usage rates and first flush size.[12] One rule of thumb is to have the tank volume to catchment area ratio be 0.05 m^3/m^2. Keep in mind that a plastic barrel containing 50 gallons of water weighs around 500 pounds, and thus structural support for these tanks are a critical part of design planning.
For a more comprehensive storage tank calculation, visit: xBYbt3wP5s0/edit#gid=0
Solar Pumping[edit | edit source]
Solar pumps can be very beneficial when utilized in a rainwater catchment system. A solar pump operates when the sun is shining and pumps water. Some pump from a collection tank attached to the downspout, to a secondary tank, normally at a higher elevation. Water gains approximately 1 psi, or pound per square inch of pressure, for every increase of 2.31 feet in elevation.[13] So, in order for us to utilize this rainwater for irrigation purposes, we need to achieve a minimum psi of 20, as this will allow us to utilize sprinklers for irrigation.[13] In order for us to achieve 20 psi, we need to place the secondary tank approximately 46 feet above the intended watering area. This can be achieved by using a pump at the downhill storage facility. There are two options for pumps that can be used, a 120 volt pump or 12 volt. Since we want to use solar as our power source, we want to use a 12 volt pump. Solar panels produce a constant 12v direct current which we can directly attach to the pump, eliminating the need for a power inverter or a battery.[14] The benefit of utilizing solar as a power source that is directly wired to the pump, allows the pump to automatically run when the sun is out.
Solar Systems[edit | edit source]
The proper size solar panel that is required depends on the power requirements of your pump. Locate the manufactures maximum wattage and amperes off of their flow rate curves. Once this information is obtained, take the wattage that is required (make sure the minimum requirements from the manufacturer are met) and multiple it by 1.25.[14] This will compensate for potential power loss due to dust, cloud cover, as well as the age of the solar panels.[14] If multiple panels are required, they should be wired in a series in order to provide the proper voltage required by the pump.[14]
The installation equipment for the solar panels should come with the panels from the manufacturer. Using these mounting brackets will be the best option for the panels for long term installation. In order to maximize incoming solar rays, the panel should be south facing.[14] Since we will be mostly using the power from these panels in the winter months, we will install them in accordance with the sun being lower in the sky, as we are located in the northern hemisphere. To maximize production, take your latitude in degrees and add 15 degrees to it, this is the angle that you should install your solar panel.[14] This adjusts the panel to gather the maximum solar energy throughout the winter months. If your demand is higher in the summer months, then take your latitude and subtract 15 degrees from it.[14]
Pumping[edit | edit source]
It is important to use the correct size pump for your pumping purposes. First you must determine your pumping height that is required. Then review manufacturers' specifications for how high a pump can push the water. Ideally, you want to find a pump that can pump water higher than your ideal location. This will allow the pump to not work as hard to move the water. You must also take into account the distance that the pump must push the water. Positive displacement pumps can move lower flows daily, but can push the water to higher levels, 30-150m, while submersible centrifugal pumps are best for high flow rates and medium pumping heights, 10-30m.[15] To determine the total relative 'height' that the water moves, the friction from the sides of the pipe must be included. The friction, or head loss, for schedule 40 PVC plastic piping varies depending on the diameter of the pipe as well as the amount of water that is flowing through it.[14] A friction head loss sheet should be available from the manufacturer. From there you can calculate the loss per 100 feet of piping, (length of pipe x head loss = friction head loss in feet).[14] Once you have calculated your total head loss due to friction, add this value to your pumping height.[14] This is your minimum height requirement that your pump must be able to achieve in order for your system to work.
Water Conveyance[edit | edit source]
Conveyance systems for pumping systems consist of everything from PVC piping, to copper pipe, and even flexible rubber tubing. The tubing/piping system can be customized to fully meet your needs and utilize whatever materials are at hand. The only thing to make sure of when designing your conveyance system is that the diameter of the tubing is not going to restrict water flow due to its size. The other thing to keep in mind is different materials have different friction rates for water flow. So make sure to locate the correct friction head loss sheet to correctly calculate the additional friction your tubing option will add to the overall water pressure for the pump.[14]
Types of Rainwater Catchment Systems[edit | edit source]
Broadly there are two ways of harvesting rainwater, surface runoff harvesting and rooftop rainwater harvesting.[16]
Surface Runoff Harvesting[edit | edit source]
In urban areas rain tends to run off all the hard cement or asphalt surfaces instead of being absorbed into the ground. This type of system puts in place areas of vegetation with layers of gravel and dirt to filter rainwater and replace it back into the natural groundwater of the hydrological cycle. This is the easiest way to capture rainwater and it is used for watering plants and preventing erosion.[17]
Rooftop Rainwater Harvesting[edit | edit source]
This system takes rain from rooftops and stores it for use, instead of letting it be absorbed into the ground. The main parts of this system are the collection/catchment surface, conveyance, prefiltration/debris exclusion, and storage. This system can be modified to fit a variety of situations. For example the catchment surface can be a metal roof, tiles, asphalt, glass or even a green roof. The conveyance methods tend to be gutters and pipes that lead to the filtration system. The materials used for the catchment surface and conveyance method determine how much of a filtration system is needed. Some filter systems use gravel or grates and others just use a flush system. A flush system just directs the first amount of rainfall into another storage container till it fills up and seals off, directing the rest into the storage tank. There are a variety of options for the storage tank the materials range from plastic to metal and there can be more than one tank connected to each other. Most tanks will have an overflow pipe in case it rains more than the container can hold.[18]
Example 1[edit | edit source]

Criteria[edit | edit source]
Intro: The Campus Center for Appropriate Technology, CCAT, needs to have their current rainwater catchment system on the main house updated, and their secondary system redesigned. To accurately make a plan that solves the problem, one must speak to whom the project is being made for. The information below was collected to create the project criteria. We spoke with two of the co-directors of CCAT to develop this list of criteria for this project. Establishing criteria and their importance ensures that the project accurately serves its purpose.
| Topic | Focus | Weight (0-10) |
|---|---|---|
| Budget | Funding is available for project improvements. | 1 |
| Educational Aspect | The goal of this rainwater catchment system is to act as a full scale example system. Ample signage must be created to explain all aspects of the project in order for it to be an effective educational tool. | 5 |
| Embodied Energy | Project must be completed with as much recycled or reclaimed materials as possible in order to reduce its environmental impact as well as follow the principles of appropriate technology. | 6 |
| Maintainability | Must be easy to clean the filter and remove debris, no more than 1 hour of maintenance per month. Create a biweekly maintenance schedule for an employee. (Current filter rarely gets cleaned, and a more self cleaning filter would serve well) | 7 |
| Aesthetics | Changes must be pleasing to the eye and look professional. (Current conditions of piping from gutter, release valve, as well as filtration can be improved upon) | 7 |
| Usability | Must be able to water the garden on the property year round. High turnover rate in staff means the system directions must be well labeled and easy to use. A simple design is key. | 9 |
| Functionality | Successfully captures and stores ample rainwater. Must have enough pressure to run the irrigation system without the need of an external pump. | 10 |
Proposed Timeline[edit | edit source]
| Date | Goal | Met? (Y/N/TBD) |
|---|---|---|
| 2.12 | Test to determine usage rates | Y |
| 2.17 | Pretotype competed, make physical measurements | Y |
| 2.24 | Submit permits to facilities management | N |
| 3.10 | Parts list created and quoted | Y |
| 3.12 | Purchase parts from list | Y |
| 3.24 | Begin renovations | Y |
| 5.8 | Complete all aspects of project | Y |
Budget[edit | edit source]
This is the list of materials that were used to update CCAT's rainwater catchment system.
| Quantity | Material | Source | Cost ($) | Total ($) |
|---|---|---|---|---|
| 100ft | Flexible 1" waterline | Home Depot/Piersons | 29.41 | 29.41 |
| 1 | 1,500 Gallon Water Tank | Hydroponics Store | 945.00 | 945.00 |
| 1 | Solar Pump System | Amazon, Appropriate Technologies | 429.00 | 429.00 |
| 1 | Electrical Wire | Fortuna Feed | 5.99 | 5.99 |
| 2 | 90 degree 1" elbow | Piersons | 5.75 | 5.75 |
| 2 | 90 degree 3" elbow | Piersons | 9.99 | 19.98 |
| 1 | 10 ft. 3" PVC | CCAT | 0 | 0 |
| 6 | Gutter Cover 25ft | Piersons | 4.99 | 29.94 |
| 1 | PVC Glue | Fortuna Feed | 0 | 0 |
| 3 | 1" Gate Valve | Piersons | 6.99 | 20.97 |
| 2 | 1" to 3/4" hose adapters | Piersons | 4.99 | 9.98 |
| 1 | 1" t valve | Piersons | 4.99 | 4.99 |
| 1 | Sales Tax 8.25% Eureka | 123.83 | 123.83 | |
| Total Cost | $1501.01 | |||
| Total Cost after tax | $1624.84 | |||
Construction[edit | edit source]
-

The design Schematic for the frame we built for the solar panel. Contains all of out measurements.
-
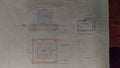
The design schematics for the upper holding tank base. Contains all of the measurements and design elements.
-

Here is the base that we built for the upper holding tank. It is constructed by 2x8 pressure treated wood, with 4x4 corners. It is held together with 4 inch deck screws and 8 inch carriage bolts.
-
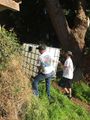
The four of us carrying a 250 gallon international bulk container up the hill to its final location.
-
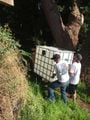
Another picture of us moving the tank up to its final location.
-
![The final location for the upper holding tank located behind the yurt on [CCAT] grounds.](/w/images/thumb/1/1c/The_upper-holding_tanks_location_on_the_hill.jpg/120px-The_upper-holding_tanks_location_on_the_hill.jpg)
The final location for the upper holding tank located behind the yurt on [CCAT] grounds.
-
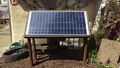
Here is the mount for the solar panel that we built. It is made out of pressure treated 2x4 and held together with deck screws. The panel is a 130w solar panel. It will provide the power for the pump that is installed directly below the panel. The stand is buried in the ground 10 inches to give it structural support.
-
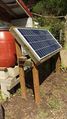
Here is the picture of the solar panel with the lower holding tanks in the background behind it. This is the complete system at the bottom of the hill.


![The final location for the upper holding tank located behind the yurt on [CCAT] grounds.](/File:The_upper-holding_tanks_location_on_the_hill.jpg)


Maintenance Schedule[edit | edit source]
Monthly[edit | edit source]
- Clean out first flush system
- Clean gutters on side of garden shed
- Check floats to make sure they are in working order
- Clean off solar panel, and check for damage
- Check pump, make sure no water damage has occurred
Yearly[edit | edit source]
- Drain entire system
- Check for sludge in bottom of holding tanks, if found, clean and remove.
- Check bases of structures for structural support.
- Check wiring to see if any cracks from photodegradation.
Conclusion[edit | edit source]
Testing Results[edit | edit source]
Our prototype was to test the water pressure from our system. We used a container approximately one-fourth of the size of our actual tank and a hose the same size as the one installed. The water pressure we obtained was sufficient, and has been approved by the client.
The final product has performed perfectly. The pump kicks on when sunlight directs strikes the solar panel and water is pumped from the bottom holding tank to the upper holding tank with no problem. The pump fills the tank relatively quickly as well. The float switches work as designed. The water pressure at the bottom of the hill is adequate for low pressure irrigation. The project works as designed.
Lessons Learned[edit | edit source]
Lessons we learned include: starting early, getting permission for electrical work from Facilities Management,and scheduling work days in advance. It must be noted that proper communication must be kept with all vested authorities at all time with adequate responses relayed to the group. This would make sure that we are on schedule and that we are meeting the needs and requirements set by the vested parties. While one semester seems like a long time, it does go by quickly and getting started/planning is essential to the timeline of the project. We got the project done, aside from Facilities' approval, but only just in time. Additionally, student schedules can be busy, so it can be difficult to organize four students. Part of this problem on some days was due to unexpected Humboldt rain.
Team[edit | edit source]
- Dalton Williams
- Morgan Kipf
- Frank Murphy
- Andie Ledesma
Troubleshooting[edit | edit source]
This should follow the troubleshooting format. If pump does not operate Is the solar panel connected?
- Make sure that the panel is plugged into the float switch terminal.
Is there adequate sun for it to operate?
- Must be in almost full sun to turn on
Is there water in the lower holding tank?
- There must be enough water to activate the float switch otherwise the pump will not activate. This is a safety against run-dry.
Is the upper holding tank full?
- If the tank is full and the upper float activated, the pump will not operate.
Low water pressure?
- Check for blockage in the pipe.
Float sticking?
- Remove top cap on the holding tank and check to see if the float is hung up on something or if it has come loose. Fix as needed.
Update September 2018[edit | edit source]
The CCAT rain catchment system on the main house is still fully functional. The roof and gutters need a cleaning but the rest of the system is intact. There are some small leaks on the piping leading to the Storage tank. The clear pipe for the first flush system has been replaced with and opaque white pipe to prevent algae growth.
The rainwater catchment system for the shed is still functional. The 250 gallon international bulk containers are facing algae buildup because they are transparent and in the sun.There are minor issues with the solar pump and some leaking from the lower spicket.
For more information on the history of the main house rainwater catchment see: [1]


References[edit | edit source]
"Rainwater Harvesting Systems | Wahaso - Water Harvesting Solutions." 2017. Accessed January 31. https://web.archive.org/web/20190916075929/http://wahaso.com/rainwater_system.php.
J., Dr. Hari, and P.E. Krishna. 2005. The Texas Manual on Rainwater Harvesting. Third Edition. Texas Water Development Board.
"Optimal Sizing of Storage Tanks in Domestic Rainwater Harvesting Systems: A Linear Programming Approach." 2017. Accessed January 31. http://www.sciencedirect.com/science/article/pii/S0921344915300756?np=y&npKey=fc73cb0561b0de93d81363aa49cc62bfd8c207dea964b65c9e4c85ec7b53a411.
Rainwater Catchment for Domestic Supply. Gould, John and Niessen-Petersen, Erik. ITDG Publishing 2003.
- ↑ CCAT. "History." Campus Center for Appropriate Technology. Accessed January 29, 2017. http://www.ccathsu.com/history/.
- ↑ NOAA. 2017. "California Climate Station Precipitation Summary." Last Modified January 28. http://www.cnrfc.noaa.gov/awipsProducts/RNOWRKCLI.php.
- ↑ NOAA. 2017. "Annual Climate Report." Last Modified January 10. http://w2.weather.gov/climate/index.php?wfo=eka.
- ↑ NOAA. 2017. "Preliminary Monthly Climate Data." Last Modified January 28. http://w2.weather.gov/climate/index.php?wfo=eka.
- ↑ Gould, John. 1991. Rainwater Catchment Systems for Household Water Supply. Bangkok, Thailand: Environmental Sanitation Information Center, Asian Institute of Technology.
- ↑ García-Montoya, Mariana, Andrea Bocanegra-Martínez, Fabricio Nápoles-Rivera, Medardo Serna-González, José María Ponce-Ortega, and Mahmoud M. El-Halwagi. 2015. "Simultaneous design of water reusing and rainwater harvesting systems in a residential complex." Computers & Chemical Engineering 76, 104-116. Academic Search Premier, EBSCOhost (accessed January 29, 2017).
- ↑ Gould, John, and Erik Nissen-Petersen. 1999. Rainwater Catchment Systems for Domestic Supply: Design, Construction and Implementation. London: Intermediate Technology Publications.
- ↑ Rainwater Catchment for Domestic Supply. Gould, John and Niessen-Petersen, Erik. ITDG Publishing 2003.
- ↑ J., Dr. Hari, and P.E. Krishna. 2005. The Texas Manual on Rainwater Harvesting. Third Edition. Texas Water Development Board.
- ↑ "Rainwater Harvesting Systems | Wahaso - Water Harvesting Solutions." 2017. Accessed January 31. https://web.archive.org/web/20190916075929/http://wahaso.com/rainwater_system.php .
- ↑ "Optimal Sizing of Storage Tanks in Domestic Rainwater Harvesting Systems: A Linear Programming Approach." 2017. Accessed January 31. http://www.sciencedirect.com/science/article/pii/S0921344915300756?np=y&npKey=fc73cb0561b0de93d81363aa49cc62bfd8c207dea964b65c9e4c85ec7b53a411.
- ↑ "Rainwater Harvesting Systems | Wahaso - Water Harvesting Solutions." 2017. Accessed January 31. https://web.archive.org/web/20190916075929/http://wahaso.com/rainwater_system.php.
- ↑ 13.0 13.1 Angima, Sam D. "Harvesting Rainwater For Use in the Garden." Oregon State University Extension Service EM9101 (December 2014): 1-10. Accessed January 29, 2017. https://catalog.extension.oregonstate.edu/sites/catalog/files/project/pdf/em9101.pdf.
- ↑ 14.00 14.01 14.02 14.03 14.04 14.05 14.06 14.07 14.08 14.09 14.10 Morales, Teresa D., and John Busch. United States Department of Agriculture. Portland, OR: Natural Resources Conservation Service, 2010. Accessed January 29, 2017. https://www.nrcs.usda.gov/Internet/FSE_DOCUMENTS/nrcs142p2_046471.pdf.
- ↑ Argaw, Neway. Renewable energy water pumping systems handbook: period of performance, April 1-September 1, 2001. Golden, CO: National Renewable Energy Laboratory, 2004.
- ↑ Morey, Aditya, Bhushan Dhurve, Vishal Haste, and Bhupesh Wasnik. "Rain Water Harvesting System." International Research Journal of Engineering and Technology (IRJET) 03, no. 04 (April 2016): 2158-162. Accessed January 29, 2017. https://www.irjet.net/archives/V3/i4/IRJET-V3I4426.pdf.
- ↑ "Rainwater Catchment." Permaculture Institute. May 26, 2014. Accessed January 30, 2017. http://web.archive.org/web/20160924174514/http://www.permaculture.org:80/resources/rainwater-harvesting/.
- ↑ Novak, AIA, LEED AP, Celeste Allen, Van Giesen, ARCSA AP, Eddie, and DeBusk, PhD, Kathy M. Designing Rainwater Harvesting Systems: Integrating Rainwater into Building Systems (1). Somerset, US: John Wiley & Sons, Incorporated, 2014. Accessed January 29, 2017. ProQuest ebrary.