
So you've got a window, it's cold outside and the cold is creeping inside. If you want to make a side draw thermal curtain with the Warm Windows material, here's the lowdown:
Steps[edit | edit source]
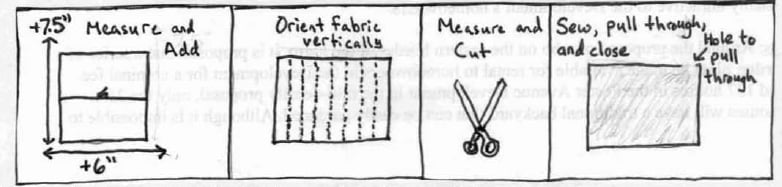
- Making the Curtain: Measure the inside dimension of the window, from one end of the opening to the other.
- For the width of the warm Windows material add 6 inches to the measurement (windows 5-7 feet add 7 inches. Windows 7-9 feet add 8 inches).
- For the width oftbe cover fabric, use the Warm Windows measurement above. However, if you are making a cover piece of more than one piece of fabric you'll need to add about.75 inch for every extra seam-this is called a "seam allowance," and in these instructions I include it automatically except in this paragraph. If your cover fabric is going to be in three pieces (a center piece and two borders), that means two extra seams (add 1.5 inches to the total amount ofcover fabric width needed). (fyou have just two piece of fabric for the front, that's one extra seam (add.75 inches to total width of fabric.
- For the length of the Warm Windows material and cover fabric, measure the height of the window from the bottom sill to the top and add 7.5 inches.
- Before anything, pay special attention to the orientation of the quilting on the Warm Windows fabric: when you are making a side-draw curtain, the quilting on the Warm Windows fabric must be vertically oriented. If the dimensions of the W.W. fabric (60" wide) do not fit your window, carefully sew two pieces together at the quilted seams.
- Measure your fabric. Look carefully, think carefully, and then measure again. Only when you're sure that you haven't gotten confused anywhere or mis-measured. do you cut.
- Depending on the design, you will now either sew the cover fabric pieces together and then sew it to the Warm Windows material. or if you cover fabric is one piece begin sewing it to the W.W. directly. Remember to face the pretty side of the cover material against the synthetic canvas side of the W. W. material as you sew. It sucks to rip seams and start over if you don't pay attention to this detail.
- Leave an opening of at least a foot wide (wider for larger curtains) to pull through the fabric wben you're done sewing. The curtain will be bulky and stiff, so reinforce the seams at the edge of the hole so you can yank without tearing out your stitches.
- Using clear nylon thread in both bobbin and spool, sew the hole closed. Hand stitching is best, but slow and not essential. I usually use a machine carefully and it's not that obvious.
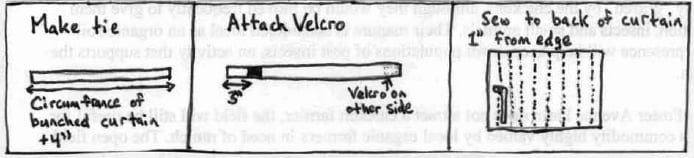
- The Curtain Tie: Carefully fold the curtam up. Usmg a fabnc measunng tape measure the circumference of the "closed" curtain. Add 4 inches (or so).
- Here you have options. You can use a piece of cover fabric, an accenting piece of fabric. or fabric tape to make the tie. I[ you are using real fabric, cut a rectangle to the above length and 5 inches in width. Fold it over to make a long tie, pretty sides facing in, and sew closed three sides while leaving a 2-3" gap for pulling the fabric through. Puil through and then carefully sew the tie closed with nylon thread.
- Whether using fabric or fabric tape, sew a I" piece of Velcro to opposite ends and opposite sides of the tie. The Velcro on the end of the tie that sews to the curtain should be approx. 3" in from the end of the tie. Look at an umbrella tie for the visual.
- Sew the tie down to the curtain about 1-2" in from the edge at waist height or so (place the curtain to the window opening to get the right spot) with the tie facing away from the curtain. The goal is to make a tie that can be pulled behind the curtain and around the front and then stuck to Velcro behind the cunain.
- Hanging the Curtain: If you have made a side-pull curtain, assemble the curtain rod and place the hooks into the plastic hangers. Carefully hook the curtain to the rod, trying to keep it level. Pick the entire assemblage up and place it against the window, adjusting the curtain on the hooks so the rod can be level and the curtain flat against the sill, even if the curtain is slightly asymmetrical (which it is likely to be:). Move the assemblage back and forth until the curtain is centered against the window. It should hang about 2-2.5" to either side of the window when fully extended.
- Mark where the brackets are on the wall with pencil when all is aligned. Take the assemblage down and remove the curtain from the hooks. Take the rod hack to the wall and mount it according to your marks. Have drywall anchors handy in case you don't hit wood. Now hang the curtain back on the rods.
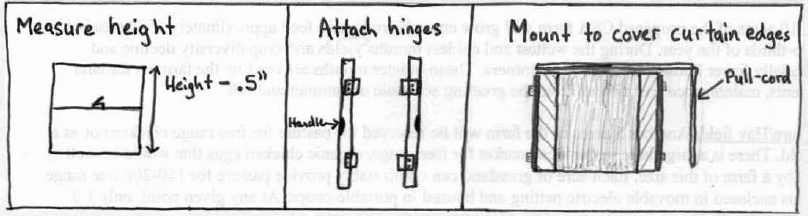
- Making Clamps: Concurrent or after you make and mount the curtain, begin making wooden clamps to hold the curtain tight to the frame or wall around the window. First measure the height of the window from.5" above the siU, assuming there is one. lftbere is no sill, measure from the bottom of the window opening. Measure up to the top of the window opening.
- Purchase 1"x2" boards that will allow you to span the distance. Make sure they are straight and smooth with rounded edges so you can avoid splinters when you open and close the clamps. Bring your measurements with you and ask the lumberyard employee to cut the boards to your specifications-it will save you time.
- Purchase spring-loaded hinges (-$2.50 a pair). Make sure each half of the hinge is flush with the other when the hinge is closed. Boards about 4 feet and longer should have three sets of hinges, while boards less than 4 feet need only two sets of hinges.
- Optional Slep: If you have a set of files and sandpaper (C-clamps are also helpful) you can grind out half-moon hand holds to help you grip the boards when you flip them open.
- Mount the 1x2 boards so they cover at least I" ofthe fully extended curtain on either side of the window. They should clamp down tightly to seal the curtain to the wall.
- Test and mess with things until it's as perfect as you can make it-anything you leave that is noticeably imperfect will likely become annoying over time.


Sendog6913 17:30, 2 March 2008 (PST) Cal Poly Humboldt - CCAT