
"A lack of adequate footwear is more than a simple inconvenience or lack of comfort. Millions are infected or dying each year due to the spread of diseases contracted through unprotected feet. It is estimated that two billion people worldwide are currently plagued with parasitic diseases that could be prevented by wearing proper footwear."[1] Walking barefoot hardens the skin on the bottom of your feet and cracks may form. These cracks allow parasitic infections such as hookworm and threadworm to penetrate the skin.[2] In addition to shoes protecting against harmful parasites, shoes also protect against burns, cuts and punctures. If untreated, these injuries may lead to serious infections. Many organizations exsist that donate shoes to people in need such as Toms,[3] Soles4Souls,[4] Samaritan's Feet[5] and many more.
Bill of Materials[edit | edit source]
- 1.7mm dia. PLA plastic or similar ($22.50 for 1 kg)[6]
- A shoe lace like material - I used 4mm dia. bungee cord ($5.73 for 75 feet)[7]
Source Files[edit | edit source]
NOTE: The files are designed around a US men's size 8 shoe. They can be changed to fit any size foot.
Tools needed[edit | edit source]
- MOST Delta RepRap or similar RepRap 3-D printer
- Filament - I used PLA
- Drill
Skills and knowledge needed[edit | edit source]
Technical Specifications and Assembly Instructions[edit | edit source]
Place your bare foot on a piece of paper. Trace the outline of your foot on the paper.

Take the trace of your foot and measure: (20 minutes total)
- The length of your foot
- The cross-section of your heel and the distance from the back of your heal to the where you measured the cross-section of the heel
- The cross-section of your arch and the distance from the the heel cross-section and arch cross-section
- The cross-section as your foot begins to widen and the distance from the arch cross-section to this new cross-section
- The cross-section of the balls of your foot (this should be the widest section of your foot, close to your toes) and the distance between the last cross-section and the cross-section of the balls of your feet
-
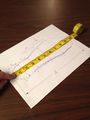
Tracing your foot.
-
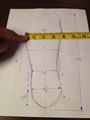
Tracing the ball of your foot.


In openSCAD change the dimensions regarding the cross-section measurements and distances between cross-sections to the measurements from your trace. (refer to the comments in the .scad file for help)
Once the scad is complete, export to .stl
Open the .stl file using Cura[9] or similar program for generating G-code
Save the G-code and open with printer controller

Begin the print. Printing of the shoe substrate will be approximately 3 hours per substrate at 20% fill (6 hours total)
Once printed, 4 (5/32" Dia.) holes will need to drilled on each side of the strap supports and 4 (5/32" Dia.) in the ankle support (30 minutes total)

Take the 4mm dia. bungee cord and tie a double knot on one side.

Thread the rest of the holes with the bungee cord. Once complete, tie a knot and cut off the remaining bungee cord.
Take the remaining bungee cord and tie a knot in one of the ends.

Begin in one of the bottom holes of the ankle support and thread the hole, pulling until the knot hits the substrate.

Make a loop that will go around the ankle, return to the hole on the other side of the ankle support, thread and tie a knot.

Take the bungee cord and thread the hole directly above the current hole and create another loop ending with a knot on the 4th and final hole (20 minutes total to thread all holes). The entire process from tracing the foot to assembly took approximately 7 hours; 6 hours for printing and an hour for assembly. The completed assembled shoe should look as shown in the image.
Common problems and solutions[edit | edit source]

- Add an additional 5mm to any dimension that you measure from your foot trace. You do not want your shoe to be too tight.
- Put blue scotch tape over your glass base. The shoe substrates are fairly large in size and may get stuck to the glass. I broke my glass base and had to replace it.
Cost savings[edit | edit source]
- 0.244g of 1.7mm Dia. PLA Filament at a rate of $22.50/kg = $5.04
- 1 foot of 4mm Dia. bungee cord at a rate of $1.98/15feet = $0.13
- Total Cost of material = $5.17
- Commercial Equivalent = $24.00[10]
Saving $18.83 —78% cheaper
Possible Improvements to Prototype[edit | edit source]
- Different Filaments are available such as flexible filament[11] that may work better than PLA
- The design could be optimized to use less filament, (i.e. more shells, reduce overall thickness)
- Design a completely enclosed shoe
- When printed in the horizontal orientation, the length is severly limited to smaller shoes sizes. Alter design to be printed vertically.
References[edit | edit source]
- ↑ web page: Dying Without Shoes: An Epidemic We Can Eliminate. Available: http://samaritansfeet.org/wp-content/uploads/2010/09/SFDyingwithoutShoes.pdf
- ↑ web page: Soles4Souls: Why Shoes? Available: http://web.archive.org/web/20150212023903/http://soles4souls.org:80/why-shoes
- ↑ web page: Toms One for One Available: http://web.archive.org/web/20191107155743/https://www.toms.com/one-for-one-en
- ↑ web page: Soles4Souls Hompage Available: http://soles4souls.org/
- ↑ web page: Samaritan's Feet homepage Available: http://www.samaritansfeet.org/
- ↑ web page: Filament Available: http://www.amazon.com/gp/product/B00JQK4RSG/ref=pd_lpo_sbs_dp_ss_2?pf_rd_p=1944687642&pf_rd_s=lpo-top-stripe-1&pf_rd_t=201&pf_rd_i=B00F0TK8E4&pf_rd_m=ATVPDKIKX0DER&pf_rd_r=0MY89AQDE3JRXEQ524H2
- ↑ web page: Bungee cord Available: http://www.walmart.com/ip/Pepperell-Bungee-Cord-Super-Value-Pack-5-Colors-15/35461590
- ↑ web page: OpenSCAD. Available:http://www.openscad.org/
- ↑ web page: Cura homepage Available: http://web.archive.org/web/20160419115704/http://wiki.ultimaker.com:80/Cura
- ↑ web page: Rider Mens Montana III Available: http://www.shoeline.com/product.aspx?ProductID=51734&refURL=gan&utm_source=google&utm_medium=cse&utm_term=637467632491&gclid=CLeGz_rQq8ICFaGPMgodsy4AyA
- ↑ web page: flexible filament http://web.archive.org/web/20210302235657/https://store.makerbot.com/flexible-filament