
Introduction[edit | edit source]
Git is a distributed version-control system designed to manage changes to text files (e.g., source code). Rather than making backups of entire files, Git maintains a history of changes to particular lines in a source file. This efficient method allows Git to track a long history of changes without wasting memory on unchanged sections of code.
Each time a piece of code is changed, those changes are 'committed' to Git with a 'commit message' and a 'diff' - a visualization of the exact changes. These changes can be tracked on several 'branches,' which act as specialized historians:
- Main/Release Branch: Keeps a history of working, publishable source code.
- Feature/Bug-Fix Branches: Maintain the history of changes during the implementation of new features or bug-fixes.
By convention, each commit comprises one context/action summarized in 50 characters (see Atomic Commits and Why Atomic Commits). Each branch comprises one complete feature or bug-fix.
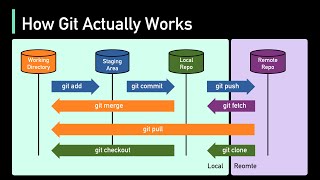
Git histories can be shared amongst multiple developers by setting up a 'remote,' which is a central server holding the source's history. Others can access the server to get a copy of the source code and push their contributions to the remote to share with others. This system allows multiple people to work on the same project without waiting on each other and keeps the versioning history backed up in several places—on each user's machine and the remote server. Advanced users can test code before committing or pushing, enforce style guidelines, and manage work in different areas of a codebase.
GitHub is one such server, and it is the one FAST will use for storing source. Best practices for managing git repositories are not covered here, but many of the links on this page offer useful information in that regard.

Create an Account[edit | edit source]
- Go to GitHub to create an account.
- When asked who will be using GitHub, select 'My Organization or Company'.
- To gain access to the group on GitHub, contact Dr. Pearce.
- To get started with using Git once you have installed it, complete the Official Git Tutorial.
- To get started with using GitHub review Start your journey - GitHub.
Creating a Repository[edit | edit source]
- To get started on a repository for FAST, go to our group on GitHub and create a new project.
- GitHub provides prompts for all the necessary information to create, including a `LICENSE`, `README.md`, `CHANGELOG`, and more.
- To get a local copy of the repository on your device, clone it. There will be a button on the top right to help you get the necessary information.
It is suggested that you use a repository template which can be found on the FAST Github, for an updated list of options see here.
Using Git[edit | edit source]
This section covers how to use Git both from the Command Line Interface (CLI) and GitHub Desktop.
Using Git from the CLI[edit | edit source]
- Install Git:
- Download and install Git from the official Git website.
- Set up your username and email:
- `git config --global user.name "Your Name"`
- `git config --global user.email "your.email@example.com"`
- Initialize a repository:
- `git init`
- Clone a repository:
- `git clone <repository_url>`
- Check the status of your files:
- `git status`
- Add changes to the staging area:
- `git add <file_name>` or `git add .` to stage all changes
- Commit changes:
- `git commit -m "Your commit message"`
- Push changes to the remote repository:
- `git push origin <branch_name>`
- Pull changes from the remote repository:
- `git pull origin <branch_name>`
| Command | Description |
|---|---|
| `git init` | Initializes a new Git repository. |
| `git clone <repository_url>` | Clones an existing repository. |
| `git status` | Displays the status of changes. |
| `git add <file_name>` | Adds changes to the staging area. |
| `git commit -m "message"` | Commits changes with a message. |
| `git push origin <branch_name>` | Pushes changes to the remote repository. |
| `git pull origin <branch_name>` | Pulls changes from the remote repository. |
Using GitHub Desktop[edit | edit source]
- Install GitHub Desktop:
- Download and install GitHub Desktop from the official GitHub Desktop website.
- Sign in to GitHub:
- Open GitHub Desktop and sign in using your GitHub credentials.
- Clone a repository:
- Click `File` > `Clone repository` and enter the repository URL or select from your repositories.
- Create a new repository:
- Click `File` > `New repository` and fill in the repository details.
- Check the status of your files:
- The main window shows the status of your files.
- Add changes to the staging area:
- Select the files you want to stage in the `Changes` tab.
- Commit changes:
- Enter a commit message and click `Commit to <branch_name>`.
- Push changes to the remote repository:
- Click `Push origin` to upload your changes.
- Pull changes from the remote repository:
- Click `Fetch origin` and then `Pull origin` to download changes.
| Step | Action |
|---|---|
| Install GitHub Desktop | Download from the official website and install. |
| Sign in to GitHub | Use your GitHub credentials to sign in. |
| Clone a repository | Use `File` > `Clone repository`. |
| Create a new repository | Use `File` > `New repository`. |
| Check file status | View the status in the main window. |
| Add changes | Select files in the `Changes` tab. |
| Commit changes | Enter a message and click `Commit to <branch_name>`. |
| Push changes | Click `Push origin`. |
| Pull changes | Click `Fetch origin` and `Pull origin`. |
Security[edit | edit source]
It is recommended that you enable 2-Factor Authentication (2FA) on your account. In the upper right, click on your gravatar and go to `Settings > Security` to enable 2FA.
When interacting with GitHub using Git on your computer, you can either provide your credentials (username and password) to git or use an SSH key. SSH keys are credentials generated by an algorithm, stored on and specific to your device. You provide half the key to GitHub (`Settings > SSH and GPG keys`), then your computer uses the other half to verify itself with GitHub. This means you don't have to remember your password, but your key could get stolen if a hacker accesses your computer. Read more on credentials versus SSH keys here.
- Creating an SSH Key:
- Linux Users: Follow GitHub's instructions directly in the Terminal.
- Windows Users: Use Sourcetree, which can generate an SSH key (`Tools > Create or Import SSH Keys`) or store credentials. After creating a key, provide the public half to GitHub according to their instructions.
Linking to OSF Integrations[edit | edit source]
To link a repository to OSF, you need to grant OSF 'application access' to your GitHub account:
- Go to GitHub.
- Go to your user settings and select 'Developer settings'.
- Type in a name specific to the OSF repository you are granting access to.
- Leave the expiration date empty unless you have a reason to want OSF to lose access.
- Check the following permissions:
- `read:user`
- `read:repo`
- The others should not be necessary, as OSF isn't capable of modifying your repository, nor should it be. Check other boxes only if you and Dr. Pearce deem it necessary. Checking these boxes will grant permission to OSF to access public *and* private repositories.
- Create the token. You'll have to copy the code right then and there.
- Provide the access token to the OSF repository according to their procedure (Check the `Add Ons` tab in the repo if that link is broken).