Abstract[edit | edit source]
The purpose of this project is to solve the awning drainage problem at Zane Middle School. Team Livewire created a replicable, integrated gutter box called the Streamline which is installed between the gutter downspout and serves as a direct drain and a surge tank. The Streamline, if deemed successful, will be implemented on other awning rainwater drainage systems throughout the campus.
Background[edit | edit source]
Team Livewire consists of Abraham Audermauer, Ahron Cervania, Jake Cooper, and Zachary Ramsey. The storm water drainage system located around the cafeteria courtyard awning at Zane Middle School in Eureka, CA has proven ineffective. Initially the gutter system overflowed during rainstorms. To remediate the system's inadequacy the gutter caps were removed allowing excess water to drain into the courtyard creating waterfalls. Zane Middle School requested that a design be implemented that removed the waterfalls and fixed the initial problem of gutter overflow.
Problem statement and criteria[edit | edit source]
The roof rainwater drainage system at Zane Middle School did not function as needed. The system previously deposited all the rainwater from the awning into the student quad area. The objective of the this project was the modification of the previous system to achieve the total diversion of rainwater from the awning roof surrounding the quad to the main campus drainage system. The following criteria for evaluating the appropriateness of a design was determined through interviews with the administration at Zane Middle School.
| Criteria | Weight | Constraints |
|---|---|---|
| Efficacy | 10 | Flowrate of water through system |
| Implementable | 9 | Easy to incorporate at all sites |
| Maintainability | 8 | Easy to maintain or repair |
| Durability | 7 | Design lasts for a long time |
| Safety | 7 | Risk to students and faculty are minimized |
| Aesthetics | 6 | Design is visually appealing |
| Cost | 4 | Material and design cost are low |
Description of Final Solution[edit | edit source]
The final Streamline design consists of an integrated, powder coated aluminum gutter box. The addition of the Streamline to the drainage system replaces the caps on the gutters, preventing the water from flowing from the gutter system into the Quad. The body of the gutter box is angled at 20o, allowing for faster drainage. The Streamline is also hollow, allowing the internal volume to be used as a secondary surge tank for water in excess of what the downspout is able to contain. The increased head due to the vertical height, that's a result of the surge tank, increases water pressure by increasing the volume of water and consequently speeding up drainage.
-
Fig 1: Rainwater drainage system at Zane Middle School before the installation of Streamline.
-
Fig 1a: Close-up of sawed-off gutter cap where water drained into the quad.
-
Fig 2: Midpoint of Streamline Construction. You can see the the apparent internal volume of the design.
-
Fig 3: The final design installed at Zane Middle School. The spout of water to the left shows the behavior of the gutter system before the installation of the Streamline.
Costs[edit | edit source]
This section includes all the associated costs to produce the Streamline. Costs are considered both in terms of man-hours and monetary expenditures. The man-hours are the total number of hours Team Livewire collectively put into the research, development, construction and implementation of the Streamline at Zane Middle School. These hours are summarized in Figure 4.

Monetary expenditures include the cost of all associated materials needed to produce the Streamline. An itemized table is provided to summarize the fiscal costs of these materials.
| Quantity | Material | Source | Cost ($) | Total ($) |
|---|---|---|---|---|
| 40 | #4 Screw | Ace Hardware | 0.17 | 6.80 |
| 40 | #4 Washer | Ace Hardware | 0.19 | 7.60 |
| 40 | #4 Nut | Ace Hardware | 0.17 | 6.80 |
| 10 | Self Tapping Screws | Ace Hardware | 0.15 | 1.50 |
| 10 | Screws | Ace Hardware | 0.11 | 1.10 |
| 10 | Screws | Ace Hardware | 0.12 | 1.20 |
| 4 | Screws | Ace Hardware | 0.14 | 0.56 |
| 24 | Self Tapping Screws | Ace Hardware | 0.12 | 2.88 |
| 2 | Metal Street Signs | Arcata Scrap | Donation | 52.50 |
| 16 Ft2 | Bronze Powder | J&W Powder Coating | Donation | 96.00 |
| 1 | Vulkem 116 Sealant | Zane Custodial Staff | Donation | N/A |
| Total Cost | $176.94 | |||
Testing Results[edit | edit source]
The Streamline has undergone natural testing through a series of five storms since it was installed. The Streamline has performed well and as expected through all storms. Zane Middle School's administration has reported satisfaction with the success and efficacy of the Streamline. Formal testing has been undertaken which included timing the speed at which five gallons of water drained through the Streamline.

| Run | Test Volume | Time to Drain |
|---|---|---|
| 1 | 19 Liters | 40 seconds |
| 2 | 19 Liters | 32 seconds |
| 3 | 19 Liters | 22 seconds |
| 4 | 19 Liters | 29 seconds |
| 5 | 19 Liters | 24 seconds |
It was found through the testing that on average the flow rate through the system was 1.34 liters per second. The volume of water used in the testing greatly exceeded the volume of rainwater that could flow through the Streamline during a maximum rainfall event, as calculated in Figure 5. Based on the rainfall data for Eureka and the testing results, it was found that the Streamline is capable of accommodating maximum volumes of rainfall.
How To Construct Streamline[edit | edit source]
A step by step tutorial to recreate StreamLine.
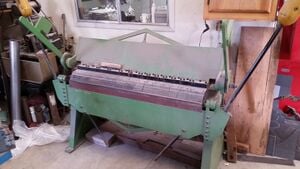
Using a break similar to the one in this photo, break the bottom section of streamline into its necessary shape. Two 1-inch flanges along the length of the piece at 90 degrees. On the six inch side a 70 degree break at 1 inch is needed. On the 4 inch side a 3inch section must be broken into the piece at 110 degrees.
Install streamline by drilling 2" holes in the original downspout and drainage pipe. Allowing for water to flow freely through the system, and capping the chopped downspout.Apply Vulkem 116 to all potential leaks. Then fix the sides to the drainage pipe using self tapping screws.
Video[edit | edit source]
A video describing Streamline's purpose, function, and how to recreate Streamline.
Maintenance[edit | edit source]
Once installed Streamline performs with little to no maintenance. In the occasion of a clog the streamline may need to be removed for cleaning. In this case all steps for installation would need to be performed again, including reapplication of Vulkem 116. Streamline was designed to accommodate to maintenance needs. Streamline can be easily snaked, which cuts down on the probability of ever needing to be removed. In the case of a leak, Vulkem 116 may need to be reapplied in order to solve the issue.
Discussion and next steps[edit | edit source]
Ultimately, to consider streamline a major success, it would be ideal to see the solution implemented throughout the entire quad area. The first iteration of Streamline solved one of the leaky downspouts, not all. Zane Middle School proposed the implementation of the Streamline gutter boxes at all downspouts of the awning in order to ameliorate the poor performance of the drainage system. If the Streamline were to be implemented on every downspout of the awing at Zane Middle School, it would improve the performance of the drainage system and solve the existing problems.


