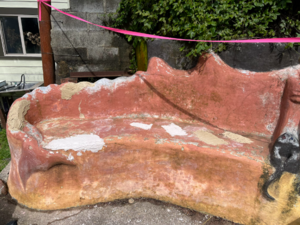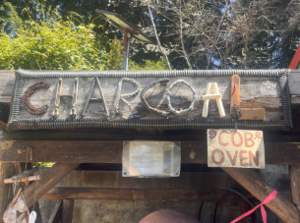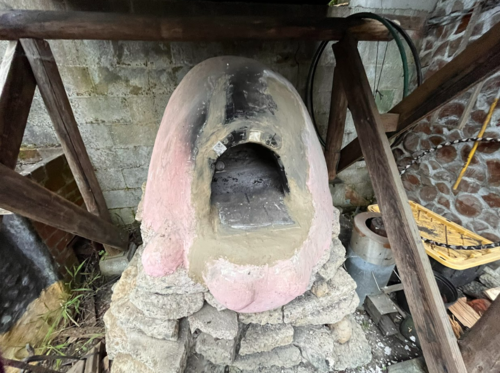
The earthen beautification project at the Campus Center for Appropriate Technology (CCAT) focuses on enhancing the aesthetic appeal and revitalizing key areas within the area. These areas encompass the cobb oven, the banana slug structure, the heated cobb bench, and their immediate surroundings. This project was completed in spring of 2024 and was made for the use of students.
Background[edit | edit source]
The earthen construction re-beautification located at the Campus Center for Appropriate Technology (CCAT) aims to provide a more physically attractive campus and restore specific areas of CCAT. These areas include the cobb oven, the banana slug structure, and the heated cobb bench and the general surrounding areas. Over the years, especially due to COVID, CCAT was not kept up with and many areas were damaged from being neglected for long periods of time. Our goal is to re-beautify the listed areas and restore the neglected structures to be better functioning and more appealing.
Problem statement[edit | edit source]
The objective of the Pink Pig Platypus Puffs’s design project is to restore and re-beautify specific areas regarding the Campus Center for Appropriate Technology (CCAT). These areas include the cobb oven, the banana slug structure, and the heated cobb bench and the general surrounding areas.
Criteria[edit | edit source]
Include a brief intro to the criteria and then include a table with constraints and weights (0-10 highest).
| Criteria | Description | Weight (1-10) |
|---|---|---|
| Durability | The capability of the design to sustain itself and endure frequent usage. | 8 |
| Aestheics | The ability of the project to display a physically attractive design that meshes with the surrounding area | 8 |
| Safety | The ability of the project to follow all safety codes associated with using any hazardous materials | 7 |
| Cost | The ability of the project to be constructed for a total cost that does not exceed the set price | 4 |
Prototyping[edit | edit source]
Desire - The aim was to determine the optimal color palette for a bench and assess the desirability and feasibility of adding "ears" to an oven design. Tests involved crafting replicas of the bench and oven using air dry clay, refining the models with water. Findings indicated that adding ears to the oven would be costly. For the bench, blue was chosen to complement the client's preference for a gradient with orange, determining it as the most suitable option.

Function - The objective of our testing was to determine the most effective plaster ratio for our project by assessing durability and strength. We conducted tests using various ratios, such as 1:1, 1.5:1, and 2:1, and experimented with and without the addition of straw in each mixture. Through our initial testing, we've gathered data on how each ratio performs in terms of resilience and endurance. However, we require further evaluation to conclusively determine which plaster mixture will hold up best for our project.
Final product[edit | edit source]
For our final design, we made various decisions. First off, we decided on a plaster to fill any cracks/damage and a paint finish for the cobb bench, banana slug statue, and the cobb oven. We also decided on a design for fixing the Charcoal sign.
1. The Cobb Bench
The Cobb Bench needed a new plaster and paint finish so we decided on using a lime based plaster and pigment. The plaster consisted of sand, water, and hydrated lime which we mixed and applied thinly, layer by layer, to the bench. The paint was an oxidized pigment mixed with the hydrated lime, an acrylic binder and water that we painted on top of the 3 layers of plaster. We applied the paint to blend from yellow at the top down to a burnt orange color, and painted the cat and mouse cup holder to stand out from the design.

2. The Banana Slug Statue
The Banana slug had a large crack going down the center and a missing antenna. We patched the crack and reattached the antenna. Finally a yellow lime paint finish was added. The lime paint was made from an oxidized yellow pigment mixed with the hydrated lime, an acrylic binder and water.

3. The Cobb Oven
The Cobb Oven needed a new plaster and paint finish so we decided on using a lime based plaster and pigment. The plaster consisted of sand, water, and hydrated lime which we mixed and applied by hand to the oven. The paint was an oxidized red pigment mixed with hydrated lime, an acrylic binder, and water that we painted on top of the plaster. We put in enough pigment to make the paint a light pink, and then applied it to the oven.

4. The Charcoal Sign
The sign was missing letters and sections. We decided to only use resources from CCAT to fix the sign such as a tire, an old PVC pipe, a tomato plant holder, and a piece of wood. The tire was cut in half to form the letter C, the tomato plant holder was cut to form the letter O, the PVC pipe was cut into three parts to form the letter A, and a piece of wood was cut to help finish the letter L.

Construction[edit | edit source]


Bill of materials[edit | edit source]
Description of costs, donations, the fact that this is just proposed, etc. For a simple cost table, see Help:Table examples#Cost Table and Template:Bill of materials for two nice formats.
| Item | Amount | Cost per unit | Total |
|---|---|---|---|
| 10 Lb bag of Hydrated Lime per square foot | 3 | USD 17.99 | USD 53.97 |
| 10 Lb bag of sand | 1 | USD 10.99 | USD 10.99 |
| Heat Gauge | 1 | USD 11.99 | USD 11.99 |
| Sandpaper | 1 | USD 4.99 | USD 4.99 |
| Plaster Pigment | 1 | USD 30.00 | USD 30.00 |
| Grand total | USD 111.94EUR 96.27 <br />GBP 81.72 <br />CAD 138.81 <br />MXN 2,333.95 <br />INR 8,378.71 <br /> | ||
Maintenance[edit | edit source]
There is no daily maintenance needed for this project. However we do recommend a new plaster and finish in a couple years.
Conclusion[edit | edit source]
Testing results[edit | edit source]
The plaster testing process included both water and scrub testing on ten separate plaster mixes. These mixes were composed of two sets of five different plaster ratios. These ratios went from a 1:1 ratio of hydrated lime to land to a 3:1 ratio of hydrated lime to sand using a variation of 0.5 each time. One of the sets was limited to those two materials and water, while the other included a 1 ratio added of clay and some straw. The clay amount did not change in any of the mixes and both the straw and water amount varied in order to maintain a similar consistency in the plaster mix.
All ten of the plaster mixes received the same testing. First water was added onto the plaster and let it soak into the surface. This was meant to demonstrate how the material was able to both absorb and release water over time. No high pressure water testing was used so scrub testing was used to determine how the plaster held up to prolonged force. In this case a hard wire brush was used against the plaster for a period of 2-3 minutes.
The mixes of 1:1 were not able to withstand the water based testing. The lower amount of hydrated lime was not able to absorb the required quantity of water that would be needed in the Humboldt climate. This also held true for the 1.5:1 ratio however with its slightly better results it could be an option for creating plaster with a different use case or climate. Both of these ratios did hold up best to the brush testing and showed strength to hold together. The ratio of 1:3 held up well against the water testing however it quickly crumbled against the brush testing. The 2.5:1 ratio was similar however this was the only case where the clay included ratio was significantly stronger than without the clay. In most cases the clay added mixtures gave similar results and were slightly better against brush testing so they were to be used as a base layer to increase the plaster's overall tensile strength. The 2:1 ratio held up well to both the brush testing as well as the water testing.
Discussion[edit | edit source]
The testing was repeated twice in order to ensure better results and both tests resulted in the ratio of 2:1 between hydrated lime and sand to be optimal. This plaster ratio was able to handle the high ratio of water as well as the pressure testing. Without the ability to test for long term durability we made the decision off of this information to go with this plaster mix.
Lessons learned[edit | edit source]
We learned as a team from this project that teamwork is a vital part of design and being a successful engineer. The next time we do a project like this, we will use the communication and teamwork skills we gained through the process of this project.
Next steps[edit | edit source]
We hope this project can be done again in the future and maybe repaired in future years if it is needed.
Team[edit | edit source]
Spring Semester, 2024
- Mackenzie Gilchrist
- Taleya Uriarte
- Kristopher Turner
- Noah Waterhouse
References[edit | edit source]