
Project Type: Solar-Powered Bike Cage Design
Project Team: Team Gatekeepers
Project Date: Spring 2024
Project Location: Cal Poly Humboldt - Arcata, CA, USA
Although many students and staff at Cal Poly Humboldt commute to and from campus using alternative modes of transportation, there is still a limited number of appropriate areas to charge and safely store electric bikes on campus. With only a dozen situated in one area of campus, there is limited use of these charging stations by students, faculty and community members who may rely on their electric vehicles for mobility. Furthermore, the security, maintenance, and efficiency of these charging stations are a priority to ensure the safety of students and their property on campus.
Background[edit | edit source]
Team Gatekeepers is partnering with the Campus Center of Appropriate Technology (CCAT), a nonprofit, student-led organization at Cal Poly Humboldt, to design and digitally model a solar-charging bike cage to be potentially implemented throughout campus for use by students, faculty, and community members.
The project will be used by students, faculty, and community members daily, particularly during the weekdays throughout the academic school year, stagnating in the summer months when school is out of session. Users should be able to store and charge their e-bikes fully for a few hours while on campus.
Problem statement[edit | edit source]
There are enough covered solar-powered e-bike charging stations on campus.
The objective is to design, test, and digitally model schematics for a solar-charging bike station fitted with solar panels and a battery to store and output electricity. The station should be able to safely store bikes in a sheltered post situated outside the CCA. Not enough solar powered electric bike charging stations on campus.
Criteria[edit | edit source]
The top priorities for designing the solar bike cage are structural integrity and safety
| Criteria | Description | Weight (1-10) |
|---|---|---|
| Structural Integrity | The structure must be durable, stable, and be able to withstand harsh weather conditions and seismic activity. | 10 |
| Safety | The structure must be safe to use and have safety features to prevent users from getting hurt. | 10 |
| Ease of use | Users must be able to freely and easily store and charge their bikes. | 9 |
| Longevity | The structure must be able to last for over long periods of time. | 9 |
| Security | The structure must include security measures to prevent theft. | 8 |
| Bike Storgage | The structure has to be able to store a minimum of 4-6 bikes. | 8 |
| Charging Capacity | The structure has to be able to produce enough power to charge 4-6 bikes. | 8 |
| Aesthetics | The structure must be aesthetically pleasing to look at and use. | 7 |
| Cost | The overall project must not exceed the budget of $20,000. | 5 |
Prototyping[edit | edit source]
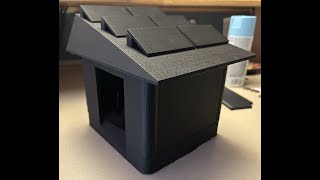
Prototyping the Solar-Powered Bike Cage demonstrated the dimensions, overall layout, and logistics of the design in application. This section portrays the evolution of prototype designs through photographs as we continued to assess and experiment with different design features.


Final product[edit | edit source]
Introduction[edit | edit source]
This section introduces the specifications of the final solution chosen from the previous section. It will include descriptions of specific features and overall purpose in fulfilling the criteria outlined in Section 2. A brief discussion will also explain why some features were chosen over others. Tables of costs have been included below displaying the team hours, section hours, materials specifics, cost of materials, etc. Finally, a guide for the construction, implementation, and maintenance of the final design is included.
Description of Solution[edit | edit source]
Structure[edit | edit source]
The structure of the Bike Coop design will incorporate a Douglas fir wood frame with hempcrete brick walls and flooring. Hempcrete will also be used to raise a platform to level the structure along the slope of the hill next to CCAT. Hempcrete brick will be cut to 1ft X 0.5ft and placed in a standard “stretcher bond” brick laying pattern to raise four outer walls 11ft long and 9 ft tall (Figure 1). For additional support, the Bike Coop design will have a wood frame made of Douglas Fir with a wood pillar at each corner standing 9 ft tall to support the roof of the building. Figure 2 shows a drawing of the wood frame seen from the front. The Bike Coop will incorporate two fiberglass windows. One will be 5-7 feet wide and 2.5 feet tall on the upper left wall near the solar panels to provide light into the structure. A second window will be installed on the back of the wall at the top, 7 feet wide and 2 feet tall. The window provides additional light to the structure.


As seen in Figure 3 and Figure 4, the interior layout of the final Bike Coop design is 12 feet wide x 11 feet long and the ceiling stands 9 feet tall. A doorless, 5-foot-wide entrance on the street-facing side of the structure allows for easier access for end users. The structure houses six circular steel bike racks: three racks angled 45 degrees along the left wall and three more perpendicular to the back wall which supports bike charging. The interior is divided into two levels, with the upper 4-foot-tall attic space hosting the battery storage compartment directly above the distribution panel on the first level. Three 12 V 2.5 kWh lithium-ion batteries are in the attic space locked in a battery storage compartment. The second floor of the structure can be accessed via a ladder. Two hanging light panels and two security cameras are mounted to the ceiling, providing lighting and safety measures for end users. There are bike storage lockers placed near the entrance for the convenience of end users, which will bring personal padlocks.


Bike Racks[edit | edit source]
The Bike Coop design will host six circular steel bike racks, 35’’ long x 2.5’’ wide x 33’ tall. These racks will line the inner walls of the structure with a minimum of 2 feet between each rack to maximize space and allow for greater accessibility. Three bike racks will be angled 45 degrees along the left wall and the other three will line the back wall perpendicularly. The bike racks are made from galvanized steel and have a capacity of 2 bikes, one on each side.
Camera[edit | edit source]
The Bike Coop design will utilize Amcrest's 5MP Analog Camera Turret A5TN28-W for camera surveillance. Maintenance of these cameras involves cleaning the lenses, looking for wear or damage, and updating firmware on the camera. This will be purchased from the official Amcrest website or other internet merchants, such as Amazon or B&H Photo Video. This 5MP analog camera is frequently used for monitoring applications. Depending on the demands for surveillance, it can be mounted indoors or outside. The camera will be connected to a compatible DVR (Digital Video Recorder) to record activity around the Bike Coop. Two 5MP analog cameras will be used in our design, one camera will be standing in the very back on the (left hand back wall when facing the entrance) facing the entry and out to the street, while the second camera faces the bikes, right by the entry.
Power Supply[edit | edit source]
The SPT 12-Amp, 9-Port CCTV Power Supply costs $78.18 at Lowe's. This power supply doesn't require much maintenance other than the occasional inspection for loose connections or dust accumulation, power supply boxes usually require little maintenance. To avoid overheating, make sure there is enough ventilation. You may purchase it online or at Lowe's hardware shops. This Power supply can use Up to nine CCTV cameras and can have their power distributed centrally by using this power supply box. It is usually connected to a power source close to the surveillance system setup. The CCTV system can then power on by plugging the power wire from each camera into a connector on the box. The power supply can be positioned in the upper storage compartment of the bike cage design.
DVR[edit | edit source]
Pricing for the Dahua 4-Channel 5MP Pentabrid DVR (XVR5104H-S2 USA Version) varies depending on the reseller, although DeluxeCCTV used to sell this DVR for about $119.00. Updating software, verifying recording storage capacity, and proper ventilation to prevent overheating are necessary for maintenance. Software is obtained via approved Dahua distributors or the DeluxeCCTV website. Surveillance camera footage is recorded and stored on this DVR, or Digital Video Recorder, pictured in Figure 5-10. The DVR has multiple recording modes, including scheduled, continuous, and motion detection recording, and supports up to four channels. An analog, HD-CVI, HD-TVI, AHD, and IP camera can be linked to it, giving setup versatility for surveillance systems. It can also be viewed and played back remotely via the internet in real-time. This can be placed in the upper storage compartment.
Solar Panels[edit | edit source]
As seen in Figure 5, the solar panel design of the Bike Coop will incorporate six 6 ft x 3.25 ft monocrystalline solar panels arranged in three rows angled perpendicularly from the street-facing wall. Two of these solar panels will be linked together and mounted to the roof with a steel mount at an approximate 38-degree angle from the horizontal to maximize exposure to the sun during the spring and fall seasons. The roof will be angled at approximately 21 degrees from the horizontal and the mounts will add a 17-degree tilt, indicated by blue in Figure 6.


Figure 5‑11:: Front view of solar panel orientation and angle indicated in blue - digital drawing (left).
Figure 5‑12: Frontal aerial view of the Bike Coop design's solar panel array - digital drawing (right).
The solar panels will be sourced from online retailers such as Renogy 400 Watt 12 Volt Solar Panels (Figure 5-10) or similar 12V models with a maximum yield of 400W of electricity per panel. The Renogy 400 Watt 12 Volt Solar Panels retail for around $450.00 per four panels on Amazon.com, so we estimate the total cost for panels will be approximately $700.00. The solar panels must be mounted to a sturdy steel mounting rack such as the Samlex 28" Adjustable Solar Panel Tilt Mount [ADJ-28] (Figure 5-11). Each mount costs approximately $130.00 and supports one panel, totaling $780.00 approximately for all six racks.
Figure 5‑13 (left): Renogy 400 Watt 12 Volt Solar Panels
Figure 5‑14 (right): Samlex 28" Adjustable Solar Panel Tilt Mount [ADJ-28]
Electrical System[edit | edit source]
The Bike Coop’s electrical system design will utilize standard monocrystalline solar panels mounted to the roof of the main structure with adjustable steel mounts. The mounts can be angled to maximize the amount of exposure the panels receive during the fall and spring semesters where usage of the bike chargers will be the highest. The electricity generated by the solar panels will travel through copper wire and water and heat-resistant conduit throughout the structure of the design. This charge controller will safely administer electricity to the battery. From there, the inverter will convert the electricity to AC suitable for charging devices such as e-bikes. Finally, the electricity runs through one last safety disconnect in case of emergency before reaching the distribution panel that the client can use to control when and where the electricity will be delivered.
Figure 5‑15: Bike Coop design’s electrical system, including solar panels, charge controller, batteries, AC/DC inverter, ground disconnect, and distribution panel.
Costs[edit | edit source]
Design Costs[edit | edit source]
The total combined number of hours each member of Team Gatekeepers has put into designing this project is 241 hours. Figure 5.5 is a pie graph of the total combined project time in hours for each section of this design project. The preponderance of hours spent on this project goes to Phase 5 – Specifications, which include brainstorming, decision process, final decisions, designing, prototyping, limitations, and results.
Figure 5‑16: Design Cost pie graph for hours spent on each section
Material and Implementation Costs[edit | edit source]
The costs of materials and labor for implementation that will be used to construct the Bike Coop are shown in Figure 5-17 and Table 5-1. The total cost to complete this project is approximately $48,000. However, volunteer labor and donated or recycled materials may reduce this cost by about $9,000, depending on the available volunteers and time constraints.
Figure 5‑17: Bar graph of project materials and costs.
Table 5‑1: Table of materials and costs
| Items | Material | Amount | Cost | Cost of Materials | Cost of Labor / Implementation | Total | Maintenance (yearly) |
|---|---|---|---|---|---|---|---|
| Wood Frame | Douglas Fir (sq. ft) | 150 | $14.00 | $2,100.00 | $4,000.00 | $6,100.00 | $0.00 |
| Brick walls | Hempcrete (sq. ft) | 40 | $15.00 | $600.00 | $3,200.00 | $3,800.00 | $0.00 |
| Flooring | Hempcrete (sq. ft) | 132 | $15.00 | $1,980.00 | $800.00 | $2,780.00 | $0.00 |
| Plaster | Hydraulic lime plaster | 132 | $41.45 | $5,471.40 | $1,600.00 | $7,071.40 | $0.00 |
| Roof | Composite shingles | 132 | $14.00 | $1,848.00 | $2,400.00 | $5,248.00 | $1,000.00 |
| Windows | Fiberglass | 1 | $1,000.00 | $1,000.00 | $200.00 | $1,200.00 | $0.00 |
| Bike Racks | Steel | 6 | $460.00 | $2,760.00 | $300.00 | $3,060.00 | $0.00 |
| Solar Panels | 400W 12V monocrystallne panel | 6 | $400.00 | $2,400.00 | $500.00 | $4,100.00 | $1,200.00 |
| Solar Panels Mount | Steel | 3 | $250.00 | $750.00 | $0.00 | $750.00 | $0.00 |
| Copper Wiring (ft) | 8 gauge copper / aluminum | 90 | $2.00 | $180.00 | $4,000.00 | $4,355.00 | $175.00 |
| Conduit (ft) | Electrical non-metal tubing | 90 | $1.62 | $145.80 | $0.00 | $145.80 | $0.00 |
| Charge Controller | 100A 12V-48V charge controller | 1 | $480.00 | $480.00 | $0.00 | $480.00 | $0.00 |
| Battery | 48v 100Ah lithium-ion | 3 | $1,000.00 | $3,000.00 | $0.00 | $3,000.00 | $0.00 |
| Inverter | 12V AC/DC inverter | 1 | $1,500.00 | $1,500.00 | $0.00 | $1,500.00 | $0.00 |
| Distribtuion panel | 1 | $3,000.00 | $3,000.00 | $0.00 | $3,000.00 | $0.00 | |
| Plugs | 6 | $300.00 | $1,800.00 | $0.00 | $1,800.00 | $0.00 | |
| Lighting | 3 | $5.00 | $15.00 | $0.00 | $15.00 | $0.00 | |
| Security Cameras | 1 | $40.00 | $40.00 | $0.00 | $40.00 | $0.00 | |
| Lockers | 1 | $400.00 | $400.00 | $0.00 | $400.00 | $0.00 | |
| Total | $9,600.00 | $ 48,845.20 | $2,375.00 |
Maintenance Costs[edit | edit source]
The total maintenance cost of this design is $2,375 yearly. Yearly maintenance on solar panels, electrical wiring, and roofing will be necessary to ensure safety and longevity. Typically, the solar panels will be replaced every 25 years. The roofing will need to be replaced every 20 years. Figure 5-18 contains a bar graph of our projected yearly maintenance costs.
| Material | Maintenace Yearly Cost |
|---|---|
| Roof | $ 1,000.00 |
| Solar Panels | $ 1,200.00 |
| Copper wiring | $ 175.0 0 |
| Total | $ 2,375.00 |
Construction[edit | edit source]
For implementing our project, we must dig at least a 1.5ft deep hole that is 12ft long and 11ft wide for the foundation and then implement a ramp into it against the sidewalk. Then we will start building the walls and support pillars out of hempcrete and concrete with the walls being about 0.5 ft thick, and the support pillars being about 1ft in diameter. While building the walls, we will outline the windows which are 1ft tall and 5ft wide and are made of fiberglass and the doorway which is 6ft tall and 5ft wide. Afterward, we will start building the roof made from Douglas fir and implement the solar panels. Then we will attach a shelf near the ceiling to hold the solar batteries and then add the cables, charge controller, and DC/AC inverter next to the batteries on the back wall. Then we will drill in 6 bike racks into the floor and arrange them at an angle for optimum storage. We will then install the lights, camera, motion sensor, outlets and all the wiring and connect them to the electrical system. Finally, we will add 6 storage lockers on the right-side wall and a sign near the outside entrance saying “Public E-Bike Storage” to let people know that they can use the building to store their bikes. To use our project, people must first walk their bikes into the building and then park and lock their bikes into one of the 6 bike racks available, three of which will have charging capabilities. There are also storage lockers available for people to use but they must provide their own personal locks to use them unless they don’t care about security. To maintain our project, we must clean the solar panels and check the batteries, DC/AC inverter, and all the electrical components within the building to make sure all are working correctly and are not damaged or worn down.
- Sample gallery
Video instructions[edit | edit source]
A good way to display a process is by making a video explaining your process.
Bill of materials[edit | edit source]
Description of costs, donations, the fact that this is just proposed, etc.
| Item | Amount | Cost per unit | Total |
|---|---|---|---|
| Things — Get at the thing store | 3 | USD 5.75 | USD 17.25 |
| Another thing — 3' x 2', yellow | 1 | USD 150.00 | USD 150.00 |
| Grand total | USD 167.25EUR 143.84 <br />GBP 122.09 <br />CAD 207.39 <br />MXN 3,487.16 <br />INR 12,518.66 <br /> | ||
Operation[edit | edit source]
Since the project is only in the design phase, there currently is no operational phase
Maintenance[edit | edit source]
Since the project is only in the design phase, there is no need for maintenance. However, if the design were to be built, only the solar panels, batteries, and all the other electrical components in the design need to be checked and well maintained.
- Solar panels - Needs to be cleaned weekly
- Batteries - Needs to be checked weekly and replaced every 10-15 years
- AC/DC Inverter - Needs to be checked weekly and replaced every 15-20 years
Conclusion[edit | edit source]
Testing results[edit | edit source]
We anticipate that in the 10 months that our design will be most used (August to May, fall and spring academic semesters), our design will generate approximately 1.4 MW of electricity. This will provide enough electricity to power nighttime lighting, 24/7 camera surveillance, and 3 hours of standard e-bike charging daily.
Discussion[edit | edit source]
The results from our testing and feedback from our client were very positive. However, since this project is limited to designing and modeling a bike cage, testing the final design is not currently possible. Moreover, our projections for costs and charging capability, in conjunction with overall positive feedback from the client, are reassuring. Our bike cage is successful in design and functionality because it can store 6-8 bikes and provide charging capability for e-bikes through 100% solar-generated power.
Lessons learned[edit | edit source]
Parts of the final “Bike Coop” 3D model are scaled incorrectly due to the available 3D printer’s inability to print smaller objects. The final 3D model also lacks finer details, such as the lights, outlets, cables, batteries, and cameras from our drawings due to the 3D printer’s inability to print smaller objects. Our specifications in this document do include all these features.
Next steps[edit | edit source]
If the project is reproduced, Team Gatekeepers anticipates that a half-dozen should be added to various areas on campus, particularly near the Cal Poly Humboldt library and the Gutswurrak Student Activities Center where many students spend time for leisure and food between classes.
Team[edit | edit source]
Introduce team and semester in the following format:
- Lonny Grafman
- Emilio Velis
- Joshua Lopez
- David Malle
- Gemma Cardenas-Ramirez
- Jerry Turner
References[edit | edit source]