
Overview[edit | edit source]
The Hexayurt was designed with the goal of creating a shelter that could be made from any standard sized sheet of material (4'x8'), built with common tools, and created with no material waste. With these considerations in mind, the Classic H12 Hexayurt was born. It uses 12 4x8 sheets, 6 cuts, and tape to assemble the pieces together. The shelter can be easily built from scratch by 2-3 people in a couple hours.
Over the years, the design has evolved to cover many new designs. Using different geometric shapes that are cut from the 4x8 sheets, many shelters can be built. The Master List compares all the different stats.
Naming Convention[edit | edit source]
As the designs evolved, there was an increasing need for clarity to differentiate between designs. Having the design constraints of "Cut from a 4x8 sheet with minimal waste" still allowed for many different options. The Hexayurt classic design was only the beginning. Instead of sticking with a 6 sided shape, you can make designs with 3-12 sides. The different sided shapes have the names Tri, Quadra, Penta, Hexa, Septa, Octa, Nona, Deca, Endeca, Dodeca.
Floating an idea to call the family of yurts Geoyurts, with the Hexayurt being the "flagship product". Geoyurt to represent Geometric shapes, as well as use in different Geographies.
All designs can be lifted to have different height walls by adding extra sheets at the bottom of the walls. Any design with an even number of walls (4, 6, 8...) can be stretched into a tent shape. Any design with 4,8, or 12 walls can be double stretched to a dome shape to get a flat roof.
This gives 4 main design categories:
Cones: All parts come to a single point, the walls slope flat to the ground
Yurts: Lift a cone 4ft off the ground with walls, also used as a unique name prefix
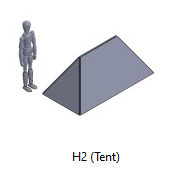
Tents: Stretch a cone by inserting a sheet into a line of symmetry
Domes: Stretch a cone twice by inserting a sheet into 2 lines of symmetry, and adding a square to close the roof, with 4ft walls.
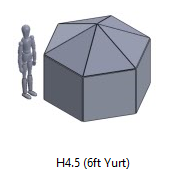
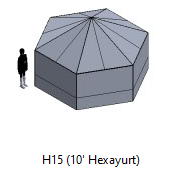
These core designs have multiple variations, each with their own designations. Since designs can be infinitely lifted without changing the geometries, 4 prefixes have been chosen. 2ft lift = Short, 4ft lift = Yurt, 6ft lift = Lifted, 8ft lift = Tall.
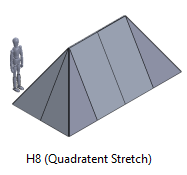
Tents can be stretched infinitely as well, but 2 names have been chosen. A 4ft stretch = Tent, 8ft stretch = Tent Stretch. Same with a Dome, but there are 2 lines of symmetry. 4ft stretch = Dome, 8ft stretch = Dome Stretch.
All designs are based off a 1:2 rectangle. The default is a 4x8 sheet of material, but any size can be used. To differentiate designs, a 2x4 sheet is a Mini prefix and a 1x2 sheet is a Micro prefix. A prefix for larger designs such as Mega could be chosen for 8x16 sheets, if those ever come to be used.
Below is a summary table:

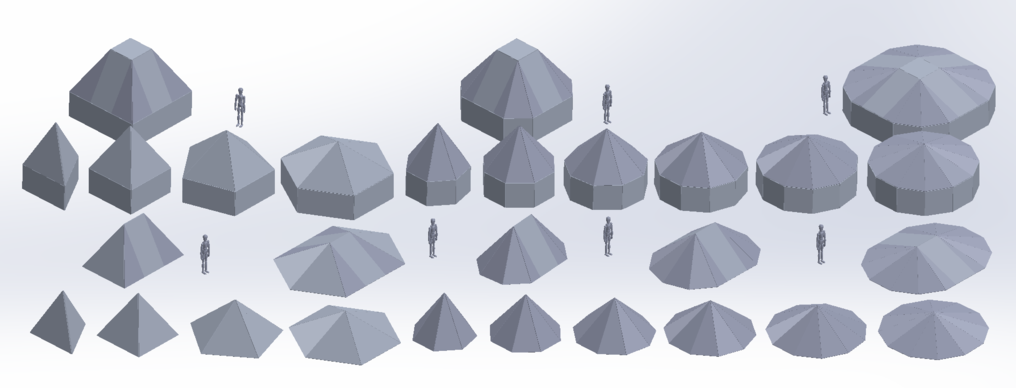
Looking at the header image to this page, we have the following designs:
Quadradome, Octadome, Dodecadome
Triyurt, Quadrayurt, Pentayurt, Hexayurt, Septayurt, Octayurt, Nonayurt, Decayurt, Endecayurt, Docedayurt
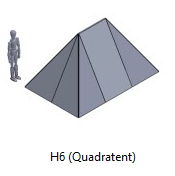
Quadratent, Hexatent, Octatent, Decatent, Dodecatent
Tricone, Quadracone, Pentacone, Hexacone, Septacone, Octacone, Nonacone, Endecacone, Dodecacone
Example Names[edit | edit source]
There may be some confusion between the "technical names" from this naming convention, and the common nicknames for the yurts. However, I see value in having some unification to talk about a variety of designs, as well as being able to predict new designs by making up a name. A Lifted Octatent Stretch would be an 8 sided shape, with 8ft extensions in the middle, and 6ft walls. I'm on the fence about building a calculator where you can input names, and it will automatically generate the sqft, volume, and required sheets to make different designs. But first, I'm finishing the master spreadsheet with existing designs.
-
Mini Tall Hexayurt
-

Tall Hexayurt
-
Lifted Hexayurt
-
Mini Quadratent Stretch
-
Quadratent
-
Quadratent Stretch
.png)
.png)
.png)
.png)
.png)
.png)
Design Score[edit | edit source]
With this influx of new designs, the elephant in the room is that most of them are not very practical. On the Master List you can see all the designs, and I wanted a way to summarize different characteristics. I've come up with 5 variables, and when you multiply the 5 together you get a overall design score. The scores end up with variable percentages, so each has a multiplier to normalize the highest score to 100%, and then the final build scores are also normalized to 100%.
Usability[edit | edit source]
The usability score tracks how comfortable the shelter is to use. For now the big weighting of it is how accessable the shelter is with door positioning, but it also takes into account how nice the interior space is for standing room. It will also take into account how easy the design folds/transports, which will give it a slight weighting towards designs using less sheets. The weights in these scores are harder to weight from a purely technical perspective, there's more bias and experiential input required for this. For now, its based on size of door, angle of door, and ratio of sqft above 4ft to show off standing space.
The door score ranges from 2ft, 4ft, 6ft, or 8ft walls, whether the hinge is vertical or sloped, and then the score is multipled by the sin of the wall angle. A wall of 90 deg (vertical) is best, with the lowest score being a 60 deg angle.
Size Efficiency[edit | edit source]
The size efficiency represents how much square footage and volume you get per sheet of material. All designs were listed, the highest score (29.86 sqft/sheet) is used as the reference point, and all other sqfts are divided against that to get an efficiency percentage. Same for volume. The sqft score and volume score are multiplied together to get a size efficiency.
There is one consideration I'm still considering, and that isolating "useable sqft" and "useable volume", but I'm not sure what limits to put. For example, the dodecacone is the design with the highest sqft efficiency. However, its just a large flat cone. I'm thinking of putting a limit of 1ft walls or something, which would shrink the sqft of it, and then use that reduced number in the calculations. Same for volume, the pointy cones (such as a septayurt) has a tall ceiling that doesnt have much use. There should be a way to subtract that unused volume. I'm open to ideas for this, but for now the size efficiency doesn't take any of that into account.
Construction Ease[edit | edit source]
Construction ease tells you how many operations you need to make to prepare a sheet for use. How many cuts and how many joints do you need to make per sheet for assembling a shelter. Since smaller is better, the minimum value of cuts/sheet is divided by the calculated value, which is multiplied by the joints/sheet number. Ex: Hexayurt is made with 12 sheets, it has 6 cuts, and 24 joints. 6/12 = 0.5 cuts per sheet, and 24/12 = 2 joints/sheet. Compared to the best designs, the calculation is (0.27/0.5)*(1.43/2) = 38.96%
Complexity Score[edit | edit source]
The complexity scores covers how many different types of shapes you need to cut to make a shelter. The Hexayurt only uses rectangles and isosceles triangles (2 right triangles combined), the Pup Yurt uses squares, and the De La Wolfie uses more complex triangles. This gives 6 options for shapes. Rectangles, isosceles, thin isosceles, squares, equilateral triangles, and other. The 7th option is waste. The calculation is 1-((#-1)/6) of shapes. If there is waste, then the score is cut in half. This means a design with a single shape has a score of 100%, 2 is 83.3%, 3 is 66.6%...
Angle Complexity[edit | edit source]
Angle complexity tells you what types of jigs you would need to make to accurately attach your sheets together. For example, the Hexayurt has 3 different connection points. There are the walls that connect to each other at a 120 degree angle. The roof triangles connect to each other at a 151.04 degree angle. The roof connects to the wall at a 120 degree angle. Since there are 2 angles needed, the score is 1/2 = 50%. Cones have a 100% score since there is only 1 angle needed to connect the triangles together. Something like the Quadrayurt has 3 different angles. 90 between the walls, 104.48 between the roof sections, and 150 between the walls and the roof for a score of 33%.
Windows[edit | edit source]
Windows are also good to cut now:
Every hole you make is a place where heat comes in during the day. A single badly-placed window can turn a Hexayurt into a solar cooker, but no windows can also get hot! The smart plan is to keep the "plug" made by cutting out the window so it can be pushed back into the window to seal out the day, like a shutter. Cross ventilation is a must. Remember to tape all raw edges, and always seal any exposed raw panel material! You can cover windows with plastic, or bubble wrap (translucent like shower glass.) You can also leave them open. If you cut the windows as rectangles or very-slightly V-shaped rectangles, you can usually wedge the window piece back into the window at an angle and use it as a sun shade. This is a good solution. But if it's windy one day and you left a window open, so much for your dust-proofing. The cure for this is furnace filters, which are cheap, very effective, and can be taped over windows on the outside. You must put them on the outside, or when they fill with dust and you shake it off them, the dust falls inside your Hexayurt. Keep them on the exterior wall. Some people recommend a filter on each side of a window. Or just cut small portholes, about four or five inches round, and cover them up on the outside with the 6" tape. It's fairly translucent. I leave the inside sticky surface exposed to act as a dust magnet.
- Consider the location of your door (north facing is best), and the location of your windows in relationship to the prevailing winds on the playa; a cross-breeze is key in a hexayurt. (from Julie Danger): I have a window in every side of my yurt to catch a cross breeze on days that aren't too dusty. I use the "plugs" like shutters. I used to tape a cheap vent filter from homo depot to the window-- that way you get light, and heat, but no dust or wind. I cut my windows to a size and shape appropriate to the vent filters I first bought. Light hasn't been much of an issue lately but that's still a good option. Light can come in from the loose Camp-Danger hinges, depending on how you cover them with foil tape. I've also seen a heat proof window glass thingy put in a window on a yurt-- that was pretty sexy. For dust-free light I'm trying out a solar security light (see Harbor Freight.com), it turns on when you move into its space. I will cover it with colored filters so it's not obnoxious and cover its motion sensor when I want it dark indoors.
Doors[edit | edit source]
(More info coming to this section.) Everything said about windows goes double for doors. The door is the one thing that really isn't perfect about the 6' or 8' Hexayurts, because the door can't be too big and the entry height is only 4'. Sorry. Try the H13 or the Mark II instead, they have taller entryways. Also see below for the BFD mod.
- The size of the door matters-- the bigger the hole you cut, the more structurally unstable the wall panel becomes. The door's panel often needs replacing after Burning Man. A good size is two feet wide, cut one foot from the end of a wall. Some people like a door that goes from the ground to about six inches from the top of the wall. If the door doesn't quite fit now, you can crush the door flap a little by banging it on the ground (really.)
- The wall panel will be more sturdy if you don't cut the door all the way to the ground-- you maintain the "shear strength" of the panel this way. Cut a portal into the material, 2-3 inches up from the ground. This is a very strong door, because it is not cut all the way to the ground. However, you then have a delicate piece of the panel exposed for people to trip on, step on, and crush. Screw two narrow bits of wood to either side, sandwiching the material in between to reinforce this section--that prevents injury to the panel from being stepped on-- it doesn't help with trippers. Some people have used even large pieces of plywood to sandwich their door panel in.
- Another way to increase strength is to have rounded corners on your door instead, as this one does.
- Use a 2" panel just for the door panel - the 2" thickness is much more rigid and durable.
- If a tape hinge is used, be sure to tape it on the inside of the jamb as well - this imparts much greater stability to the hinge.
- Where you make your hinge matters too. Definitely have the door swing outward, always. Hinging the door with tape from the top like a cat flap makes the door stay closed and keeps it very rainproof. This is not the most convenient or aesthetically pleasing door, and it's hard to prop open for air. A hinge from the side is less rainproof, and it's hard to guarantee that it will stay closed on its own, it needs a latch mechanism.
- Don't let your door be blown off: secure it from the outside and the inside with tape so that it cannot be ripped off the face of your yurt.
- Try not to interfere with the tension ring if you want a bigger door. Doing that has structural implications. Remember to orient the door on the North side, otherwise your yurt will be hotter than it has to be and more subject to winds.
- For the sake of convenience, design your door to open outward. This way it will not occupy room inside your dwelling.
- Consider mitering the edges of your door when you cut it out (cut it out on a diagonal angle). This way it will close easily and seal well when closed. If it's cut out like a plug that needs to be forced closed, you will put extra strain on that panel. You can easily do this with an adjustable length/break off blade box cutter knife.
- Some people have even weather stripped their doors with foams or other traditional materials.
- A serious consideration is a door that will stay closed, perhaps with a latch, but that can also be opened from inside and outside the hexayurt-- so that your midnight, mid-dust storm bathroom run will not disturb your hexayurt-mate. And, if they decide that they want to come outside, you have not locked them in.
- Door panels are often damaged during use, such that some clever folks have reinforced their doors by sandwiching them between plywood, as shown below. If you do this you can probably even add a traditional door knob, perhaps a lockable one.
- A very simple closure device can be constructed using two pieces of rope - two feet in length each. Drill a hole the diameter of the rope through the door and the frame 2 inches from the edge, tie a knot near the middle of each rope, thread each rope through each hole, and tie another knot on the opposite side flush with the panel. The ropes won't move in the panel, but you have about 10 inches on each side to tie the door shut. Mind your yurt mate with this option.
The Camp Danger Door has a mitered edge, is not cut all the way to the ground, and hinges from the side.
Camp Danger Door 2.1 (WhiteBuffalo)
The door, explained in part by this handy video. (DEAD LINK)

The Magnetic Door[edit | edit source]
- This door keeps itself closed using neodymium magnets. In the photo below you can see the two small, but powerful magnets which have been taped to the yurt wall.
- Note: The wall is upside down in the lefthand photo, which is why the kickboard is on top. The kickboard is important because it protects the foam along the door frame.
- To attract the door to the magnets, we attached a small metal plate we found at Home Depot.
- We think this is the best door solution because it is lightweight, packs completely flat, and is very easy to use.
-

magnets on yurt wall
-
two plate design (not ideal)
-
one plate design (ideal)


- We experimented with combinations of 1 and 2 metal plates in horizontal & vertical configurations, but ultimately the single-plate vertical design was the best. It seems to put the least amount of stress on the door and is the easiest to open and close.
- We took great care in attaching the metal panels to the door. First, we put a layer of bi-directional filament tape to protect against tearing. We also used very large washers.

- We sanded down then taped over exposed screws to prevent them from digging into other panels during folded transport. A small piece of cardboard from the magnet packaging keeps the screw from poking through the tape.
-

cut off ends of screws
-

cardboard & tape over screw ends


- The edge of the door is carefully beveled to strengthen it when closed and prevent it from opening into the yurt. This is the most challenging part of building the door!
- The edges of the door are covered in bi-directional filament tape in order to strengthen them.
-
cutting the beveled door
-
unattached door
-
final
-
tape on door edge


- We divided our yurt into 3 bedrooms, with 3 separate doors, without compromising the yurt's structural integrity. In the photo you can see 2 of the 3 doors.
-
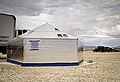
photo showing 2/3 doors
-

3 door illustration


- Tip: Don't forget to attach something to the inside of the door so that you can pull it shut from the inside.

- Tip: The door can be easily propped open by tucking it under one of the rope Halo leads that secure the yurt to the ground.
more photos of our yurt can be found here: Yurt!
The Anwar Door[edit | edit source]

This is a hack. It's a hack because the pieces don't quite fit, but the tape deals with the one inch problems you will find. It works, and it does make for a much more open space inside, but it's much harder to build on the playa, and a little more vulnerable to wind. You will have to assemble this one all the way at least once or twice at home if you are going to get it right on the day.
The trick is this. If you cut down one of the isosceles triangles on the roof, and flip the two pieces vertically (using the seam where they are taped to the rest of the roof as a hinge) they mark out an equilateral triangle, 8' x 8' x 8' from the apex of the roof to two corners of the Hexayurt, with the whole triangle level with the apex. In short, you get a flat roof.
So you make an equilateral triangle for that hole. Now if you imagine this modified roof section on the 4' high wall, you see you have an 8' x 8' hole to fill. Two boards, preferably in the vertical orientation (for strength) fill it, and you now cut the door here.
In practice this is hard because there is no good way of taping the edge of the equilateral triangle to the now-vertical roof section. There's just no way to get at it that I know. And everything is off by the thickness of one board.
I mean, I'd love it if this worked. But it just doesn't. I think that in a high wind it's likely to be quite weak and it's a bear to put together. In short? Let's work on this one together and try and figure out a better way of doing it, or something equivalent. It's not ready for prime time, however convenient it appears.
Transport[edit | edit source]
8-foot hexayurts have successfully arrived at Burning Man on top of cars as small as sedans-- however, that's probably not ideal. There are 2 approaches for transport: Tarp or Plywood. There's an account of panels being "wrecked" by the vibration and force of air (not sure if these panel edges were already tape-sealed)
- Plywood: Preferable because tarps make a lot of flapping noise in the wind. Stack a half-wall, then the roof cones, then the other half-wall. The half-walls stabilize the roof cone. Sandwich the stack between two sheets of 4'x8' plywood. Tie them together tightly.
- Tarp: Stack the half walls and roofs as above, wrap the bundle very tightly in your ground tarp like a flat burrito. The tighter it is, the more study and less noisy in the wind.
- The entire package is an easy carry for two people. It weighs significantly under 100 lbs. It is quite large.
Do read a few hexayurt transport horror stories on the Burning Man discussion boards--because transport would be a terrible way to lose your yurt, injure another car/person, etc. It's recommended to have backup living quarters (even a cheap tent) in the even that your hexayurt sails away during transport or assembly. Remember: this is extreme self-reliance.
Furniture[edit | edit source]
https://playatech.com/ has an incredible range of efficiently designed flat pack playa furniture. Each piece - a chair, shelves etc. - is cut from a sheets of 4' x 8' plywood (or other crush-proof materials - not hexayurt boards!) They slot together like puzzle pieces without bolts or screws. Just like the hexayurt, you just download the designs and make them yourself. Perfect for the playa, and the hexayurt plus furniture will pack down into a single 4' x 8' box in your truck or on your roof rack. We think it's an unbeatable combination.